Form Workflow
Build a workflow on a form to send email, run integrations and branch on a visitor's answers. Workflows are available on all paid plans.
What workflows do
A workflow is an automation attached to one form. When a visitor submits the form, Formbold runs the steps you drew, in order: send an email, post to Slack, add a row to Google Sheets, create a HubSpot contact, and more. You can also split the flow so that different answers lead to different steps.
You build it by dragging steps onto a canvas. There is no code, and visitors never wait for it: the steps run in the background after the form is submitted.
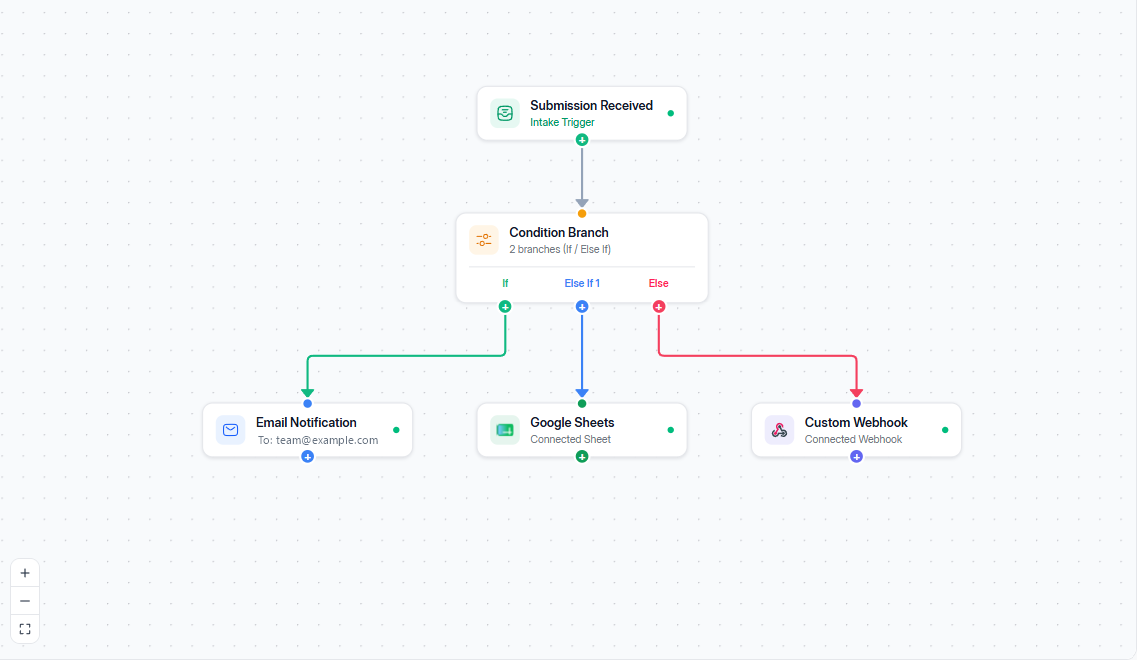
Every workflow starts with Submission Received. In this one, a Condition Branch then sends each submission down one of three paths, depending on the visitor's answers.
What changes when a workflow is on
A workflow takes over the work that Formbold normally does after a submission.
| What Formbold normally does | While a workflow is on |
|---|---|
| Sends the notification email to your form's recipients | Stops. Add an Email step if you still want it. |
| Runs the integrations connected to the form | Stops. An integration only runs if it is a step in the workflow. |
| Sends the auto-responder to the submitter | Unchanged. |
| Keeps spam submissions out of notifications | Unchanged. Spam never runs the workflow. |
Turn the workflow off and everything goes back to the normal behavior. Your flow stays saved.
Before you start
- Workflows are available on every paid plan (Starter, Premium and Business). They aren't included on the Free plan.
- Connect the integrations you want to use (Slack, Google Sheets, and so on) on the form's Integrations tab. See Connecting Apps.
- To send email, the recipient must be a verified email in your workspace. To use another address, add and verify it in your workspace email settings first.
Build your first workflow
- Open your form and select the Workflow tab.
- The first time, the canvas is pre-built to match how your form works today: your current notification email and connected integrations are already there. Nothing changes until you publish.
- Select any step to change its settings, or add new steps from the left panel.
- Select Publish.
- Check that the top bar shows Live & Active.
- Submit your form with sample answers, then open Execution Runs to confirm it worked. See Execution runs below.
Get to know the editor
Top bar
| Item | What it does |
|---|---|
| Workflow Status | Shows Live & Active or Disabled. |
| Unsaved Changes | Appears when you have edits that aren't published yet. |
| Enable Workflow | Turns the workflow on or off. |
| Execution Runs | Opens the history of what ran. |
| Publish | Checks your flow and applies your changes. |
Left panel. Under Logic & Branching you'll find the Condition Branch. Under Integrations & Actions you'll find every step listed in Steps you can use, later on this page. A green Connected badge means that integration is already set up on this form.
Canvas. Your flowchart. Use the + and - buttons at the bottom left to zoom, and the button below them to fit the whole flow on screen.
Step settings. Select a step to open its settings panel on the right. Use Display Name to rename the step on the canvas, and the trash icon to delete it. The Submission Received step can't be deleted.
Connect and arrange steps
- Add a step: select it in the left panel, or drag it onto the canvas.
- Connect steps: drag from the + dot at the bottom of one step to the dot at the top of the next. The lines show the order the steps run in.
- Reposition a step: drag it.
The rules:
- A workflow has exactly one Submission Received step, and every other step must be connected to it, directly or through other steps.
- Steps can't loop back to an earlier step.
- One step can lead to several steps. Those run at the same time.
- If one step fails, the others still run.
- A workflow can have up to 50 steps in total, including Submission Received.
Where you put a step decides who triggers it.
- A step placed before a Condition Branch runs for every submission. For example, connect an Email step before it to tell your team about every submission.
- A step placed on a branch runs only when that branch is chosen. For example, connect a Slack step to the If branch to alert Slack only for urgent requests.
Steps you can use
| Step | What it does |
|---|---|
| Sends the submission to the addresses you choose | |
| Slack, Discord, Telegram | Sends the submission to your channel or chat |
| Google Sheets | Adds a row to your spreadsheet |
| Notion | Adds an entry to your Notion database |
| Webhook | Sends the submission to your own URL |
| Zapier, Make | Starts your Zap or scenario |
| Mailchimp | Adds the submitter to your newsletter audience |
| HubSpot | Creates a contact |
Email step
Choose who receives the email under Recipient Email ("To"), and optionally under CC (Optional) and BCC (Optional). You can only choose from your verified workspace emails. To use another address, add and verify it in your workspace email settings first.
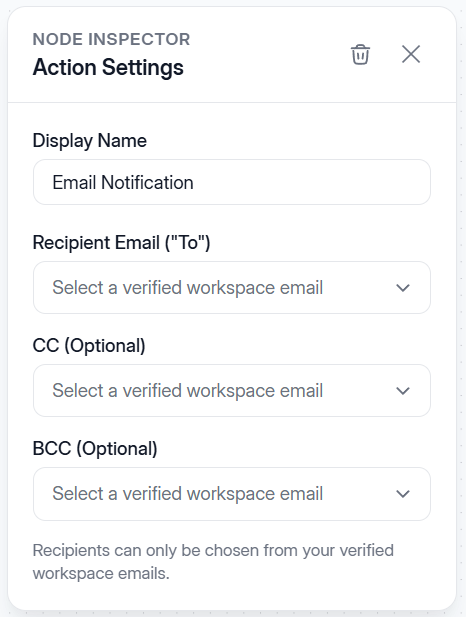
The recipients belong to the step. If you change your form's notification email later, edit the Email step too and publish again.
Connected steps
Every other step uses an integration you set up on the form's Integrations tab. Select the step to see its status:
- Connected: there is nothing else to set up.
- Not Connected: select Connect in Integrations Tab, finish the setup there, then come back.
If you reconnect an integration or change its settings, the workflow picks that up automatically, with no need to publish again.
Branch with conditions (If / Else)
A Condition Branch sends each submission down one path, depending on what the visitor entered. Use it when different answers need different steps.
- If is the first check.
- Else if adds further checks.
- Else takes everything that matched none of the checks.
Each path has its own handle at the bottom of the Condition Branch: If, one for every Else If, and Else. Drag from a handle to the step that path should run, as in the picture at the top of this guide.
Set up a branch
- Add a Condition Branch and connect it to the step before it.
- Select it to open its settings. Under If, type a Field, choose an Operator and enter a Value. For example: budget Greater than or equal 5000.
- To check more than one thing in the same branch, select + Add condition. Then select the and / or label between the rules to switch how they combine. See Combine rules with and / or, below.
- Select + Add else-if branch to cover another case.
- Connect each branch to the steps it should run. Connect Else to the steps for everything else.
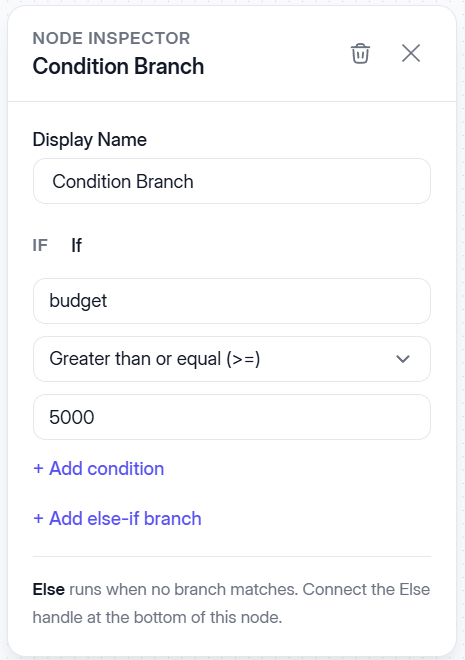
The name next to IF is the branch's label on the canvas. You can rename it, for example to Big budget.
Combine rules with and / or
When a branch has several rules, and / or decides when it matches. It starts as and, and the setting applies to all rules in that branch.
- Use and for narrow cases, such as "from Bangladesh and a large order".
- Use or for wider cases, such as "from Bangladesh or a large order".
For example, a branch with these two rules:
- country Equals BD
- total Greater than 500
| Submission | With and | With or |
|---|---|---|
| country BD, total 800 | Matches | Matches |
| country BD, total 100 | No match | Matches |
| country US, total 100 | No match | No match |
Each branch has its own setting, so an If branch can use and while an Else if branch uses or.
How a submission picks a branch
- Branches are checked from top to bottom: If, each Else if, then Else.
- The first branch that matches wins. The rest are ignored, so only one branch runs.
- Order matters. Place narrower checks above broader ones, or the broad one will catch everything first.
- If a branch has nothing connected, the submission simply stops there.
- If you remove or rename a field in your form, update the condition. Does not equal and Does not contain are true when the field is missing.
Fields, operators and values
The Field is the name of a form field, such as email or country, and must match your form exactly. Suggestions come from your recent submissions. For nested data, use dots, for example address.city.
Every operator, with a real rule. In the dropdown, some operators also show a symbol, for example Greater than or equal (>=).
| Operator | Example rule | True when |
|---|---|---|
| Equals | plan equals Pro | the answer is Pro |
| Does not equal | country does not equal US | the answer is anything except US |
| Contains | message contains refund | the answer includes the word, for example "I would like a refund" |
| Does not contain | message does not contain unsubscribe | the word doesn't appear anywhere |
| Starts with | phone starts with +880 | the number begins with +880 |
| Ends with | email ends with @example.com | the address is from that domain |
| Is empty | company is empty | the visitor left the field blank |
| Is not empty | phone is not empty | the visitor entered something |
| Greater than | score greater than 80 | the answer is 81 or $1,200, but not 80 |
| Greater than or equal | quantity greater than or equal 10 | the answer is 10 or more |
| Less than | age less than 18 | the answer is 17 or lower |
| Less than or equal | rating less than or equal 2 | the answer is 2 or lower |
Good to know:
- For checkboxes, where a visitor can pick several answers, Equals and Contains are true if any selected answer matches.
- Text comparisons ignore capital letters, so Urgent matches urgent.
- Numbers can include currency symbols and commas: $5,000 is read as 5000. If an answer isn't a number, a number comparison is false.
- Is empty and Is not empty don't need a Value.
Sample workflows
Handle urgent support requests
Your support form has a Priority field with the answers urgent, normal and low.
- Add a Condition Branch after Submission Received.
- Set up the branches:
| Branch | Rule | Steps |
|---|---|---|
| If | Priority equals urgent | An Email to your team lead, followed by a Slack alert |
| Else if | Priority equals normal | An Email to the support team |
| Else | Anything else | A Google Sheets row, for a weekly review |
- On the If branch, connect the Email to the Slack alert, so Slack runs right after the Email.
- Give each step a clear name with Display Name. Here, the Email on the Else if branch is called Support Team.
- Select Publish, then submit one request for each priority.
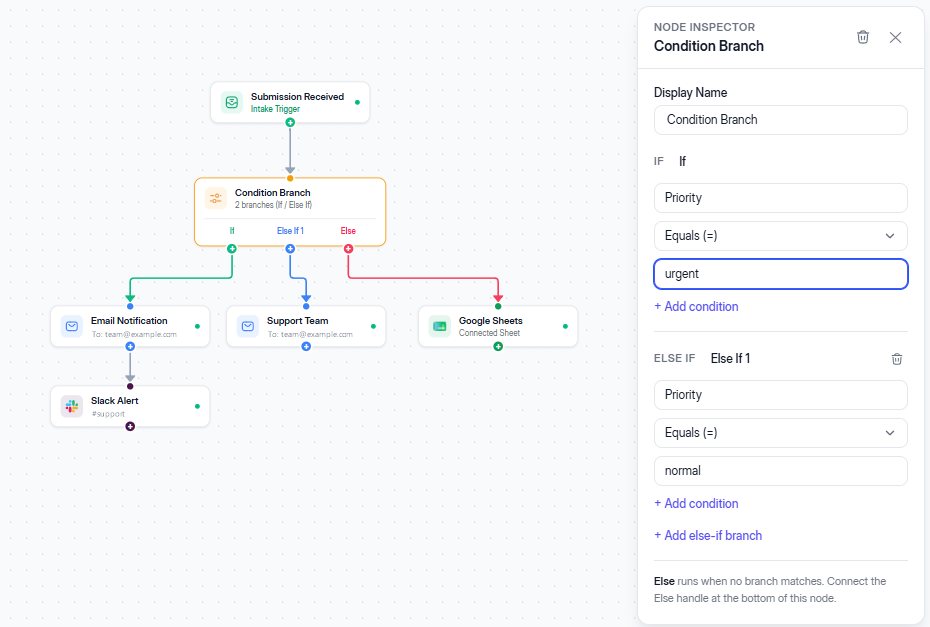
Each submission follows one of the three paths:
- urgent: the Email goes out first, then the Slack alert.
- normal: only the support team gets an Email.
- Anything else: only a row is added to Google Sheets.
Tip: To run two steps at the same time instead of one after the other, connect both of them to the branch, not to each other.
Spot bulk orders
Your order form has a quantity field.
- Add a Google Sheets step after Submission Received, so every order is logged.
- Add a Condition Branch after the Sheets step.
- Set If to quantity Greater than or equal 10.
- Connect the If branch to a HubSpot step and an Email step for your sales team.
- Leave Else empty.
- Select Publish and submit orders of different sizes.
| Quantity entered | What happens |
|---|---|
| 25 | Sheet row, HubSpot contact and sales email |
| 10 | Same as above, because 10 is greater than or equal to 10 |
| 3 | Sheet row only. The run shows a Branch Skipped step. |
| "ten" | Sheet row only, because "ten" isn't read as a number |
Sign-ups: keep records and grow your newsletter
Your sign-up form has name, email and a newsletter field with the options Yes and No.
- Add a Notion step after Submission Received, to keep a record of every sign-up.
- Add a Webhook step after Submission Received, to pass each sign-up to your own system.
- Add a Condition Branch after Submission Received.
- Set If to newsletter Equals Yes, and connect it to a Mailchimp step.
- Leave Else empty.
- Select Publish and submit one sign-up with Yes and one with No.
Notion and the webhook both connect directly to Submission Received, so they run for every sign-up. Mailchimp is only on the If branch, so it runs when newsletter equals Yes. Else has no step, so a No answer stops there after Notion and the webhook have already run.
| newsletter answer | What happens |
|---|---|
| Yes | Notion entry, webhook call and a Mailchimp subscription |
| No | Notion entry and webhook call only |
Publish and go live
- Publish applies all your changes at once. Until then, new submissions keep using the last published version.
- Publishing also turns the workflow on, even if you had switched it off. Use Enable Workflow to pause it again.
- If something needs fixing, Publish stops and shows a message. See Fix common problems, below.
Execution runs
Every submission that goes through your workflow creates a run. Runs show what happened, step by step.
Open the run history
Select Execution Runs in the top bar. A panel called Workflow Execution Runs opens on the right. Close it with the X button, Esc, or by selecting outside the panel.
- Runs are listed newest first, 10 per page. Use Previous and Next to move between pages.
- Each run shows its status, the submission number (for example Submission #1042) and the time it ran. Older runs also show the date.
- If your form is set not to store submissions, the run is labeled Zero-Storage Submission.
- Before your first submission, the panel says No execution runs yet.
- Run history is kept for 30 days.
Read a run
Select a run to open its Executed Steps, listed in the order they ran. Each step shows:
- The step name, such as Trigger, Condition, Email Notification, Slack or Google Sheets.
- A dot: green if it worked, red if it failed.
- How long it took, in milliseconds.
- The error, for a failed step, in plain words, for example that an integration isn't connected.
- Evaluated: True or Evaluated: False, on a Condition step. True means one of your If or Else if branches matched. False means none matched, so the submission followed Else.
Steps on different branches that run at the same time can appear in any order.
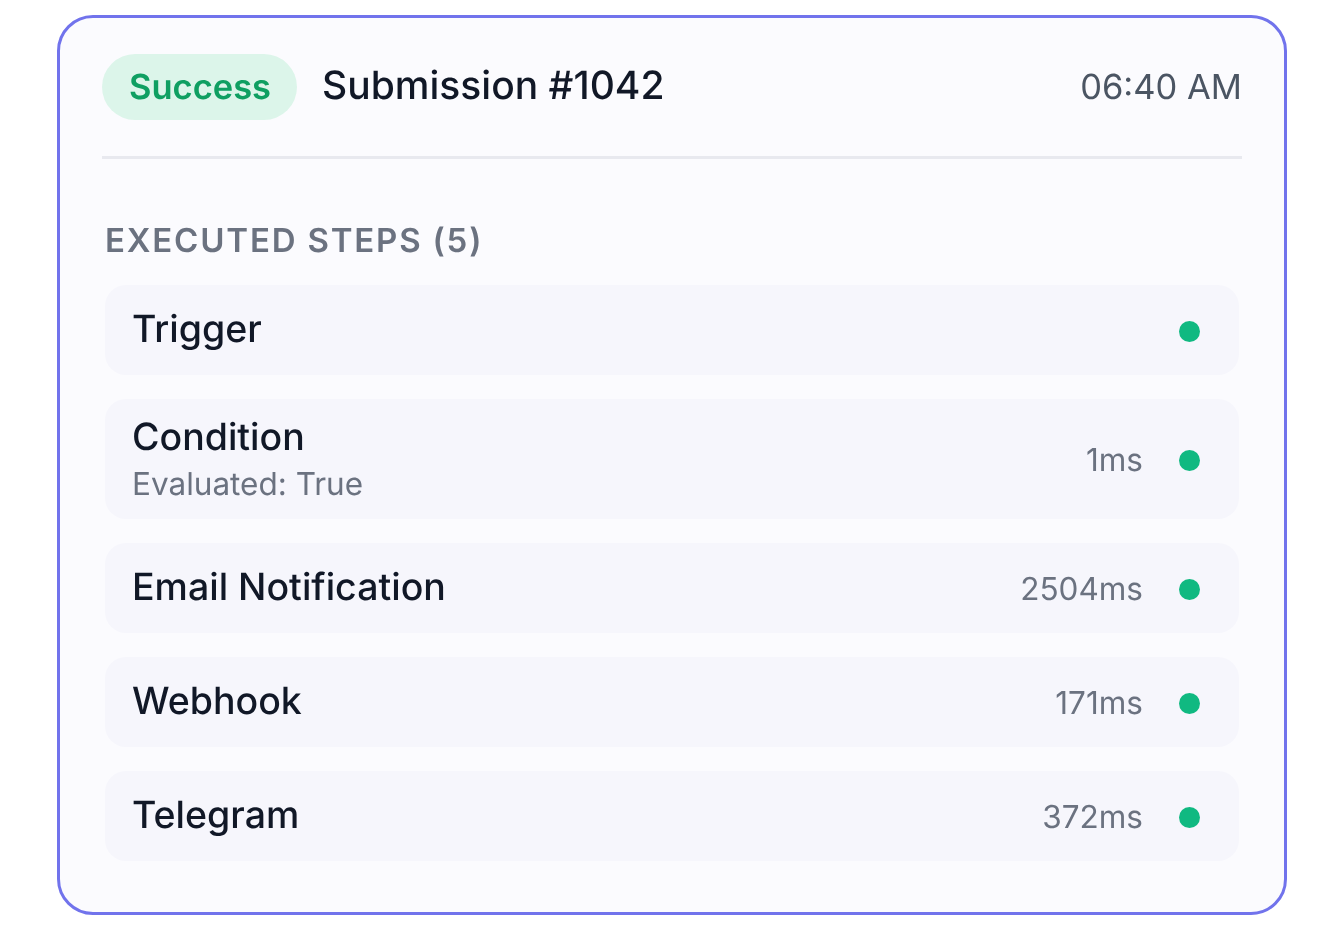
In this run, the Condition matched (Evaluated: True), then the Email, Webhook and Telegram steps all worked.
Run statuses
| Status | Meaning |
|---|---|
| Running | The workflow is still working on this submission |
| Success | Every action worked |
| Partial Failure | Some actions worked and some failed. Open the run to see which. |
| Failed | No action worked |
| Skipped | No action ran |
A run is Skipped when nothing needed to run, for example:
- No branch matched and there was nothing connected to follow. The run shows a Branch Skipped step.
- The workflow was turned off just before the run started. The run shows a Run Skipped step.
Fix common problems
| Symptom | What to check |
|---|---|
| Changes don't affect new submissions | Look for the Unsaved Changes tag and select Publish. |
| Error: a step is not connected to the trigger | Connect that step to the flow, or delete it. |
| Error: circular loop | Remove the connection that leads back to an earlier step. |
| Error: email recipient not verified or suppressed | Verify the address in your workspace email settings. Addresses that bounced earlier can't be used. Choose another one. |
| Error: too many steps | A workflow can have up to 50 steps, including Submission Received. Remove steps you don't need. |
| Error: upgrade to Pro | Workflows are available on paid plans only. Upgrade your workspace from Free to Starter, Premium or Business. |
| No emails after turning the workflow on | The workflow replaces the default email. Add an Email step with your address, then Publish. |
| Slack, Sheets, or another integration stopped | Integrations only run when they're steps in the workflow. Add the step and Publish. |
| Emails still go to an old address | The Email step keeps its own recipients. Edit the step and Publish. |
| A step says Not Connected | Connect the service in the form's Integrations tab. |
| Nothing happened on a submission | Check the status is Live & Active and your workspace is still on a paid plan. Then open Execution Runs to see whether a run exists and which steps ran. Spam submissions never run workflows. |
| A condition never matches | Check the spelling of the field and the exact value. Number comparisons need a numeric answer. Open a recent run: Evaluated: False on the Condition step means no branch matched. |
| A submission took an unexpected branch | Check the order of the branches and whether the rules use and or or. The first match wins. |
| Can't edit the Workflow tab | Members can only edit workflows on forms they created. Ask a workspace owner or admin. |
Last updated: November 11, 2026