Code Examples & Framework Guides
Explore production-ready integration examples for HTML, React, Next.js, Vue, Angular, Vanilla JavaScript (AJAX), and AI prompt generators.
Overview
FormBold provides a clean RESTful endpoint for every form that works natively with any web stack or framework. Below are production-ready code examples tailored for popular technologies.
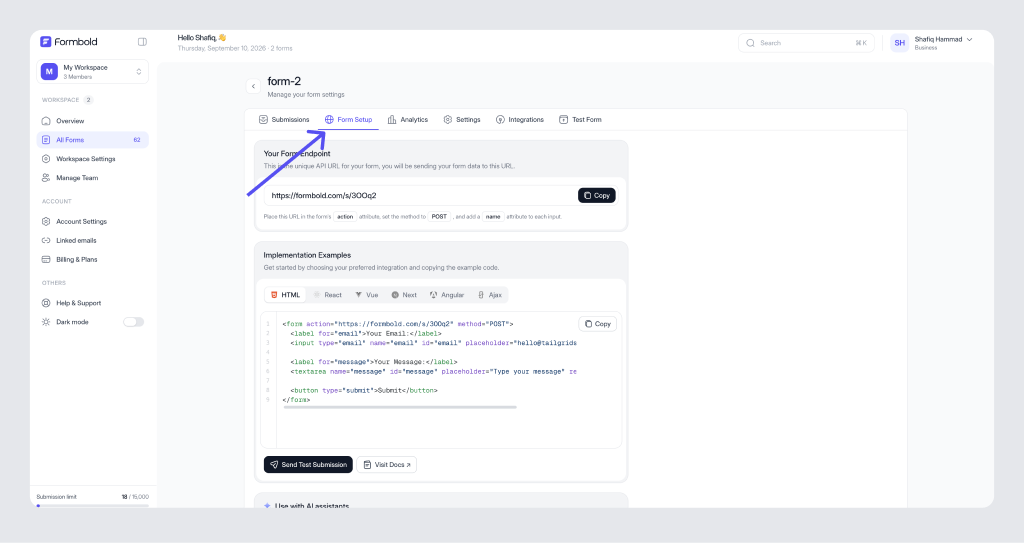
1. Plain HTML Form
The simplest way to use FormBold. Requires no JavaScript libraries or build tools:
<form action="https://formbold.com/s/YOUR_FORM_ID" method="POST">
  <label for="name">Your Name:</label>
  <input type="text" name="name" id="name" placeholder="Sarah Connor" required />

  <label for="email">Your Email:</label>
  <input type="email" name="email" id="email" placeholder="[email protected]" required />

  <label for="message">Message:</label>
  <textarea name="message" id="message" rows="4" placeholder="How can we help?" required></textarea>

  <button type="submit">Submit</button>
</form>
2. Plain HTML with File Upload
To accept file attachments, add enctype='multipart/form-data' to the form element:
<form
  action="https://formbold.com/s/YOUR_FORM_ID"
  method="POST"
  enctype="multipart/form-data"
>
  <label for="email">Email Address:</label>
  <input type="email" name="email" id="email" required />

  <label for="attachment">Upload File (Max 5MB):</label>
  <input type="file" name="attachment" id="attachment" />

  <button type="submit">Send File</button>
</form>
3. Plain HTML with Google reCAPTCHA
Embed the reCAPTCHA v2 widget to filter automated bots on your static form:
<script src="https://www.google.com/recaptcha/api.js" async defer></script>

<form action="https://formbold.com/s/YOUR_FORM_ID" method="POST">
  <label for="email">Email:</label>
  <input type="email" name="email" id="email" required />

  <label for="message">Message:</label>
  <textarea name="message" id="message" required></textarea>

  <!-- Google reCAPTCHA widget -->
  <div class="g-recaptcha" data-sitekey="YOUR_RECAPTCHA_SITE_KEY"></div>

  <button type="submit">Send</button>
</form>
4. Vanilla JavaScript (AJAX / Fetch API)
Submit form data asynchronously without triggering a full page reload, including loading indicators and double-submission guards:
const form = document.querySelector("#contact-form");
const submitBtn = document.querySelector("#submit-btn");
const statusMsg = document.querySelector("#status-message");

form.addEventListener("submit", async (e) => {
  e.preventDefault();
  submitBtn.disabled = true;
  submitBtn.textContent = "Sending...";

  const formData = new FormData(form);

  try {
    const response = await fetch("https://formbold.com/s/YOUR_FORM_ID", {
      method: "POST",
      body: formData,
      headers: {
        Accept: "application/json",
      },
    });

    if (response.ok) {
      statusMsg.textContent = "Thank you! Your message has been sent.";
      statusMsg.className = "success";
      form.reset();
    } else {
      const errorData = await response.json();
      statusMsg.textContent = errorData.message || "Failed to send message.";
      statusMsg.className = "error";
    }
  } catch (error) {
    statusMsg.textContent = "Network error. Please try again.";
    statusMsg.className = "error";
  } finally {
    submitBtn.disabled = false;
    submitBtn.textContent = "Submit";
  }
});
5. React (Custom Component)
A clean, functional React component with state management and user feedback:
import React, { useState } from "react";

export default function ContactForm() {
  const [status, setStatus] = useState({ state: "idle", message: "" });

  const handleSubmit = async (e) => {
    e.preventDefault();
    setStatus({ state: "loading", message: "" });

    const formData = new FormData(e.target);

    try {
      const res = await fetch("https://formbold.com/s/YOUR_FORM_ID", {
        method: "POST",
        body: formData,
        headers: { Accept: "application/json" },
      });

      if (res.ok) {
        setStatus({ state: "success", message: "Form submitted successfully!" });
        e.target.reset();
      } else {
        setStatus({ state: "error", message: "Submission failed. Please try again." });
      }
    } catch (err) {
      setStatus({ state: "error", message: "An unexpected error occurred." });
    }
  };

  return (
    <form onSubmit={handleSubmit} className="space-y-4 max-w-md">
      <div>
        <label htmlFor="name" className="block text-sm font-medium">Name</label>
        <input id="name" name="name" type="text" required className="w-full border p-2 rounded" />
      </div>

      <div>
        <label htmlFor="email" className="block text-sm font-medium">Email</label>
        <input id="email" name="email" type="email" required className="w-full border p-2 rounded" />
      </div>

      <div>
        <label htmlFor="message" className="block text-sm font-medium">Message</label>
        <textarea id="message" name="message" rows={4} required className="w-full border p-2 rounded" />
      </div>

      <button
        type="submit"
        disabled={status.state === "loading"}
        className="px-4 py-2 bg-indigo-600 text-white rounded hover:bg-indigo-700 disabled:opacity-50"
      >
        {status.state === "loading" ? "Submitting..." : "Send Message"}
      </button>

      {status.message && (
        <p className={status.state === "success" ? "text-green-600" : "text-red-600"}>
          {status.message}
        </p>
      )}
    </form>
  );
}
6. Next.js (App Router Client Component)
Next.js 14 / 15 / 16 compatible App Router component with client-side form submission:
"use client";

import { useState } from "react";

export default function NextContactForm() {
  const [submitting, setSubmitting] = useState(false);
  const [submitted, setSubmitted] = useState(false);

  const onSubmit = async (e: React.FormEvent<HTMLFormElement>) => {
    e.preventDefault();
    setSubmitting(true);

    const formData = new FormData(e.currentTarget);

    try {
      const response = await fetch("https://formbold.com/s/YOUR_FORM_ID", {
        method: "POST",
        body: formData,
        headers: { Accept: "application/json" },
      });

      if (response.ok) {
        setSubmitted(true);
      }
    } finally {
      setSubmitting(false);
    }
  };

  if (submitted) {
    return (
      <div className="p-6 bg-green-50 border border-green-200 rounded-xl text-green-800">
        <h3 className="font-semibold text-lg">Thank you!</h3>
        <p>Your message has been received. We will get back to you shortly.</p>
      </div>
    );
  }

  return (
    <form onSubmit={onSubmit} className="flex flex-col gap-4">
      <input type="text" name="name" placeholder="Your Name" required className="input" />
      <input type="email" name="email" placeholder="Your Email" required className="input" />
      <textarea name="message" placeholder="Your Message" rows={4} required className="textarea" />
      <button type="submit" disabled={submitting} className="btn-primary">
        {submitting ? "Sending..." : "Submit"}
      </button>
    </form>
  );
}
7. Vue 3 (Composition API)
Vue 3 single-file component using <script setup> and the Fetch API:
<script setup>
import { ref } from 'vue'

const isSubmitting = ref(false)
const isSuccess = ref(false)
const errorMessage = ref('')

async function handleSubmit(event) {
  isSubmitting.value = true
  errorMessage.value = ''

  const formData = new FormData(event.target)

  try {
    const res = await fetch('https://formbold.com/s/YOUR_FORM_ID', {
      method: 'POST',
      body: formData,
      headers: { Accept: 'application/json' }
    })

    if (res.ok) {
      isSuccess.value = true
      event.target.reset()
    } else {
      errorMessage.value = 'Failed to submit form. Please try again.'
    }
  } catch (err) {
    errorMessage.value = 'An error occurred. Check your internet connection.'
  } finally {
    isSubmitting.value = false
  }
}
</script>

<template>
  <form @submit.prevent="handleSubmit">
    <div v-if="isSuccess" class="alert-success">Thank you for your message!</div>
    <div v-if="errorMessage" class="alert-error">{{ errorMessage }}</div>

    <label for="email">Email</label>
    <input id="email" name="email" type="email" required />

    <label for="message">Message</label>
    <textarea id="message" name="message" required></textarea>

    <button type="submit" :disabled="isSubmitting">
      {{ isSubmitting ? 'Sending...' : 'Send' }}
    </button>
  </form>
</template>
8. AI Coding Prompt Template
Paste this prompt into Cursor, ChatGPT, Claude, or v0 to automatically generate tailored forms for your exact tech stack:
I have created a FormBold form with the endpoint:
https://formbold.com/s/YOUR_FORM_ID

Please help me integrate this form into my web application.
My stack is: [Insert stack, e.g. Next.js 15 App Router with Tailwind CSS]

Requirements:
1. Submit the form to the FormBold endpoint using POST.
2. Provide form fields for Name, Email, and Message with proper validation.
3. Use the Fetch API with 'Accept: application/json' headers for seamless AJAX handling.
4. Disable the submit button and show a spinner while submitting.
5. Display accessible success and error state alerts.
6. Reset the form fields after successful submission.Last updated: September 10, 2026