
Connecting Apps and Integrations with Form
FormBold offers a ton of app integrations. You can connect them and use them for spam protection, lead generation, and notification.
Currently, FormBold offers integration for Email, Slack, Telegram, Webhook, Notion, Discord and Google Sheets.
We are going to share all the processes you need to follow in order to integrate the apps.
Integrating web form to email is one of the core features of FormBold. You can easily connect your form with your email, this way you’ll get all the submissions straight into your inbox.
To use the FormBold API first you have to create a Form then you’ll have to integrate it.
Here are the steps you can follow to connect FormBold API to your static Form:
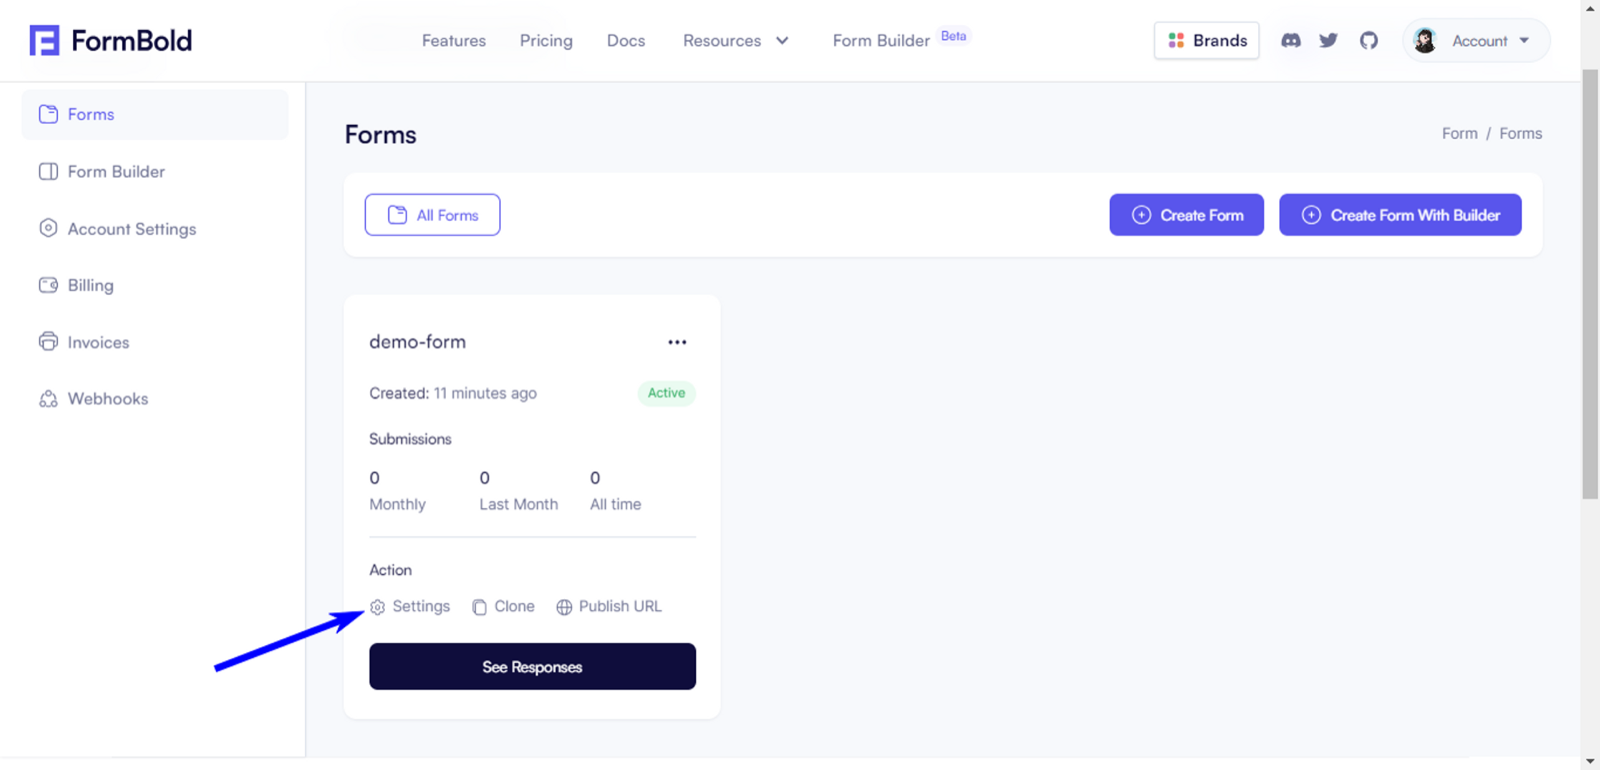
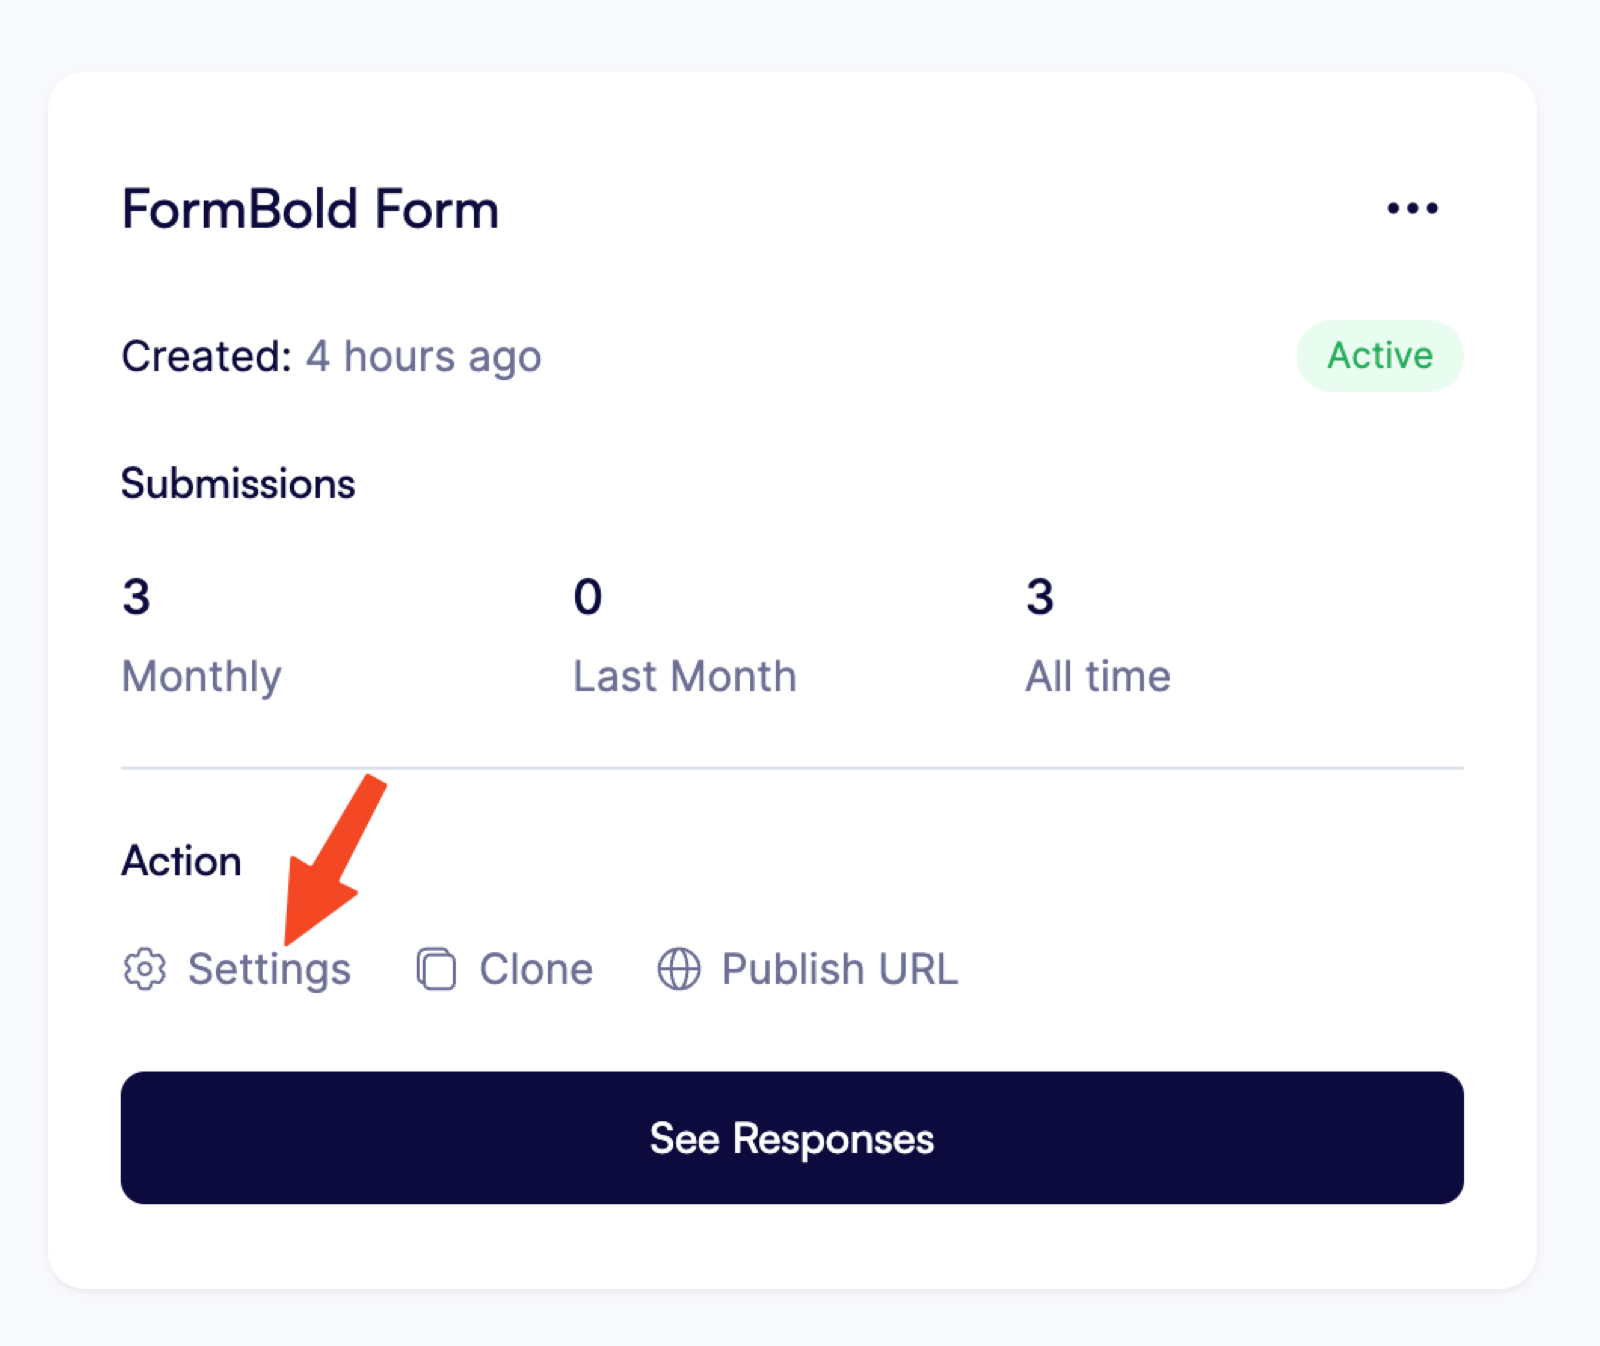
Login to FormBold and create a form
Then go to the Form Setting.

- Now go to Integrate
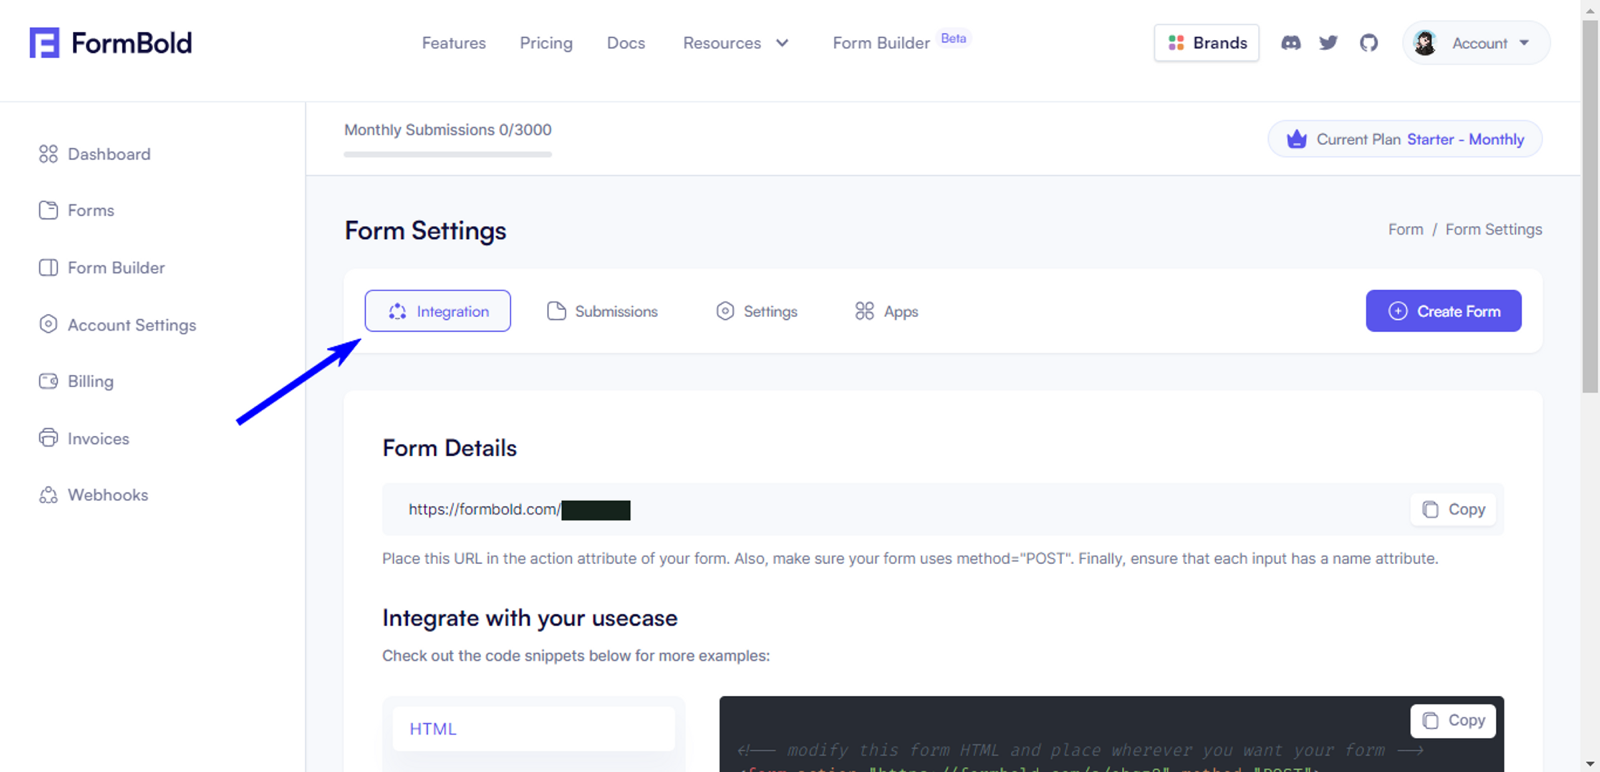
- Copy the Form API.
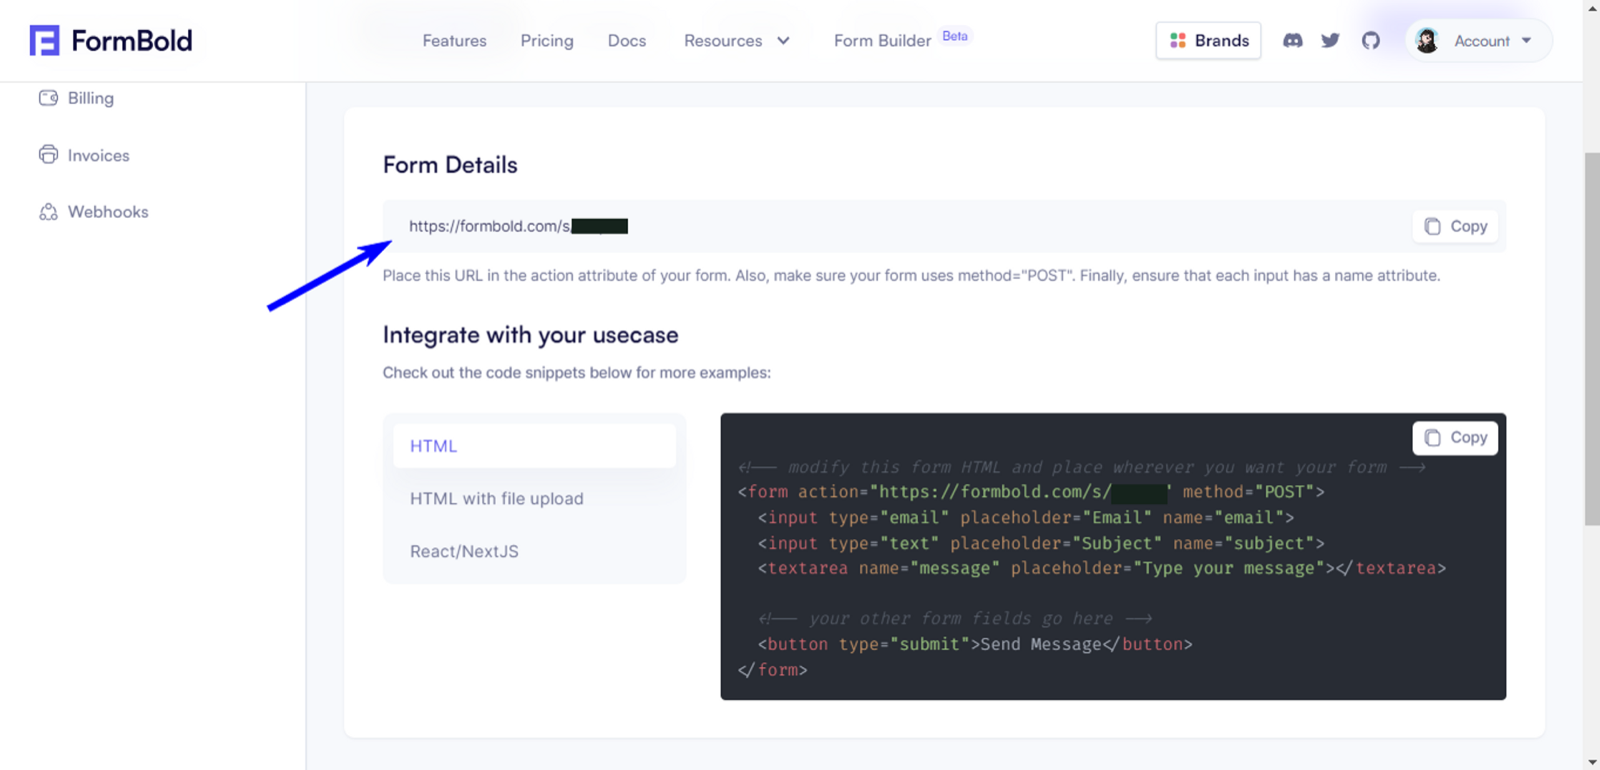
- Now add the endpoint to the action of your Form. And make sure your form method is set to POST.
Save and done!
Your form is now dynamic you will receive form submissions, no matter where it is hosted.
Slack
You can integrate Slack with FormBold and get all the submissions in your preferred Slack channel.
To get started here’s what you need:
A FormBold account
A FormBold form setup and
A Slack account and a Slack Channel to send the submissions.
Now follow these steps to integrate FormBold with your Slack channel.
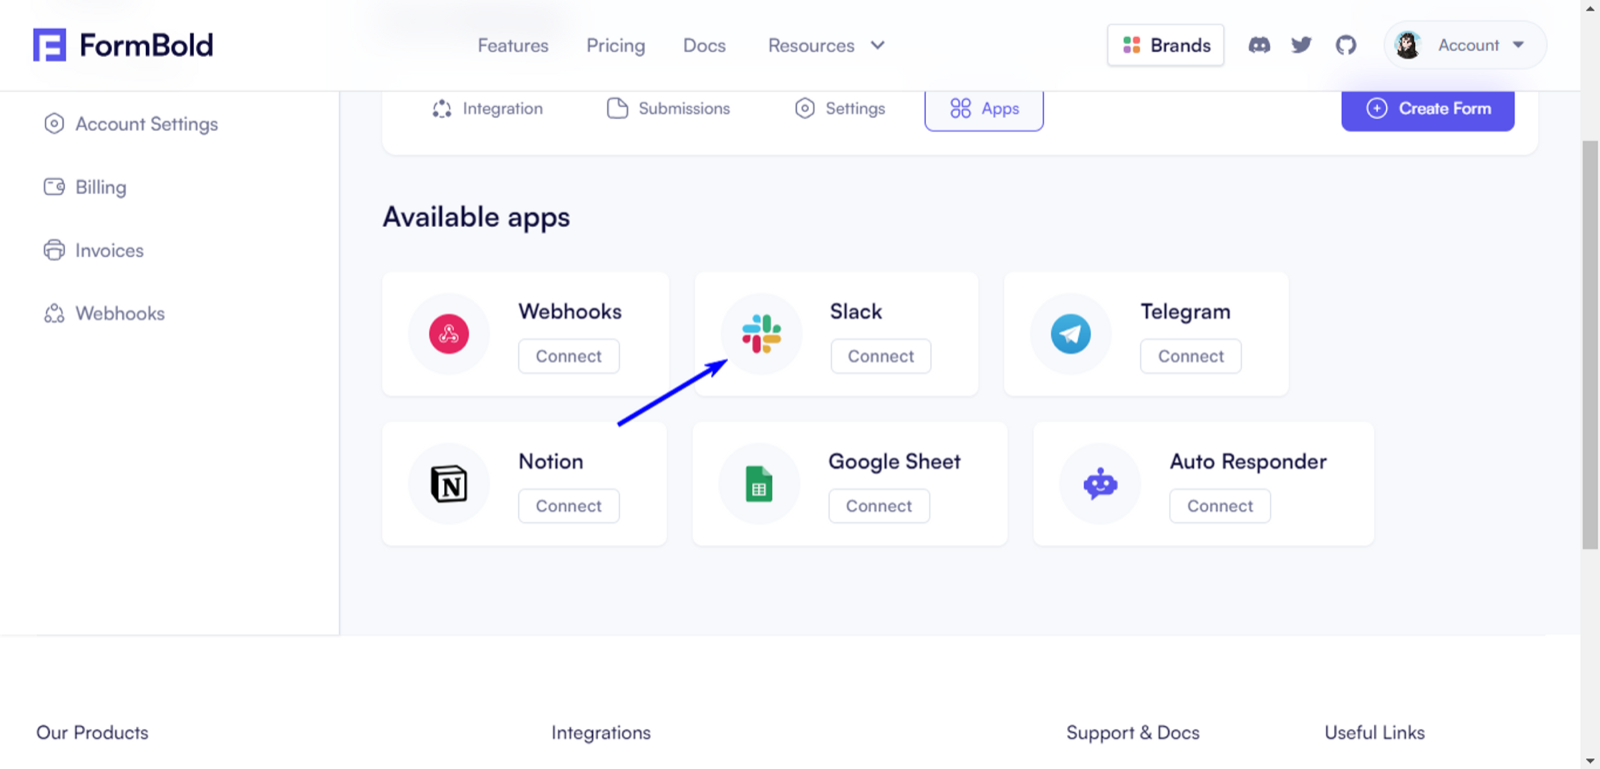
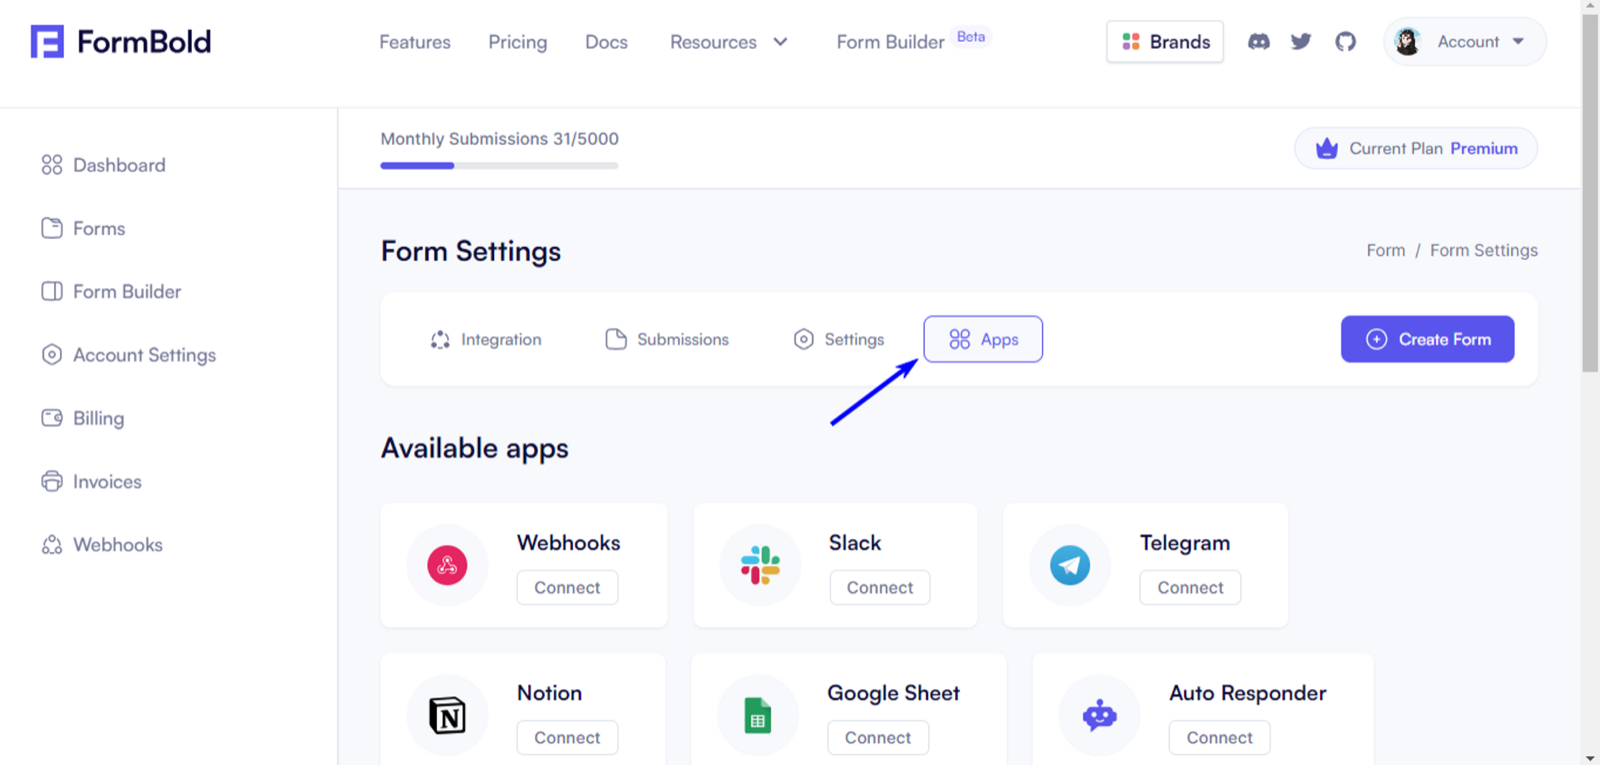
- Go to Form Settings

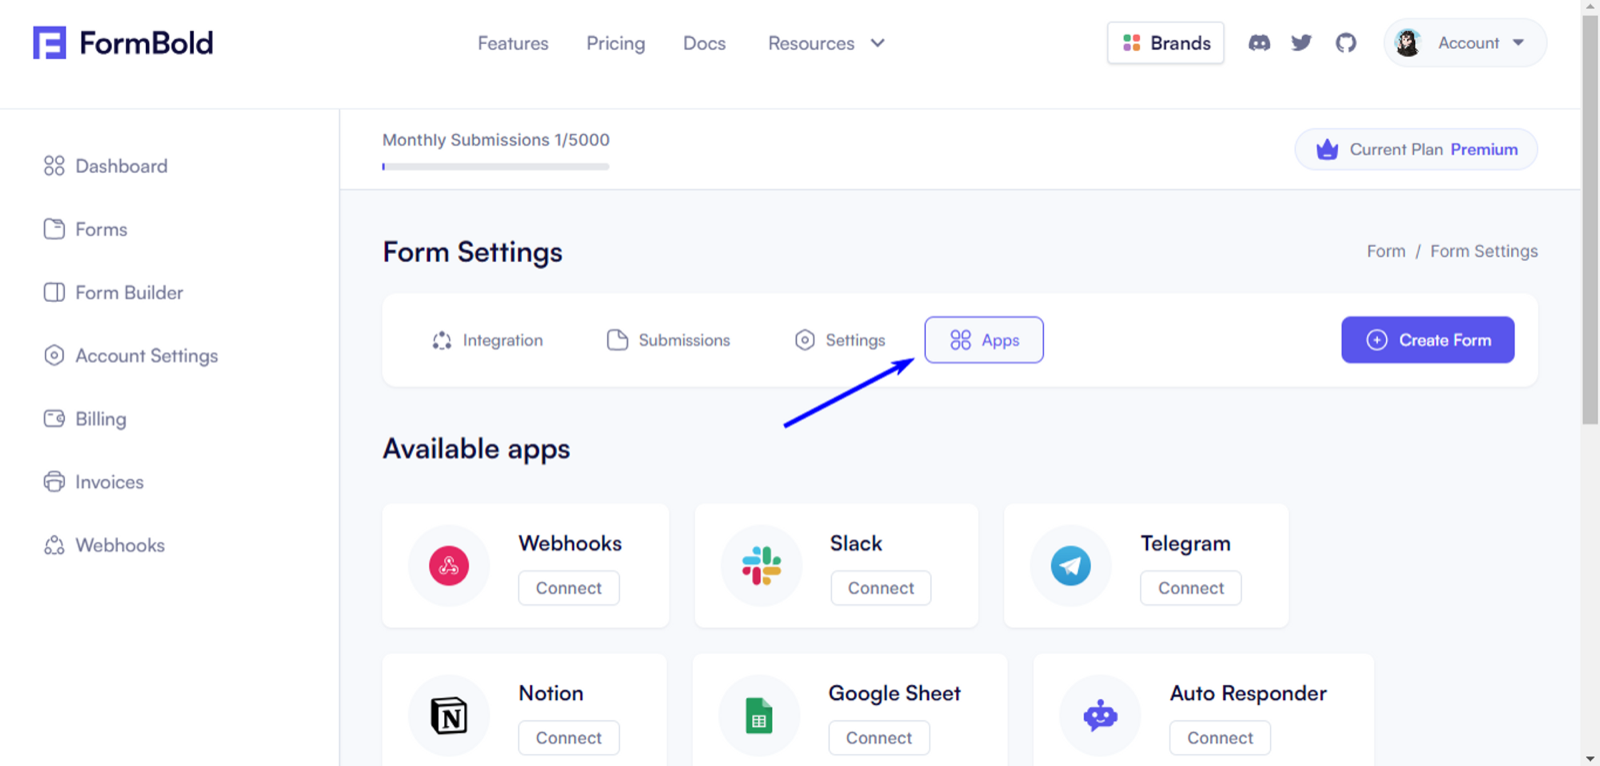
- Then go to Apps

- After that click on the Slack button
When you click on the Slack button you’ll see something like this:
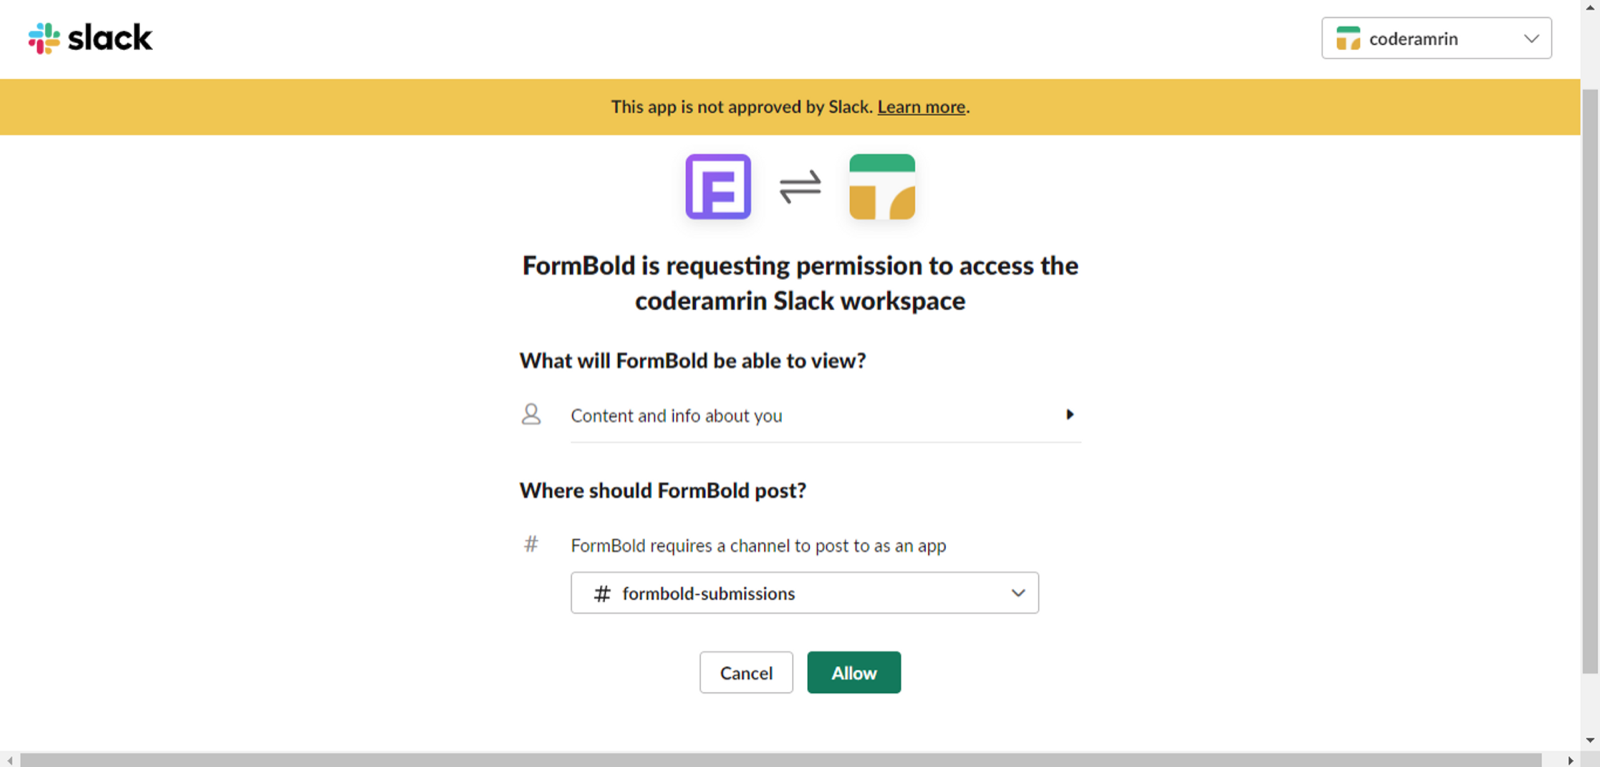
Go ahead and allow Slack permission and choose the channel you want the submissions to send.
If the integration is successfully completed you’ll see something like this:
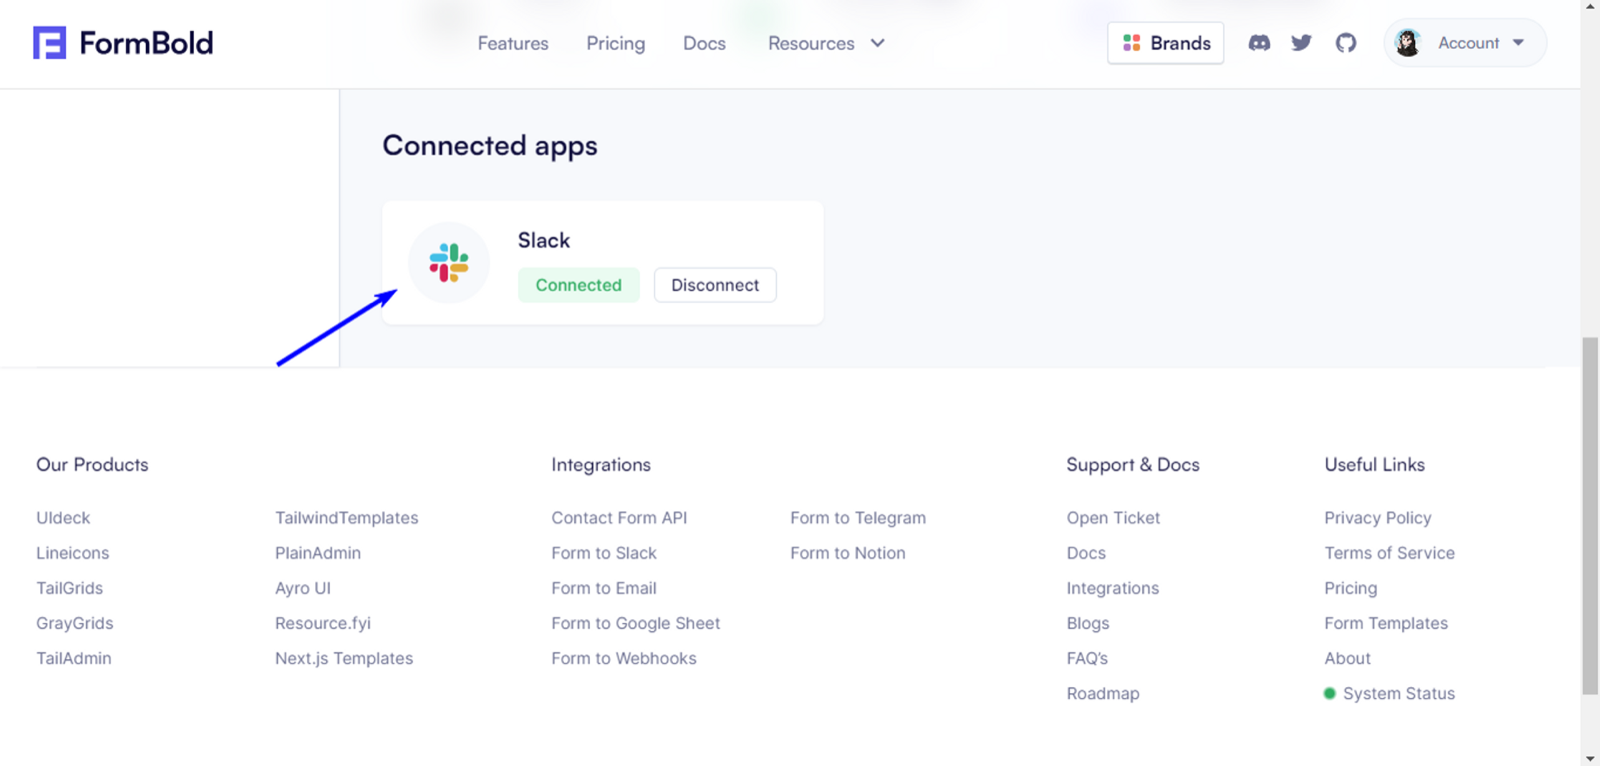
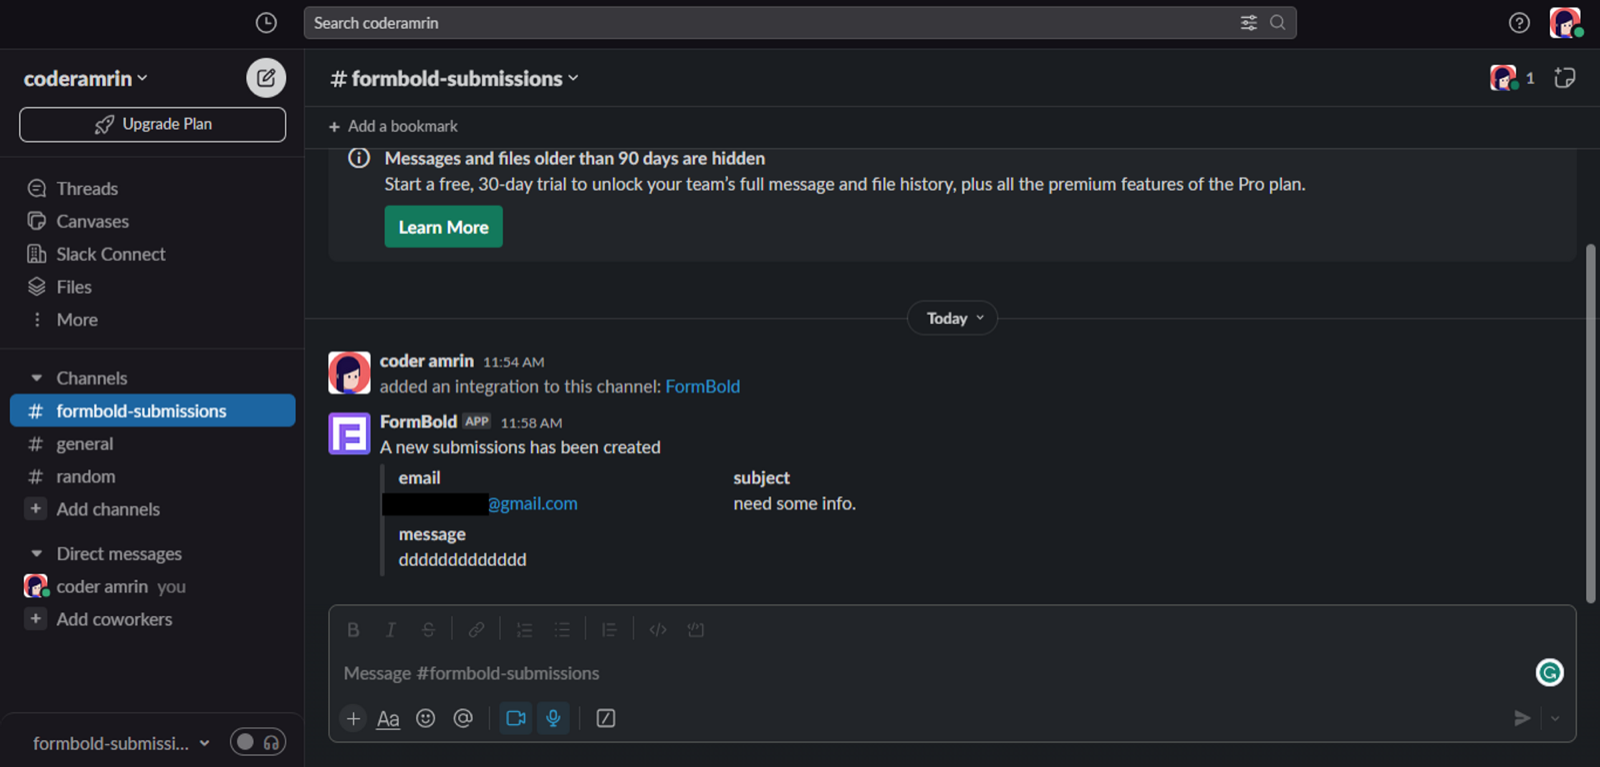
Now go ahead and submit a test message on the FormBold Form. You’ll get all the submissions straight into your Slack channel.
Google Sheets
Google Spreadsheet is one of the most popular Spreadsheet solutions available on the internet, it has various use cases depending on your needs. FormBold Sheet Integration allows you to store and receive website form submissions to a specific Google Sheet.
Follow these steps to integrate Google Sheets with FormBold.
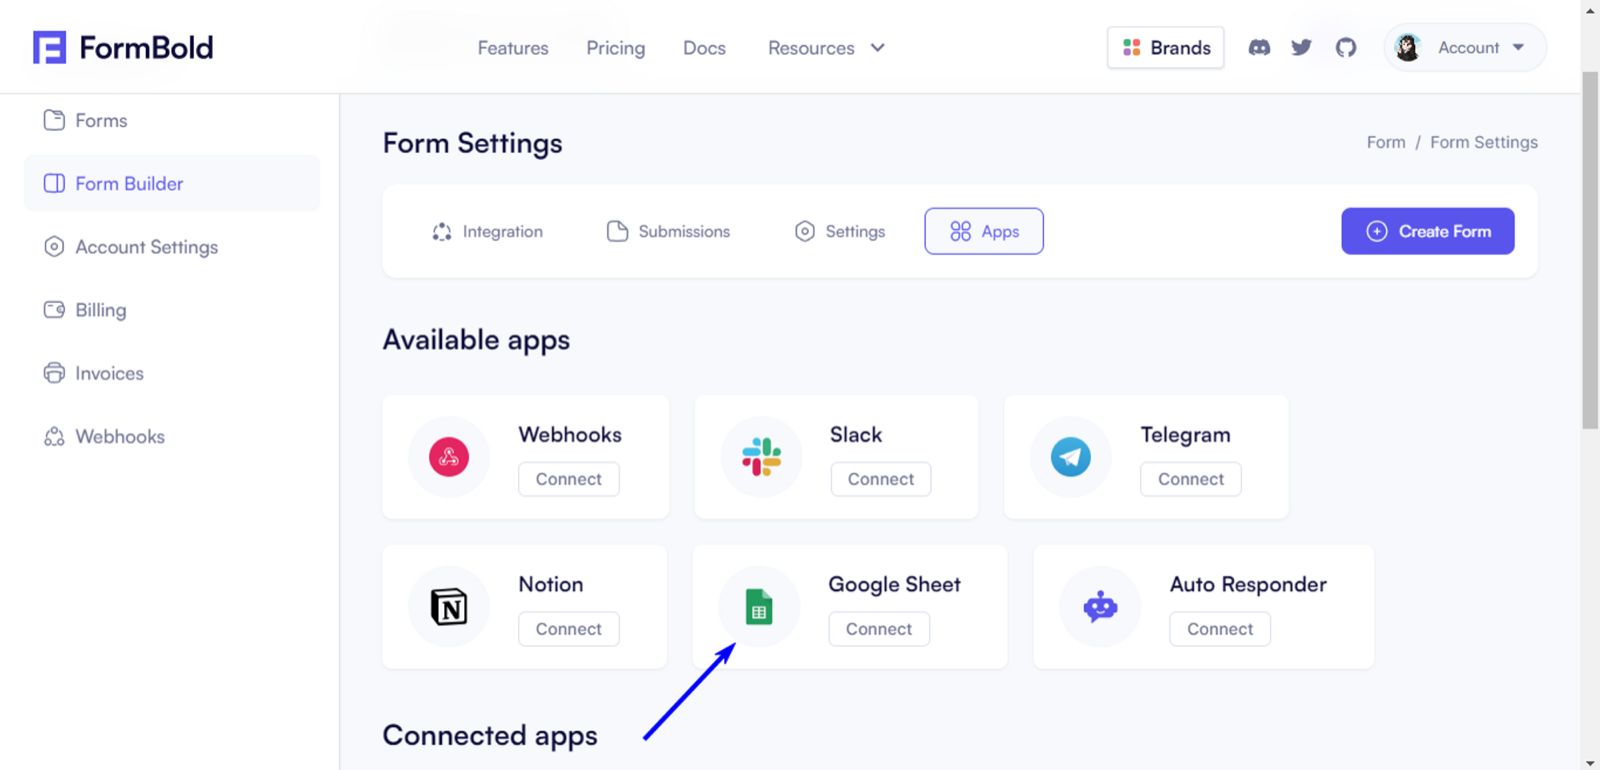
- Go to Form Settings.

- Then go to Apps

- After that click on the Google Sheet button.
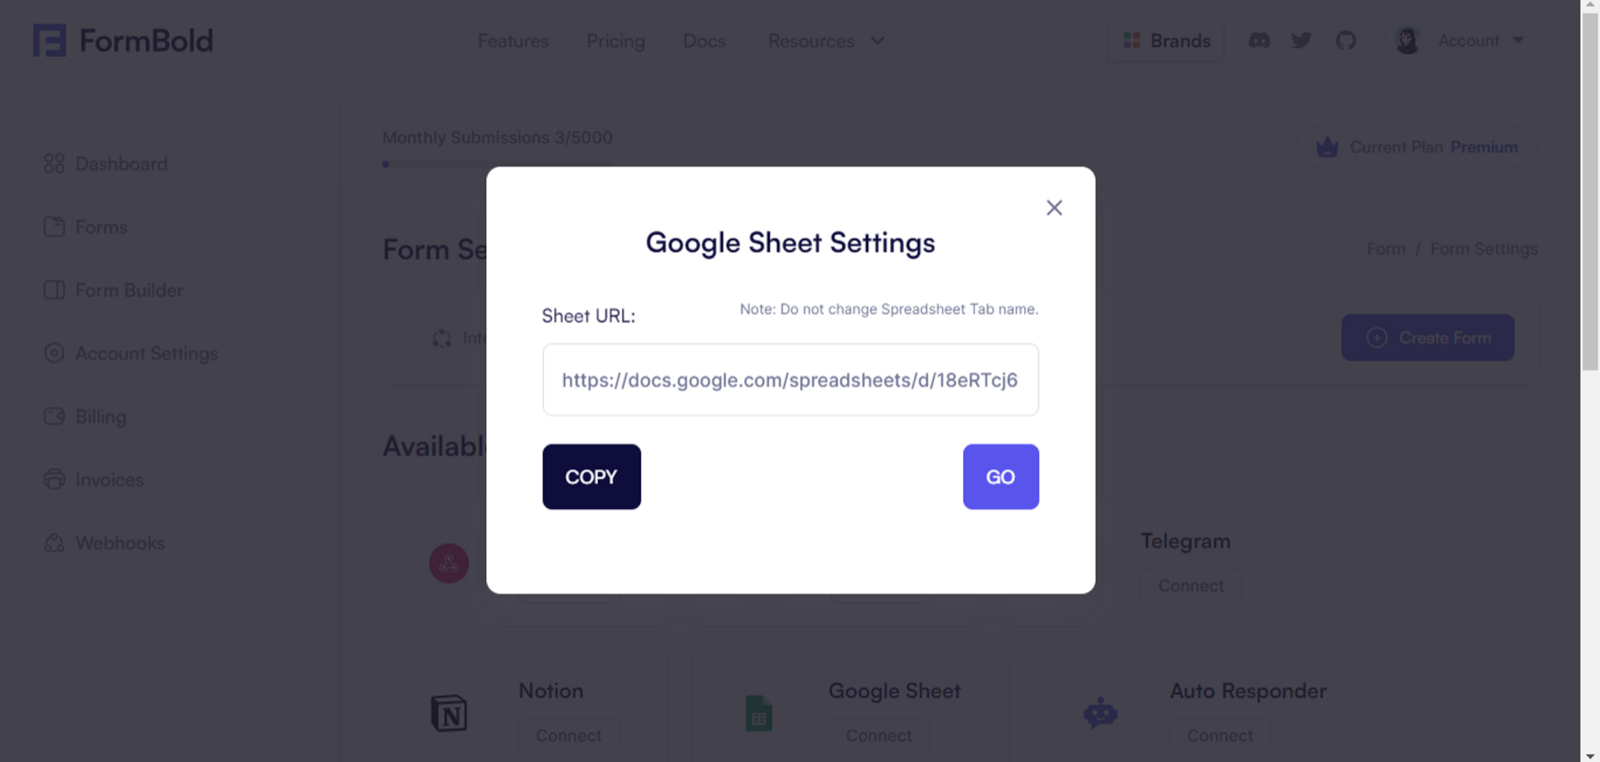
When you click on the Google Sheet button you’ll be asked to log in. After that, you’ll see the Google Sheets link like this.
Click on the Go button or copy the link and go to that URL. You’ll see all the previous submissions there. And if you submit a new form the sheet will be updated automatically.
Auto Responder
Sometimes you want to send an automated response email to the users after successful submission. You can set up an Auto Responder in FormBold easily.
Follow these steps to integrate Auto Responder in your FormBold form.
Go to the Form Settings of the form you want to add Auto Responder to:
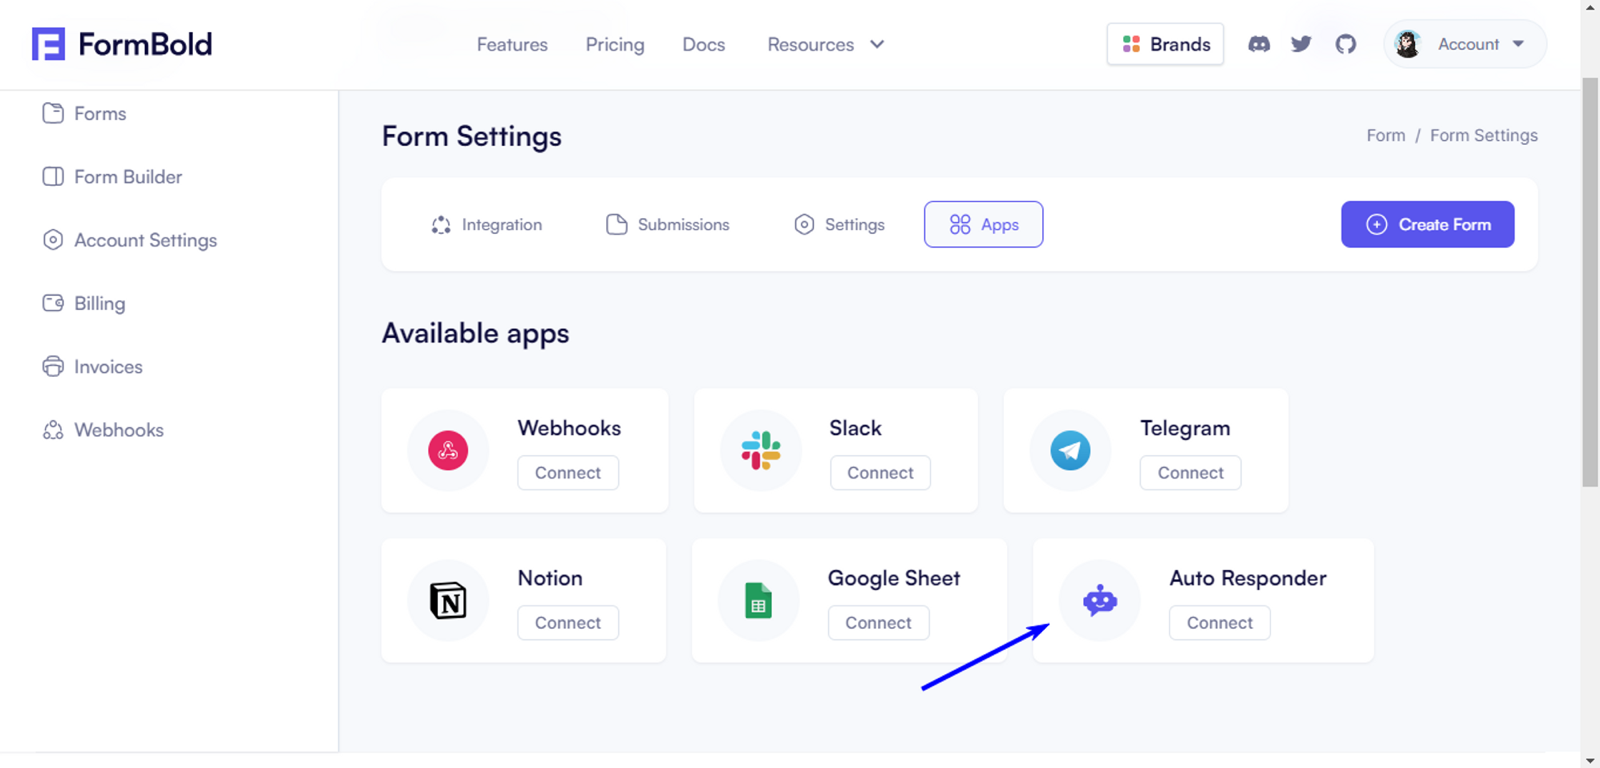
- After that go to Apps
- And click on the Auto Responder button:
- When you click on the Auto Responder you’ll see something like this. Go ahead and fill in the fields for the auto-respond email:
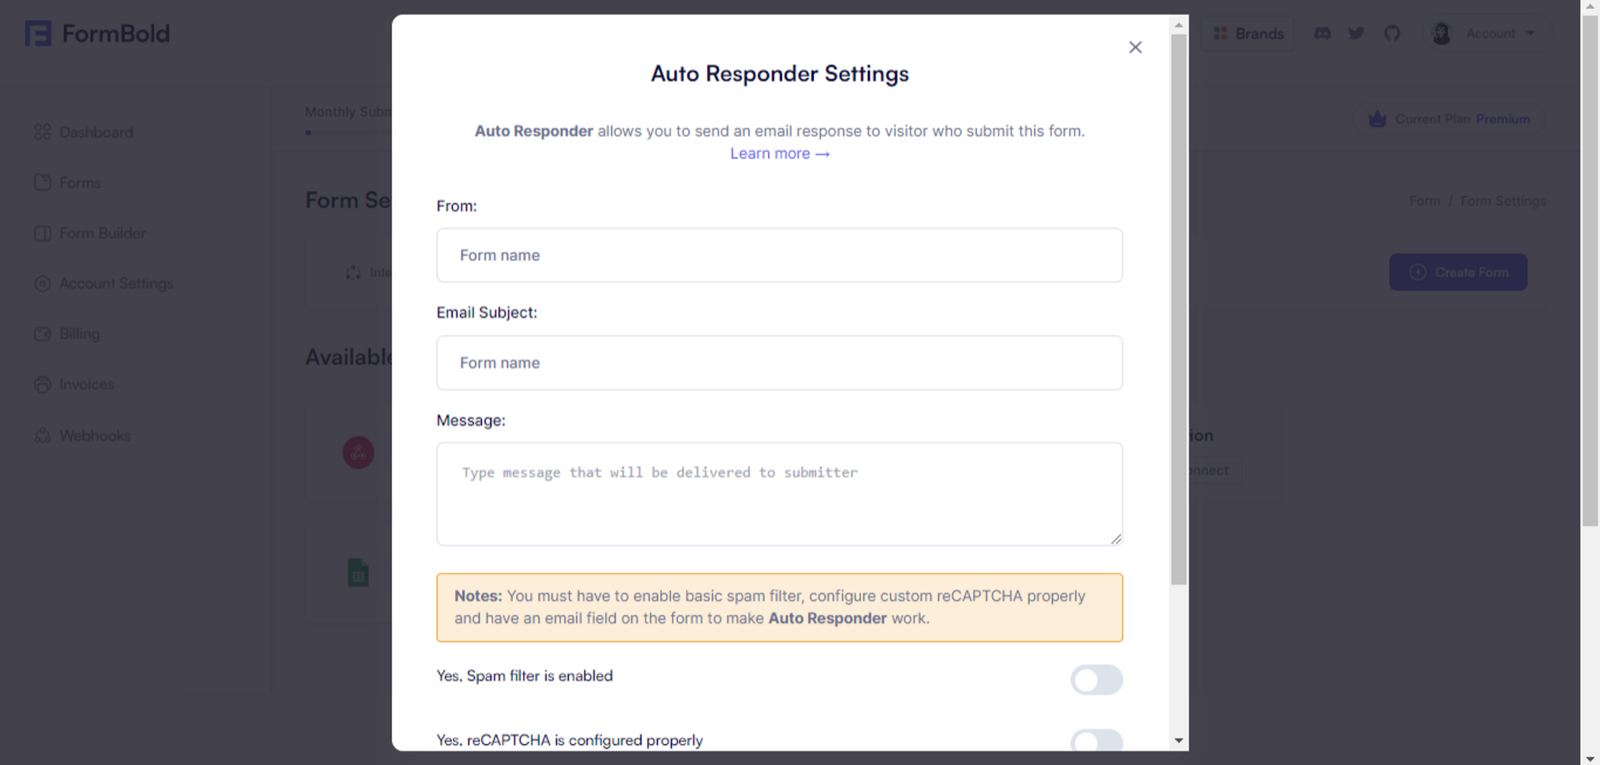
- After you’ve filled the forms turn on the toggle buttons and make sure you enabled the Basic Spam Filter and configured Custom reCAPTCHA
Once you configured Auto Responder successfully the users will get a response email after each submission.
Notion
Notion is one of the most popular project management software available out there. You can integrate your FormBold form with Notion.
Here are the steps you need to follow in order to integrate FormBold with Notion.
- Create A Notion Database:
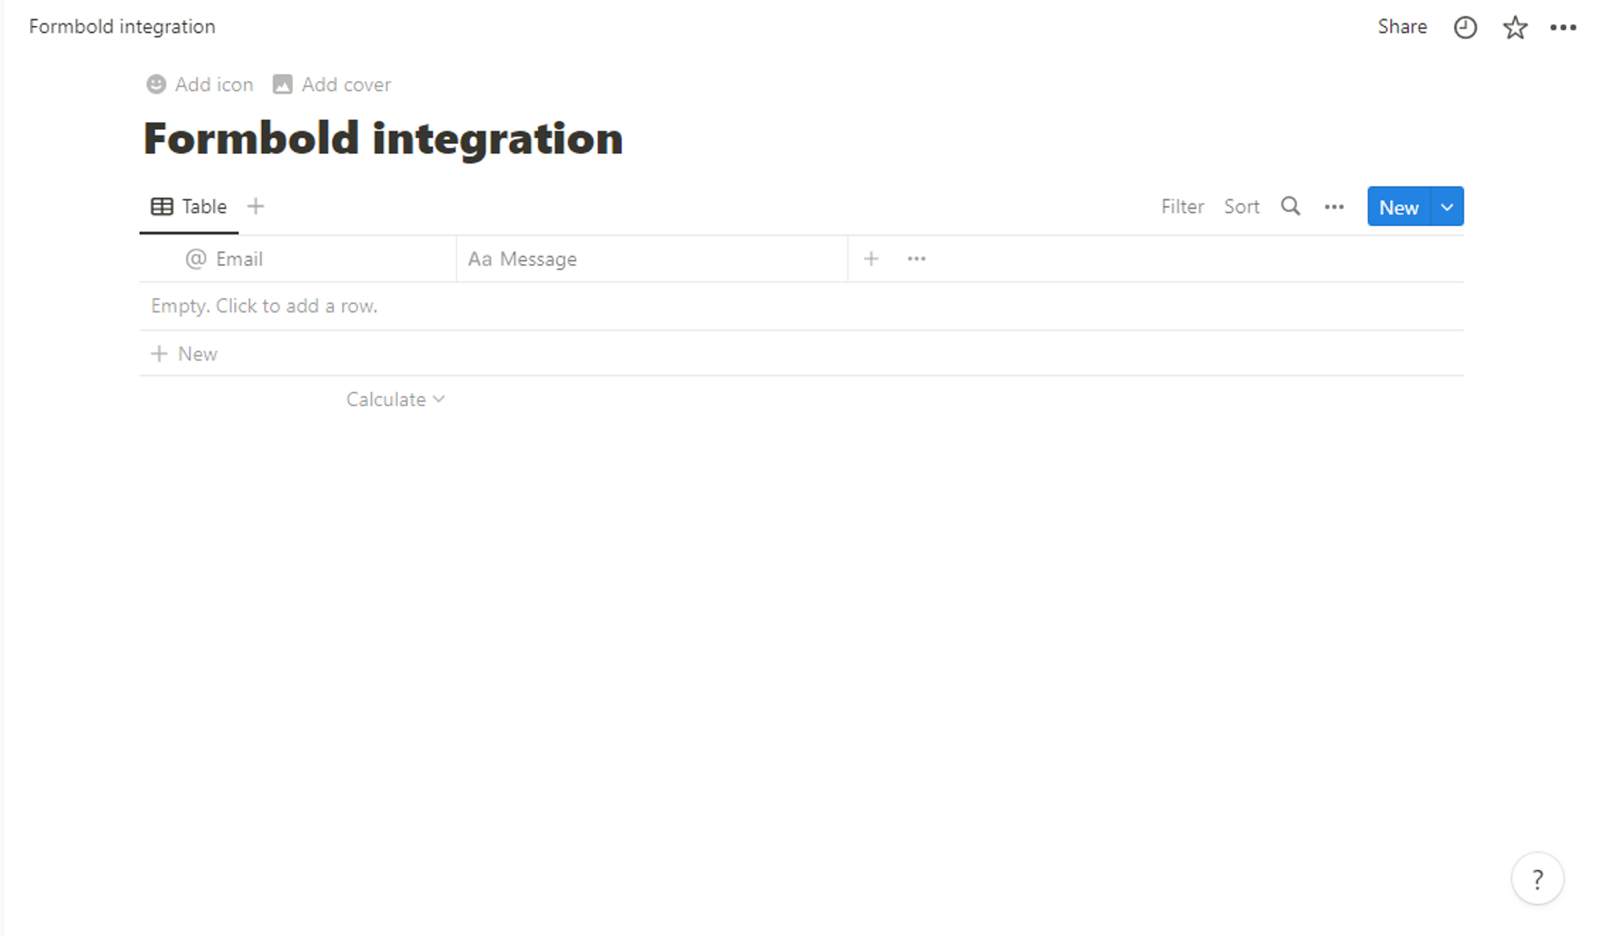
To integrate Notion with FormBold first, you’ll have to create a Notion Database and add the fields to it.
Go ahead and create a notion database and add the fields.
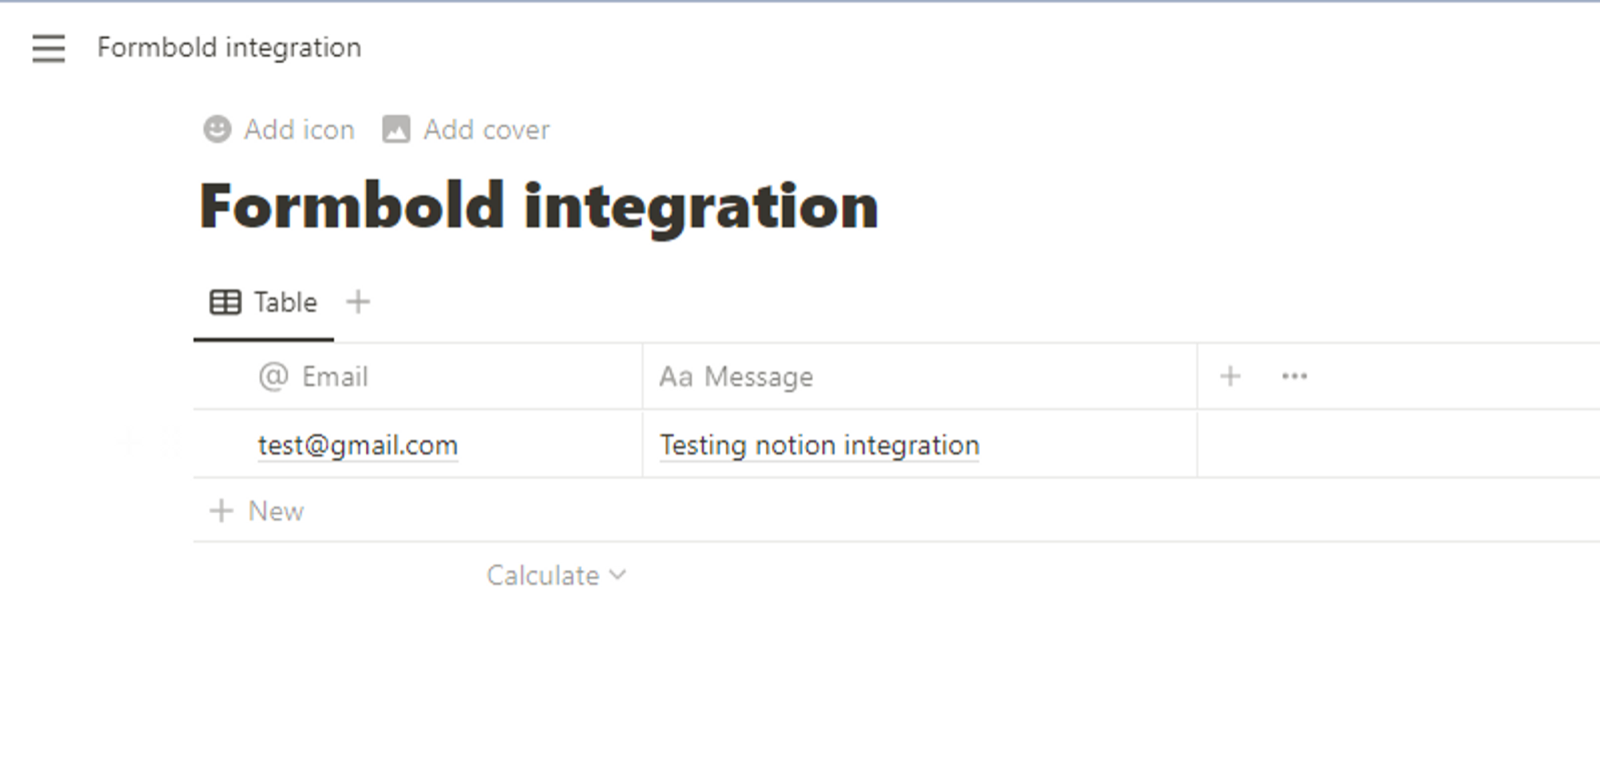
Here’s what it looks like for a simple Form with two fields Email and Message.
You can add as many fields as you need for your Form.
Note: The title of the page can be anything you want.
Now that we have the Notion Database set let’s connect it with the Form.
- Connecting the Form
To connect the Form follow these steps:
Go to the Form Setting

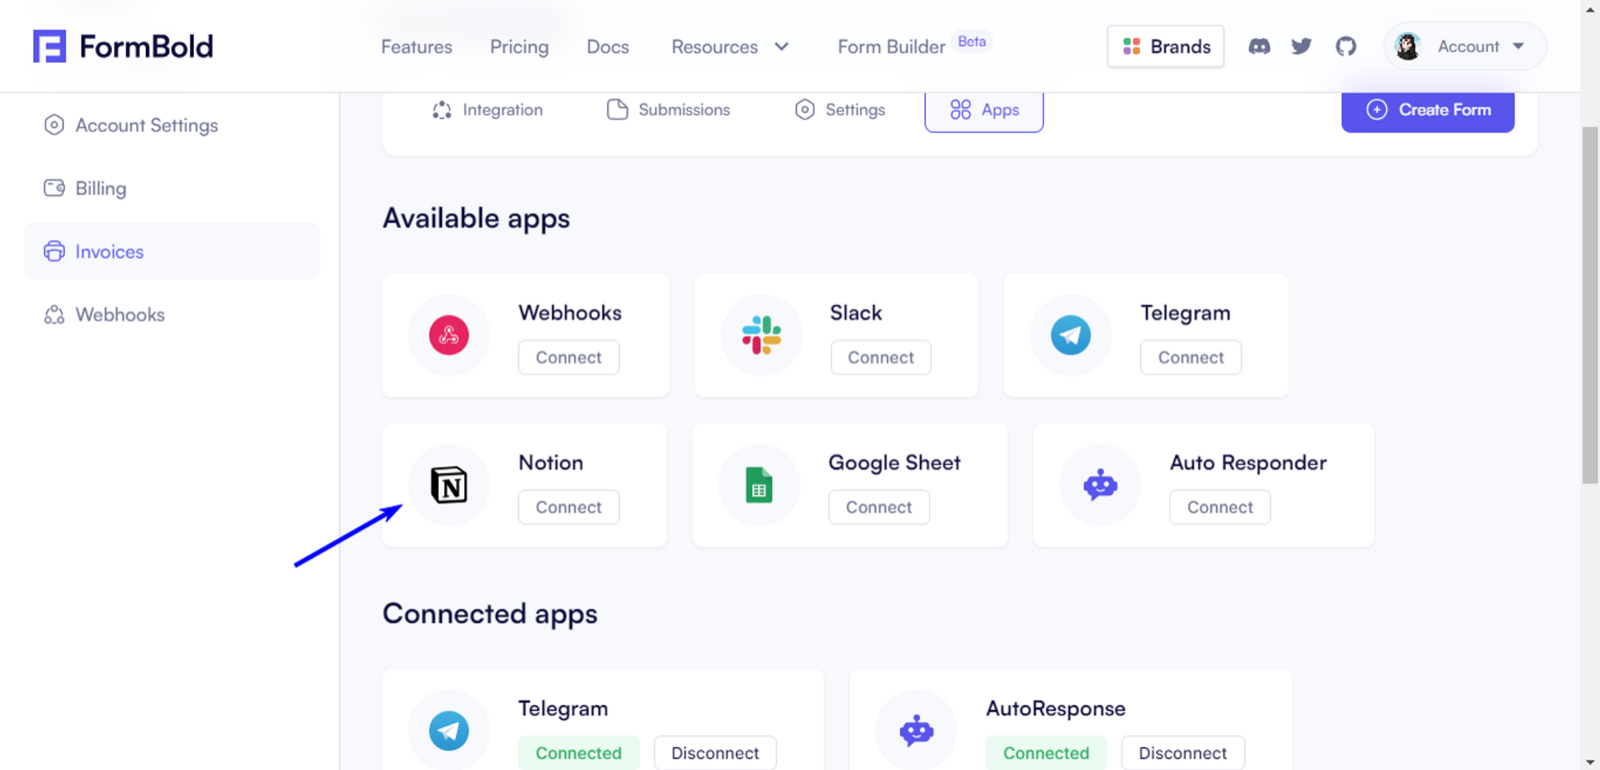
- After that go to Apps
- Now go ahead and click on the Notion button.
When you click on the button you’ll be redirected to a webpage that looks like this 👇
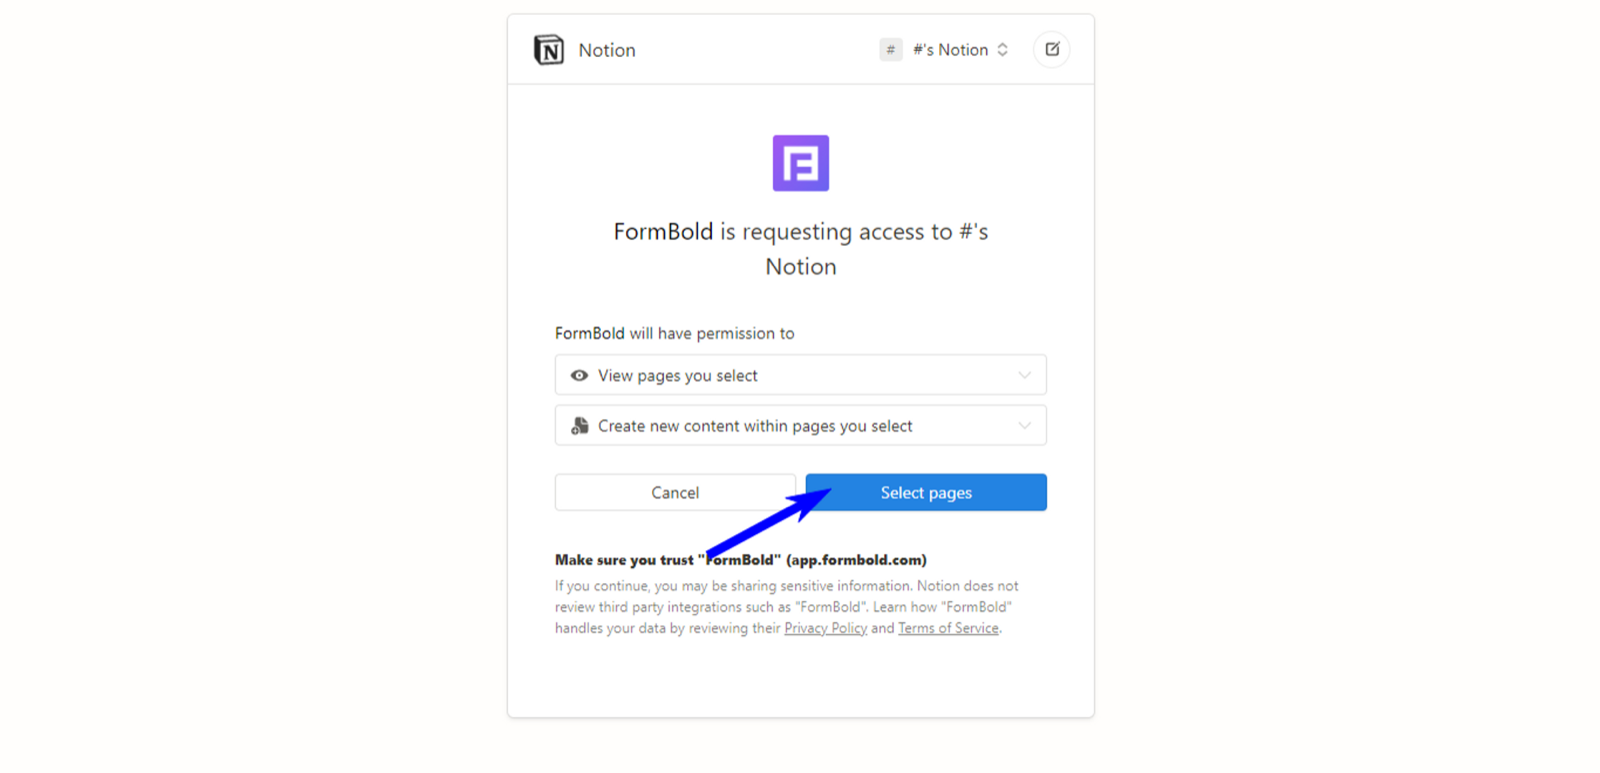
Go ahead and select the page you created earlier.
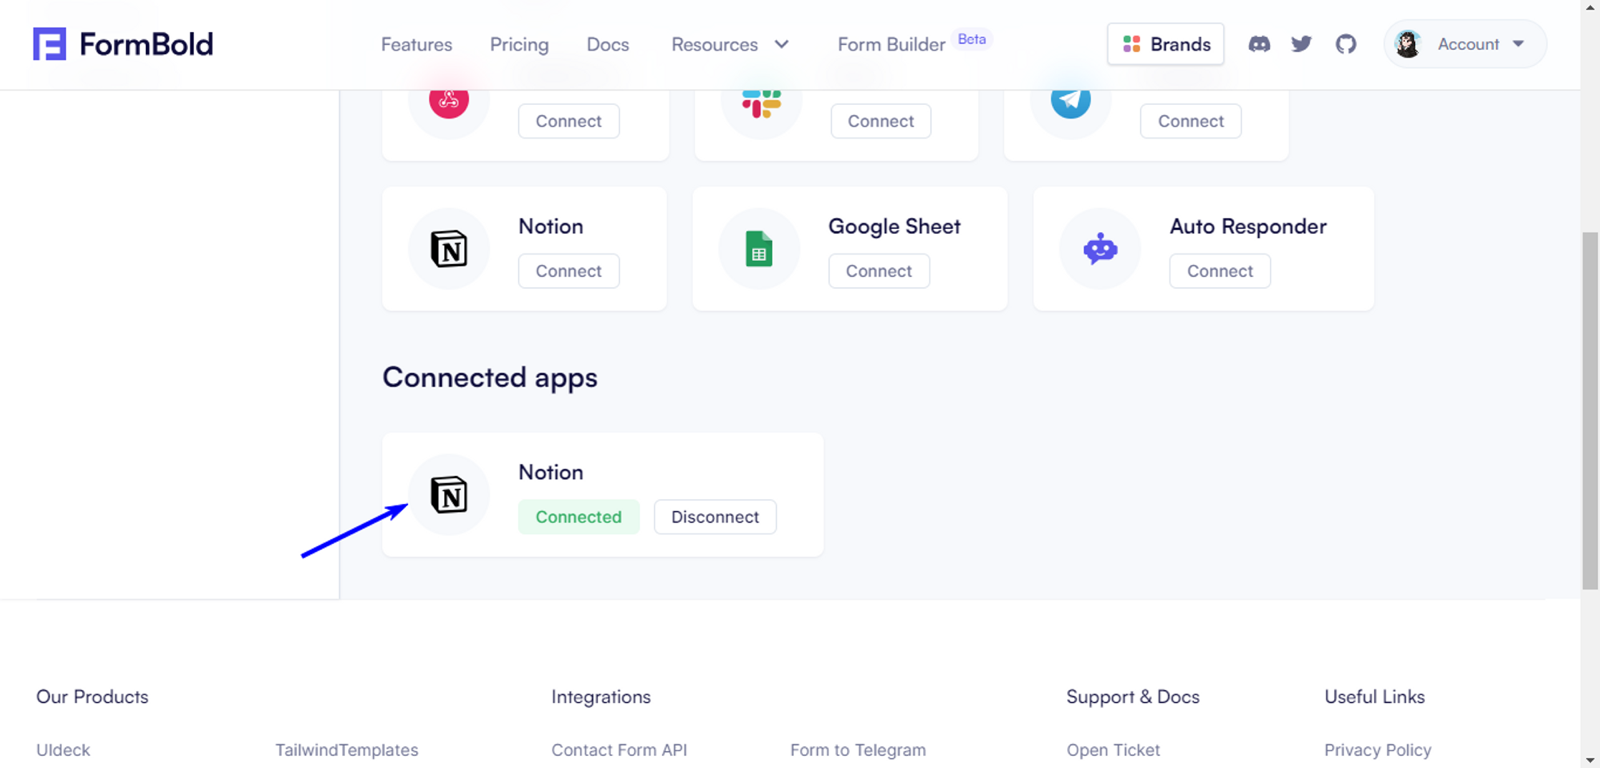
- After the Database is selected you’ll be redirected to the Apps tab and you’ll see a Notion button under Connected Apps. Click on that.
- Now select the Database from the drop-down menu.
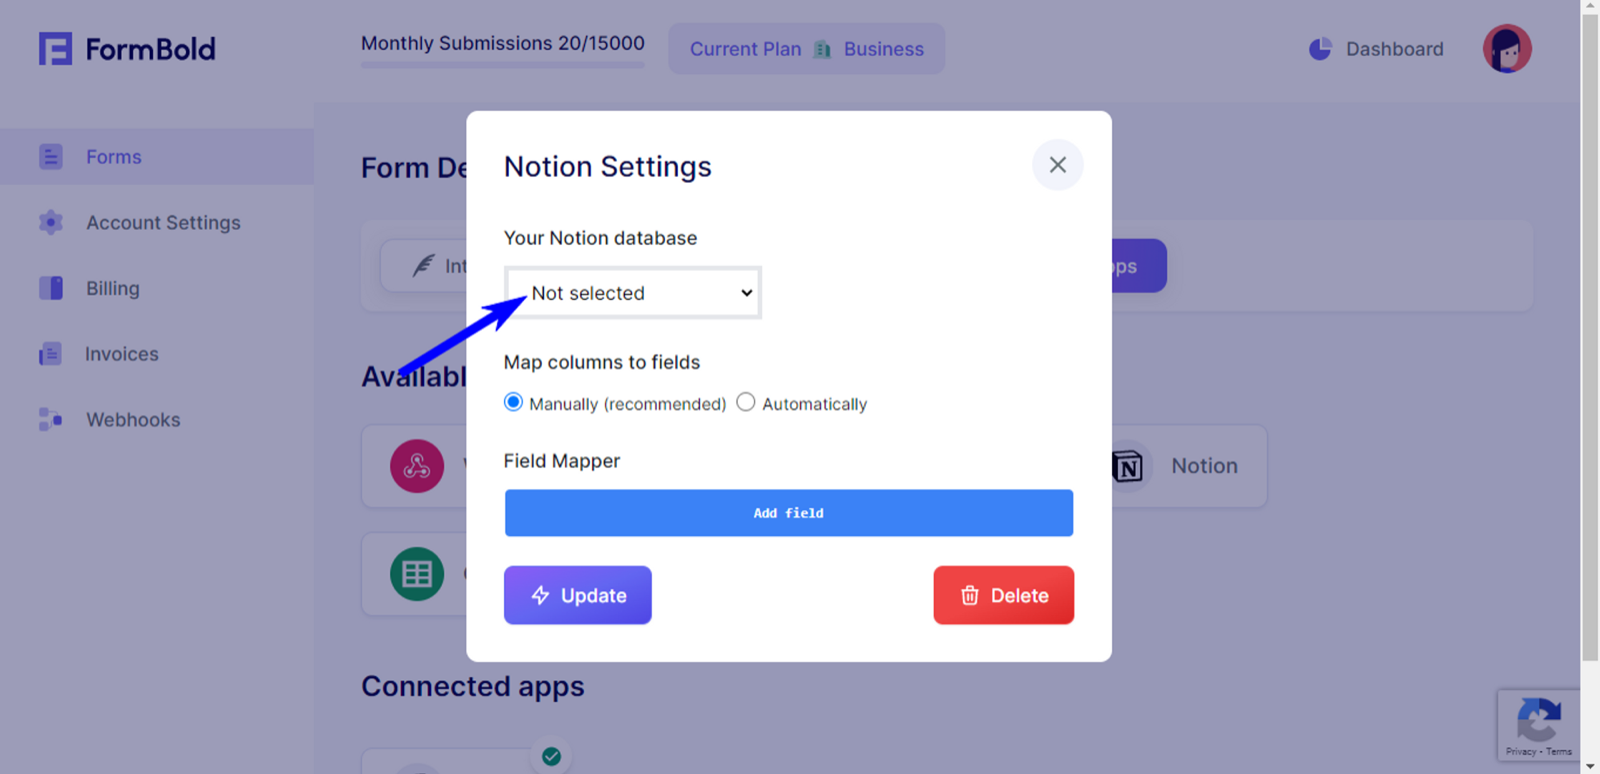
- After that, you’ll have to add the form fields from the Field Mapper.
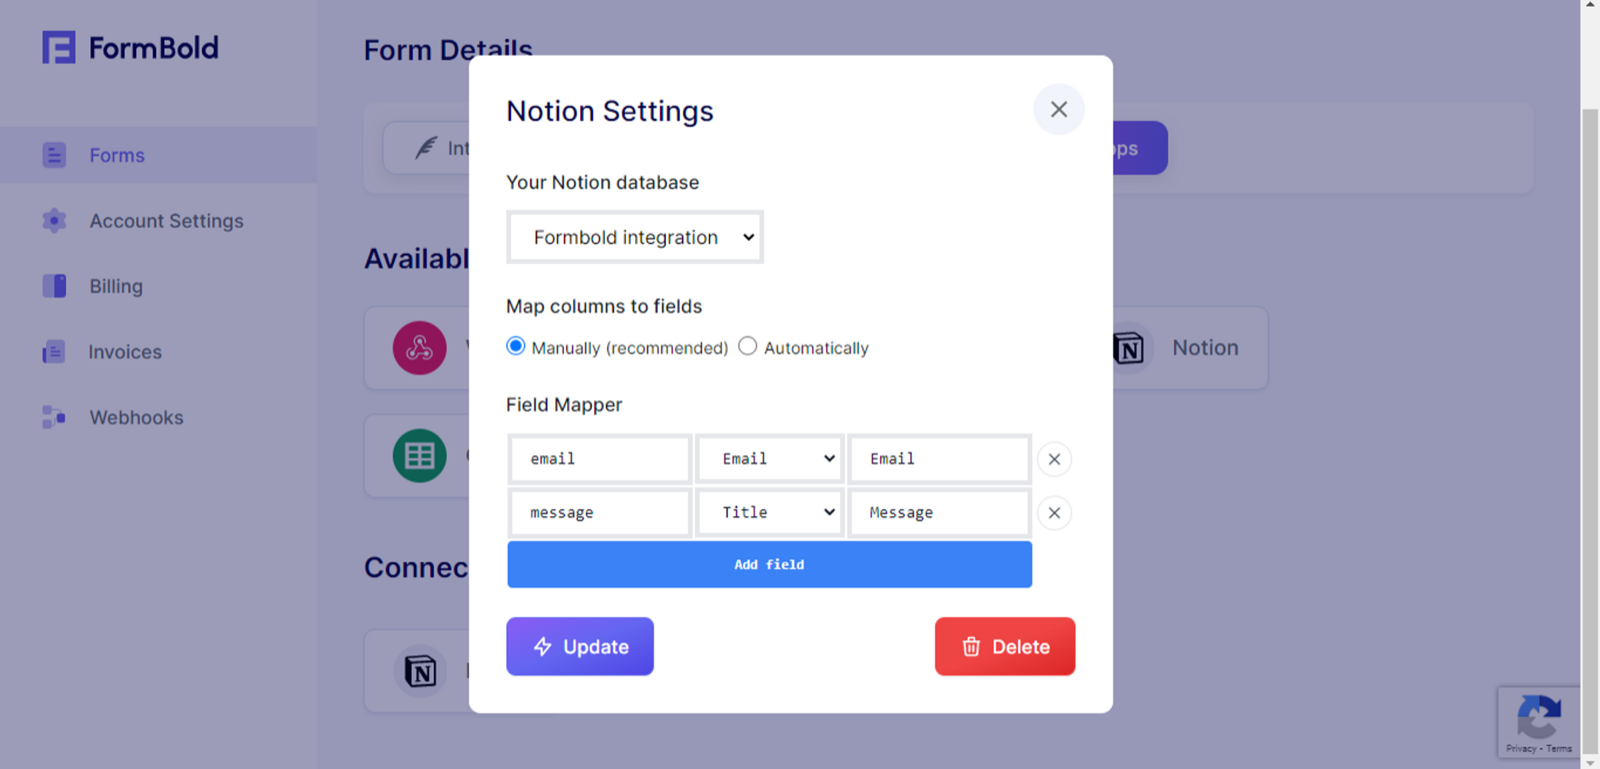
Note: The Form Field name is the same name as the input field of the form. The type is the type of Notion Database field type. The Notion Field name is the name of the Database field you created earlier.

This is how it looks for a simple form with two input fields.
Now go ahead and test it. If Notion was connected successfully you’ll see the submissions in the Database.
Telegram
You can integrate Telegram with your FormBold form. This way you’ll get all the submissions in your Telegram inbox.
To integrate Telegram with FormBold form follow these steps:
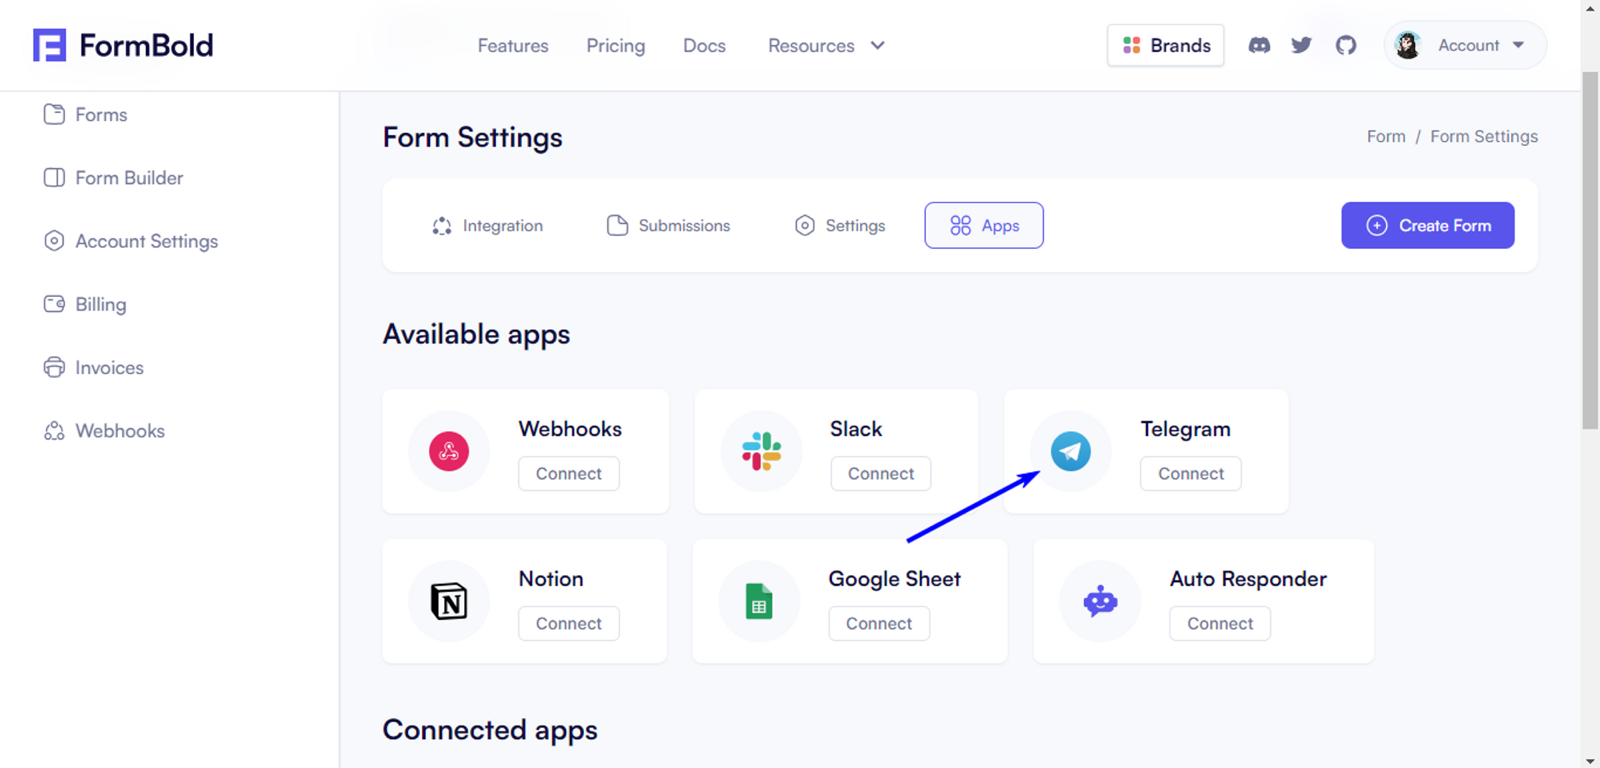
- Go to a specific Form Settings from your dashboard
- After that go to Apps

- Now click on the Telegram button.
- After that follow the steps to sign in to your Telegram account with your phone number. Then follow the steps to complete the integration.
If the integration is done properly you’ll see something like this:
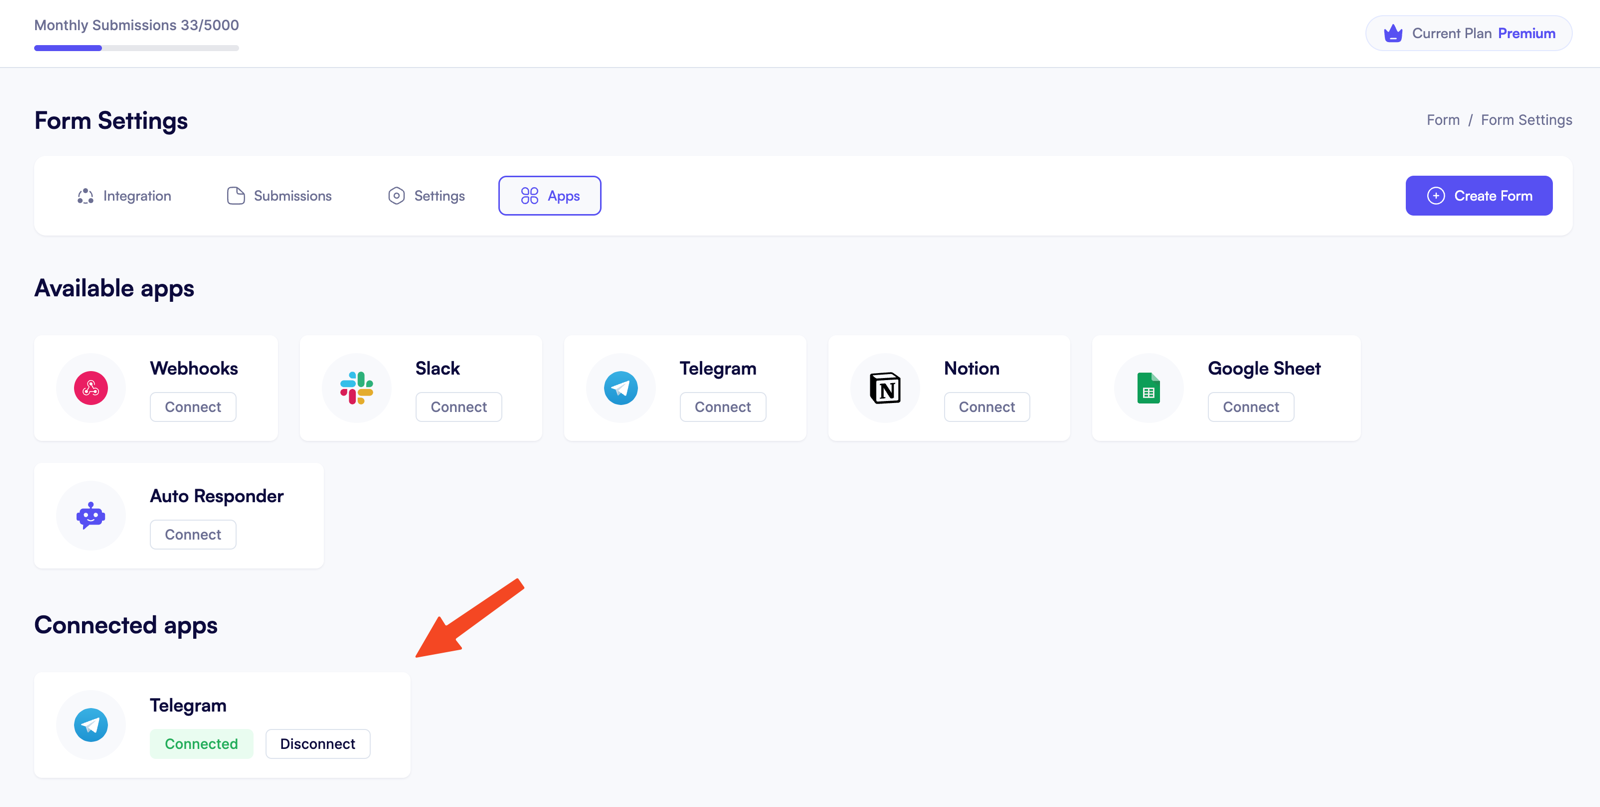
Now submit the form. If everything is connected successfully you’ll get the submissions in your Telegram Inbox.

Discord
Step 1: Set up integration In Discord, right-click the server icon, go to Server Settings > Integrations. You need server owner or integration permissions.
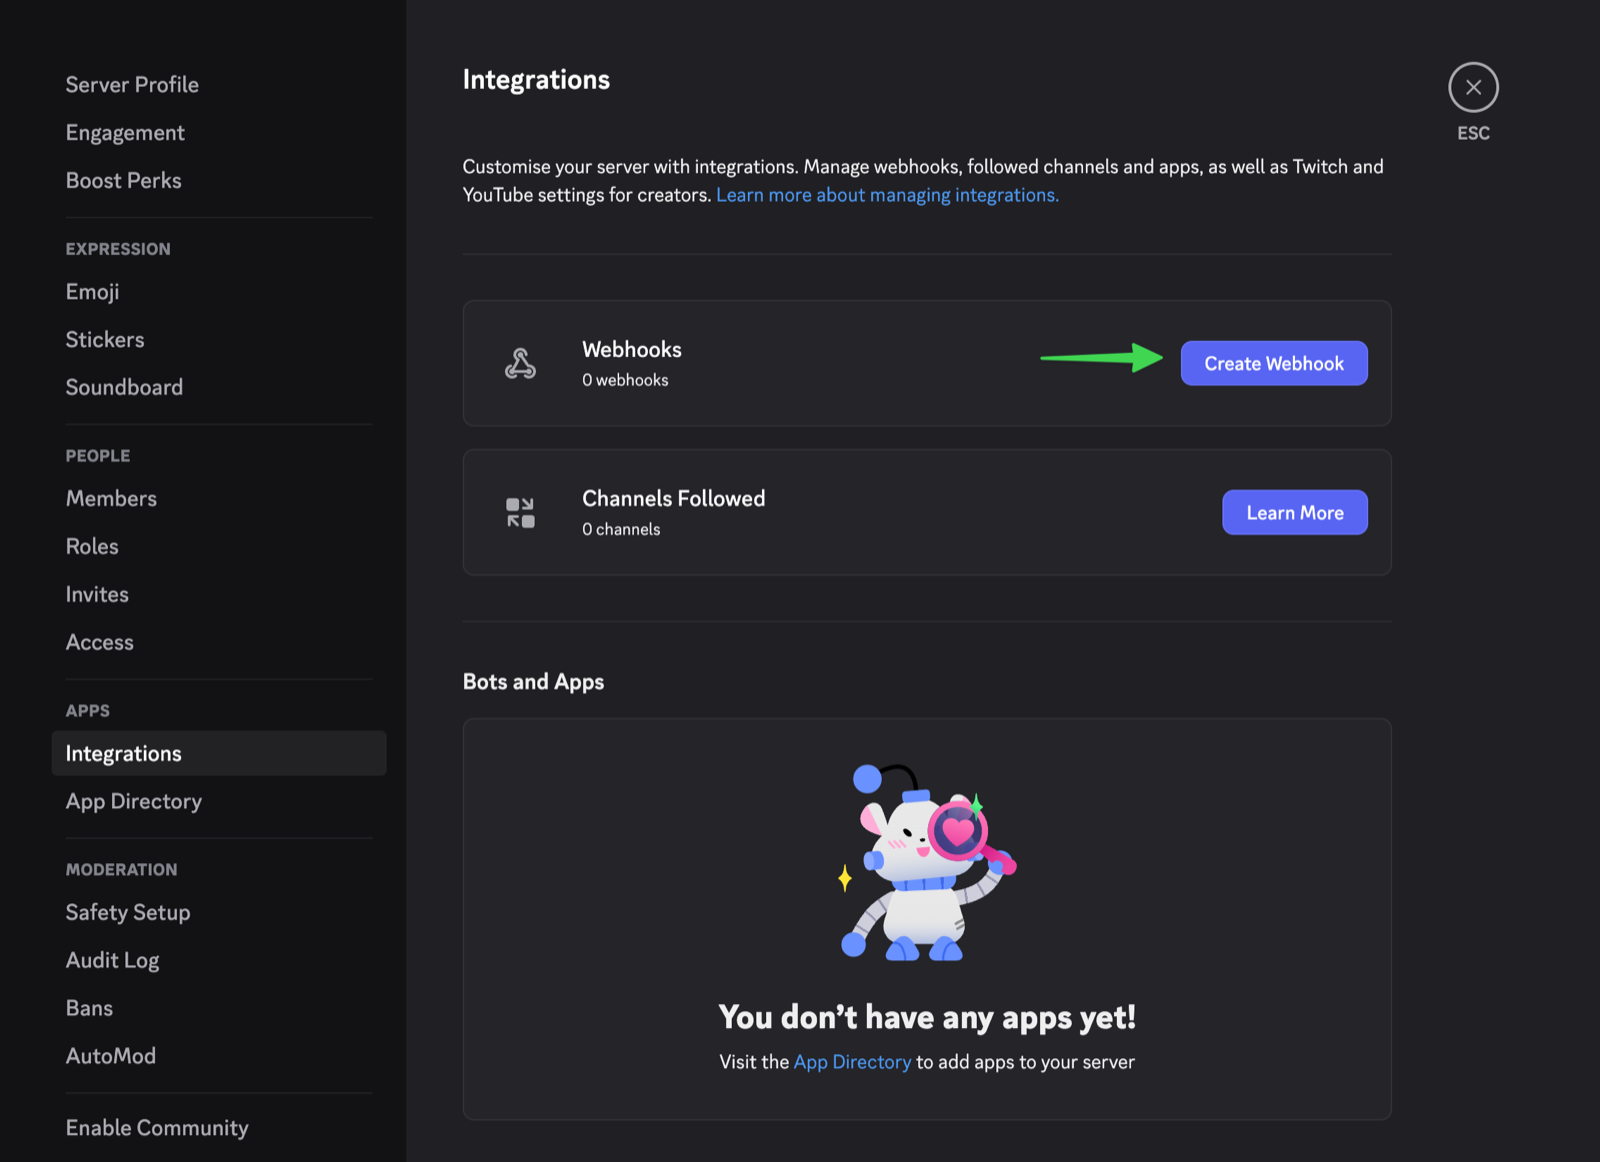
Step 2: Create webhook Click “Create Webhook,” choose the target channel, set the bot name to anything you can remember or FormBold
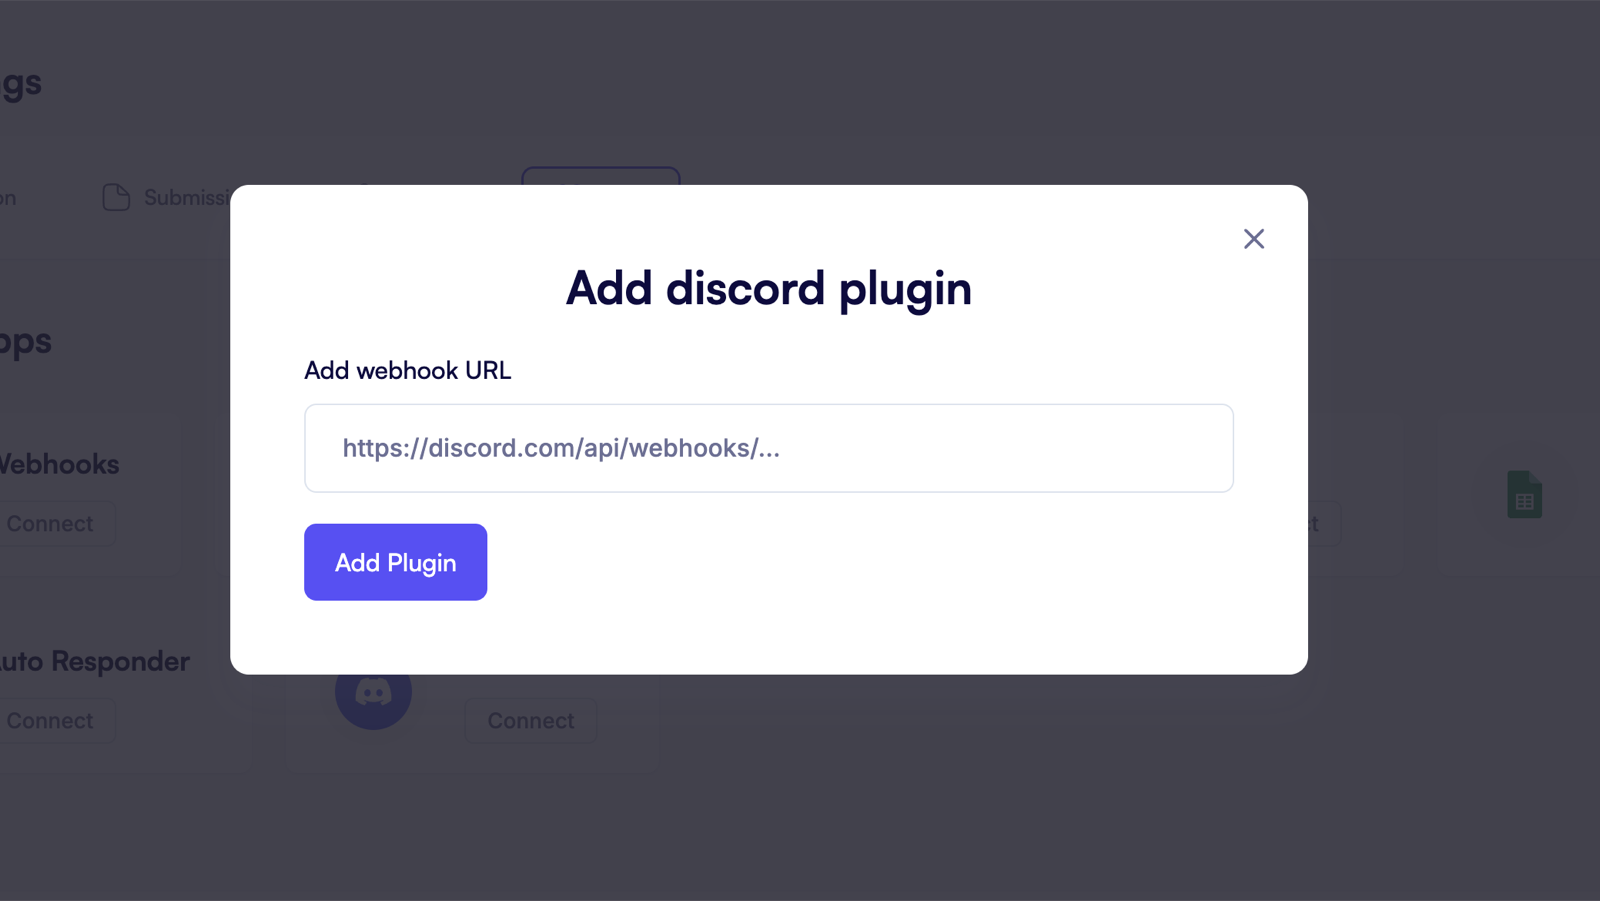
Step 3: Connect webhook to Formbold Copy the Webhook URL from Discord. In FormBold, go to your form’s Apps tab, select the Discord Plugin, paste the webhook URL, and click “Add Plugin.”
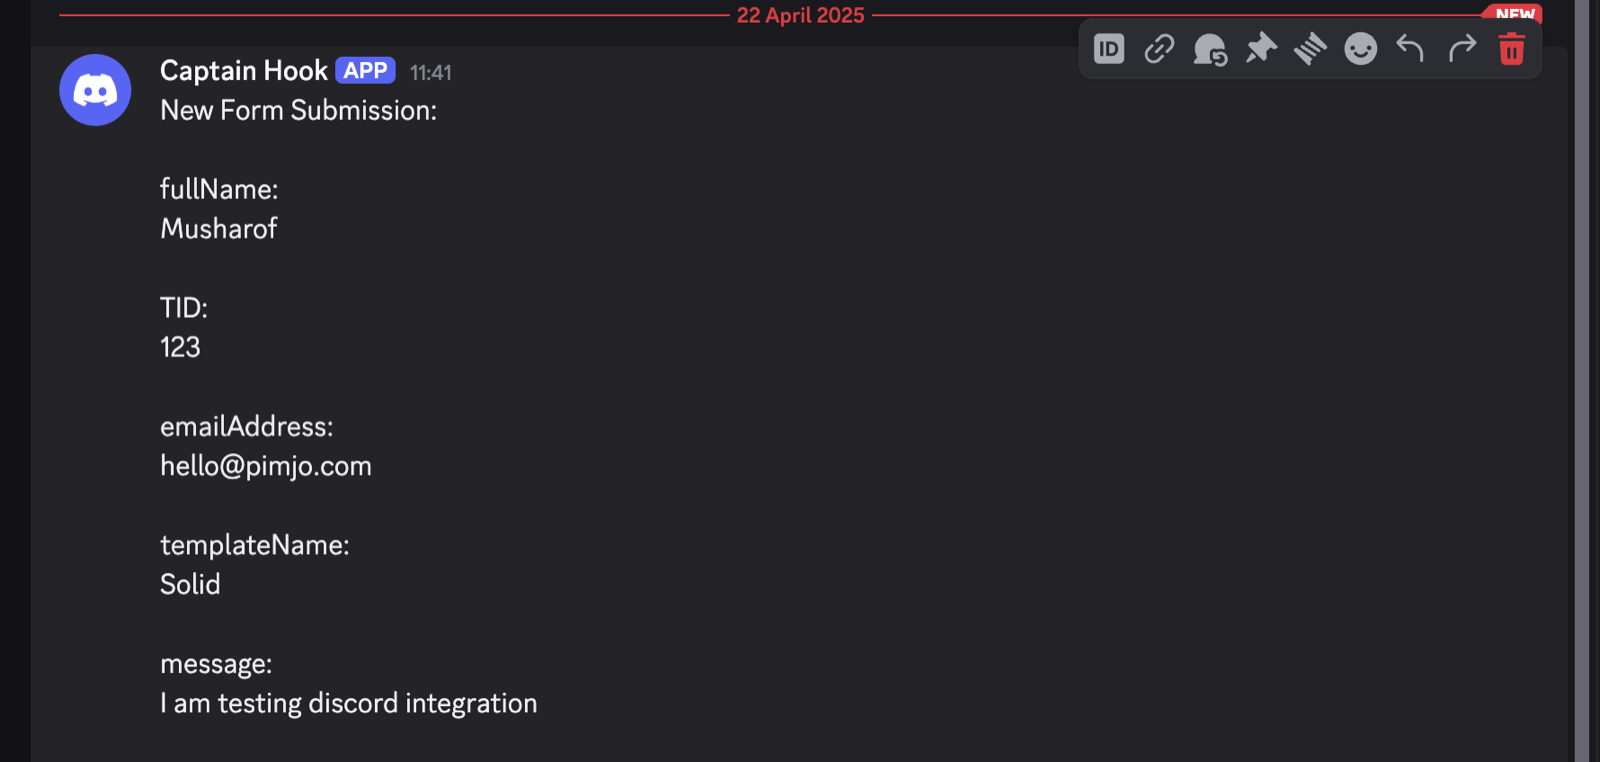
Test the integration by sending a test message by submitting your form. To change the channel later, disconnect and reconnect the app with a new webhook.
Mailchimp
Connect your FormBold form to Mailchimp to automatically sync form submissions with the Mailchimp audience.
Follow these steps:
Step 1: First, log in to your Mailchimp account. Once you’re in:
-
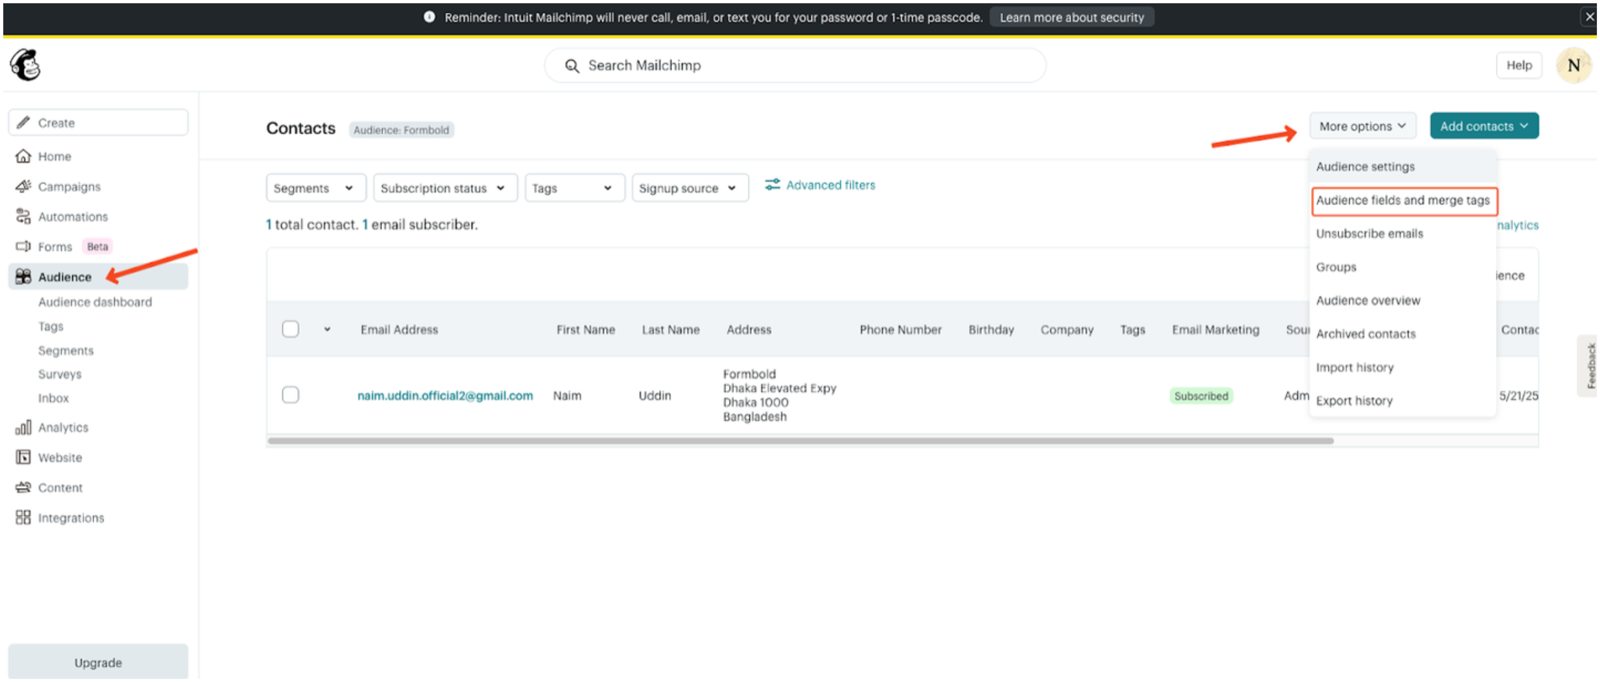
Go to the Audience section from the left sidebar.
-
Click Audience dashboard to view and manage form fields.
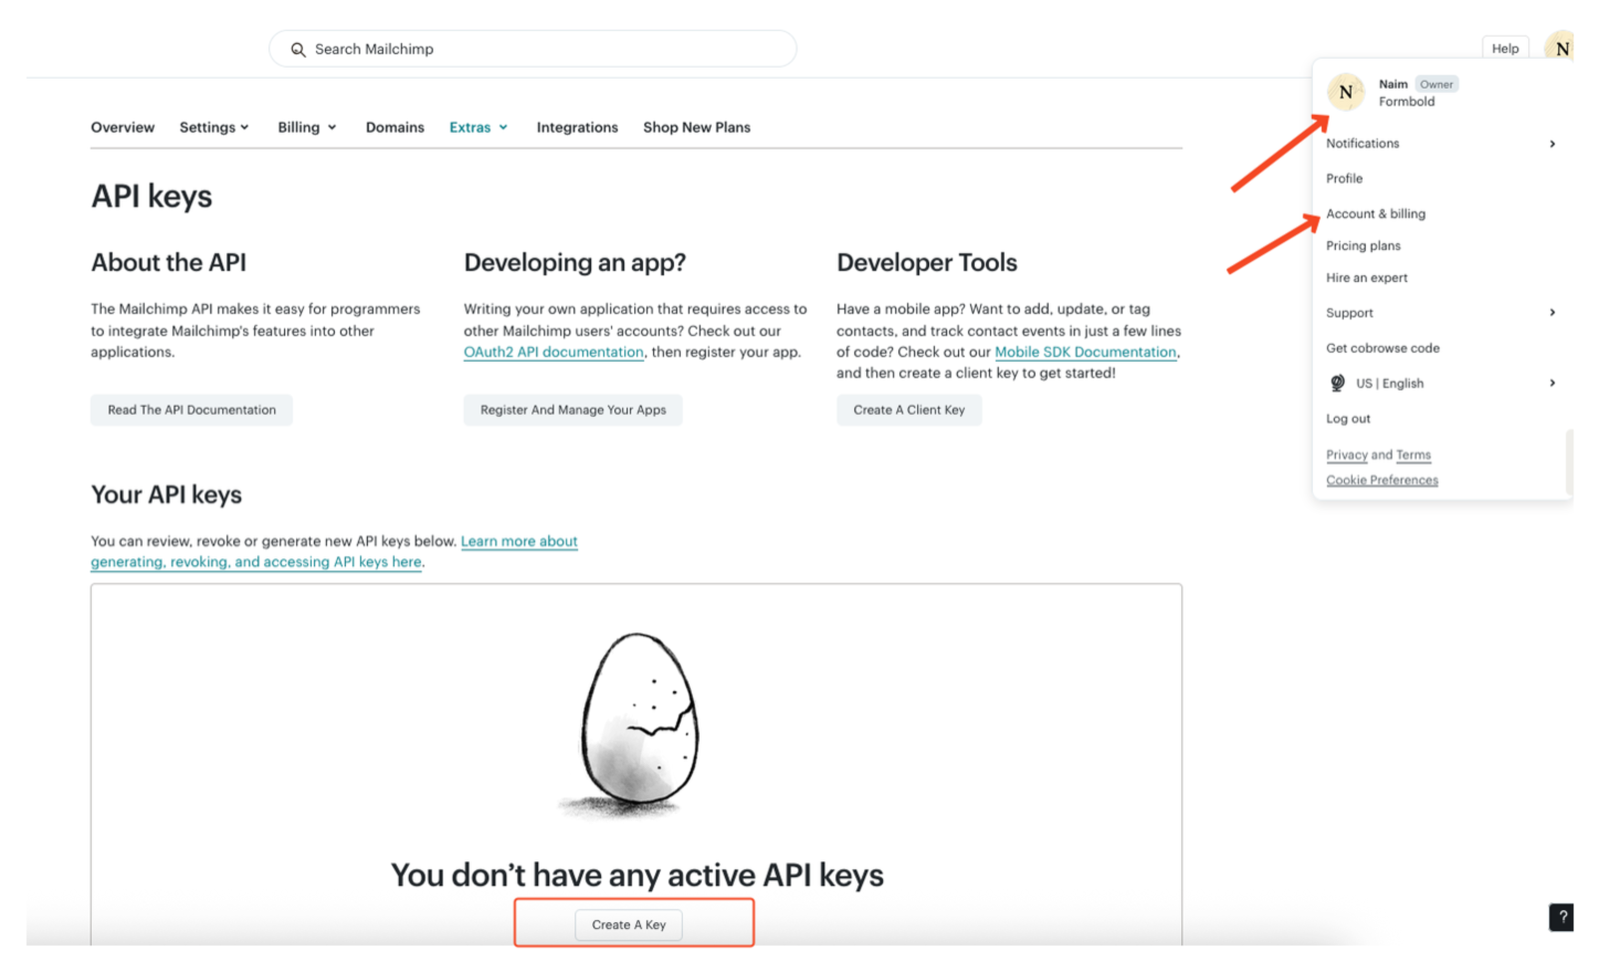
Step 2: Create an API Key
-
Click your profile icon (bottom left) → Account → Extras → API Keys
-
Create a new key if needed and copy it for later.
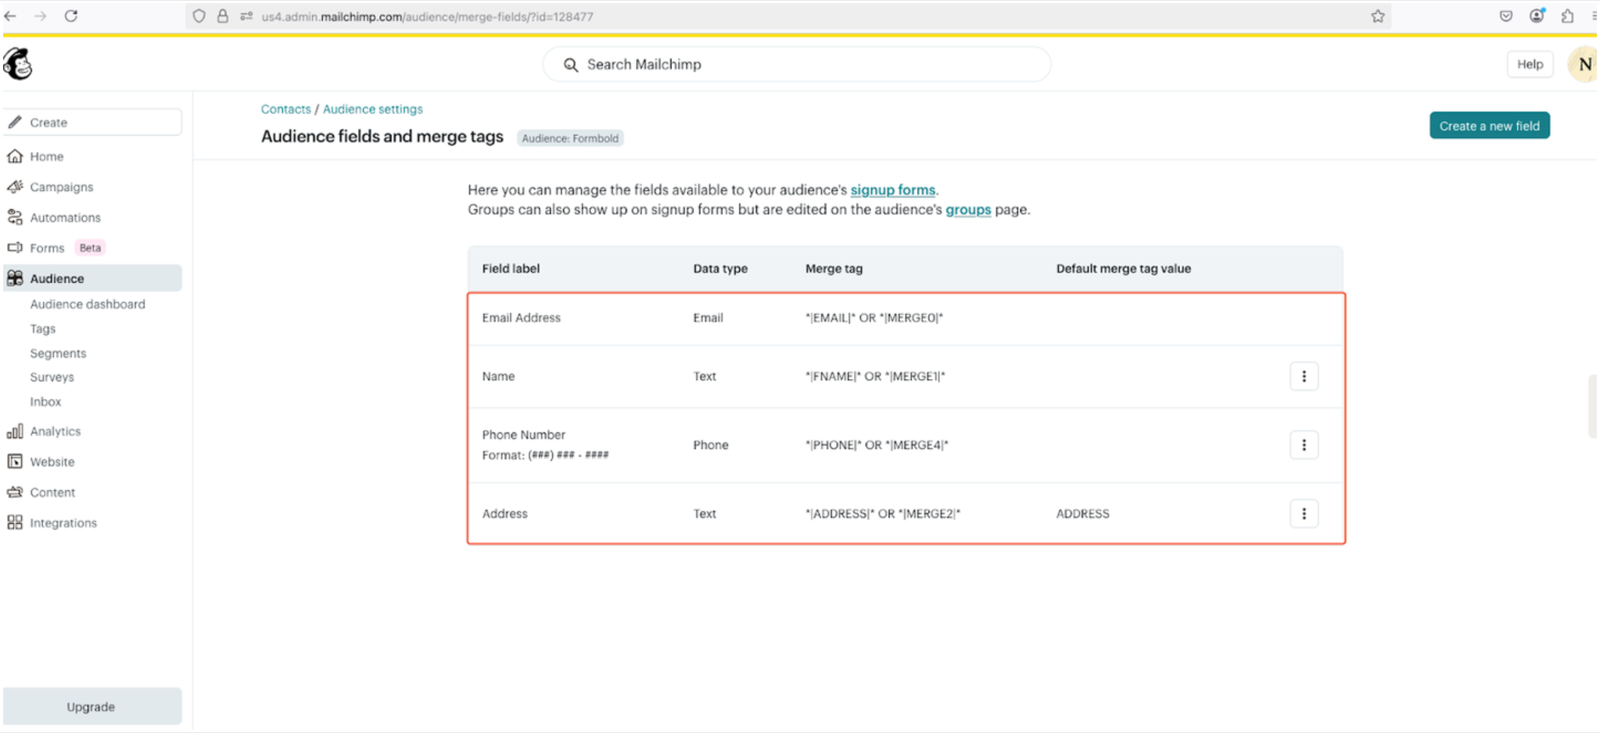
Step 3. Configure Audience Fields
Update your Mailchimp fields to match your form.
-
Delete old fields: Click the three-dot menu next to each row and remove existing fields.
-
Add these fields:
-
Email Address: Type – Email, Merge tag –
*|EMAIL|*or*|MERGE0|* -
Name: Type – Text, Merge tag –
*|FNAME|*or*|MERGE1|* -
Phone Number: Type – Phone, Merge tag –
*|PHONE|*or*|MERGE4|* -
Address: Type – Text, Merge tag –
*|ADDRESS|*or*|MERGE2|*, Default – “ADDRESS”
-
You’re All Set!
Step 4: Once your Mailchimp fields are ready and your API Key is created, you can connect this in FormBold by:
-
Going to your Form Settings → Apps → Mailchimp
-
Paste your API Key and select the audience
-
Map form fields using the Field Mapper
Step 5: Test Integration: Submit a test form and check Mailchimp to confirm the sync.
Zendesk
Connect FormBold form with Zendesk to automatically create support tickets, manage leads, or sync customer data via the Zendesk API.
Follow these steps:
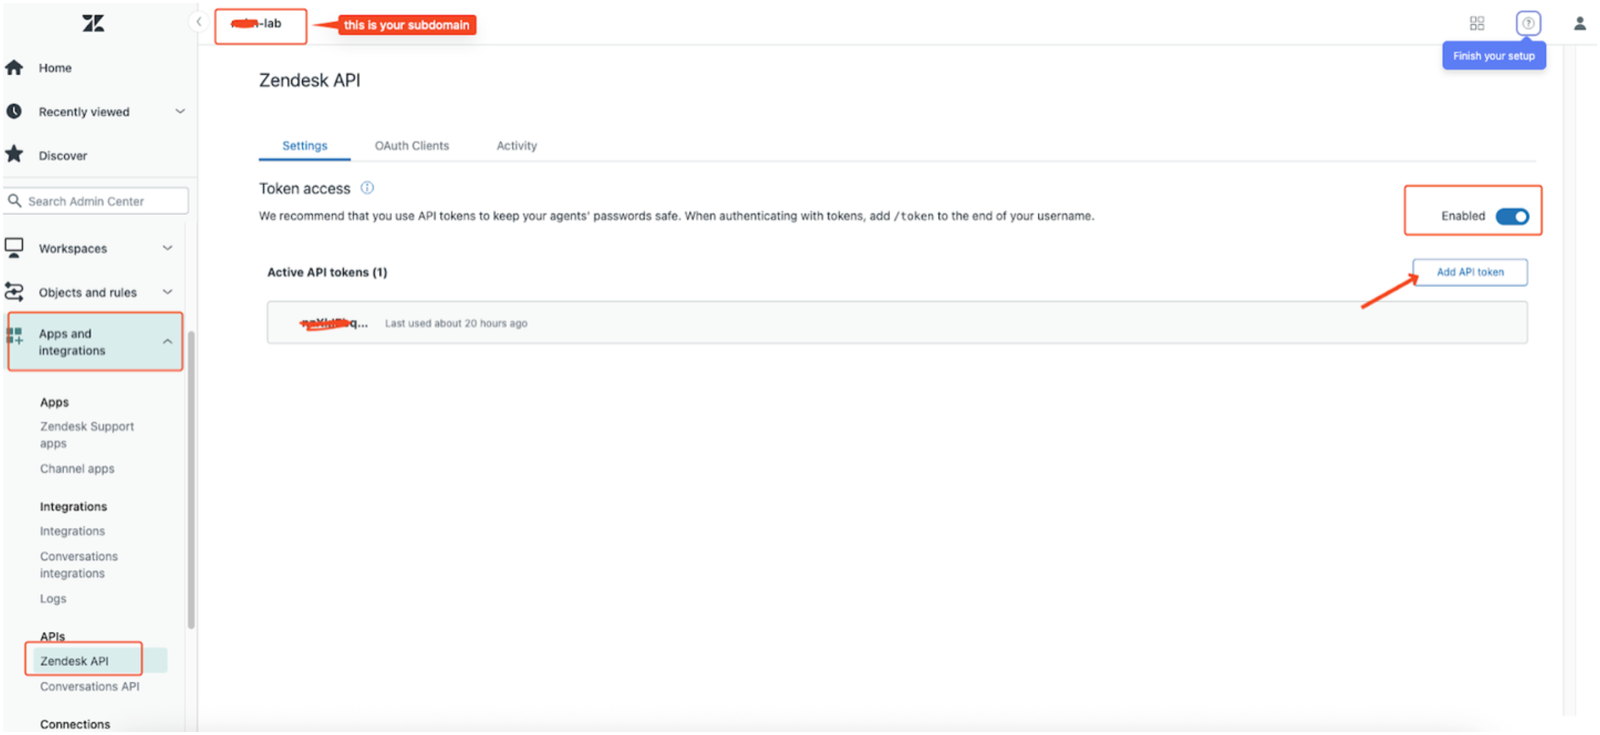
Step 1: Find Your Zendesk Subdomain
Subdomain uniquely identifies your workspace and is required for all API calls.
-
Go to your Zendesk Admin Center
-
Check the URL in your browser
Example:
https://abc-lab.zendesk.com→ Subdomain:abc-lab
Step 2: Get Your Primary Zendesk Email
You’ll need your primary Zendesk email for API authentication.
- Click your profile icon (top-right) → View Profile
- Under the Account tab, note your primary email address
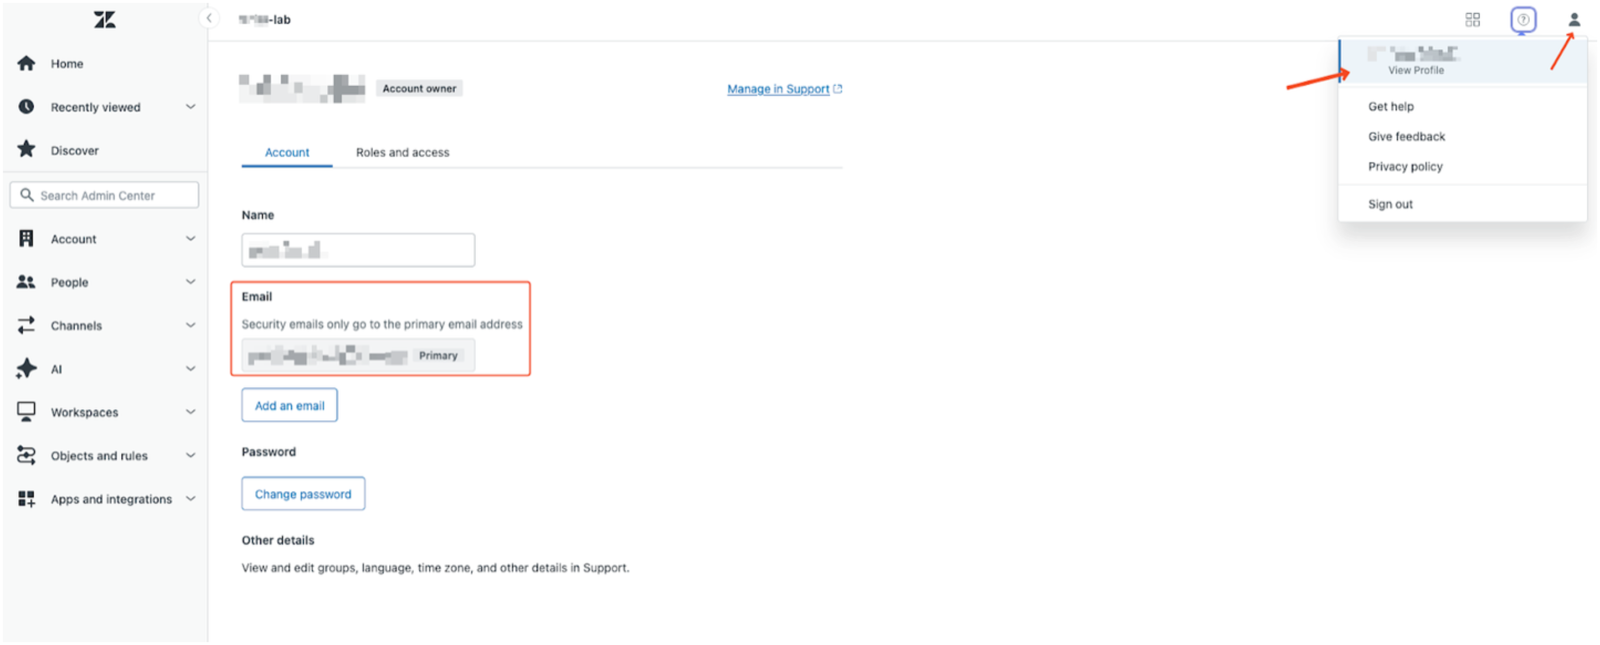
We will use this email when setting up the API connection inside FormBold.
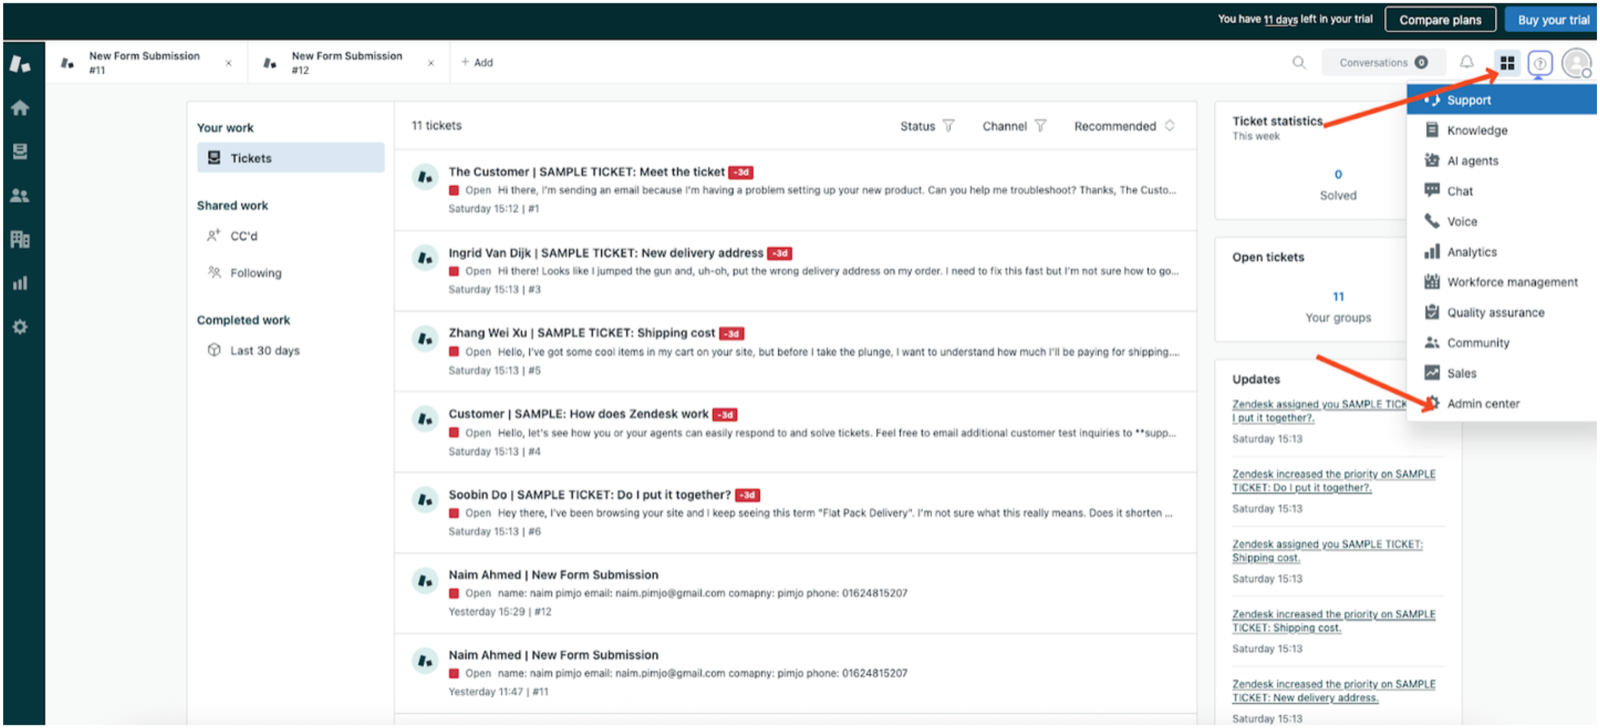
Step 3: Generate an API Token
Zendesk uses tokens instead of passwords for secure API access.
-
Click the grid icon (top-right) → Admin Center
-
Navigate to:
Apps and integrations → APIs → Zendesk API
-
Enable Token Access (toggle ON)
-
Click Add API Token
-
Give it a name (e.g.,
FormBold Integration) -
Copy and store the generated token safely
⚠️ You won’t be able to view it again
we’ll use this in combination with the email for API authentication.
Step 4: Connect Zendesk in FormBold
Make sure you have:
- Your Zendesk subdomain
- Your primary email
- The API token
Then:
- Go to Form Settings in FormBold
- Open the Apps tab → Select Zendesk
- Paste in the details and map the form fields
Submit a test form entry to make sure Zendesk integration is working correctly.
Make (Formerly Integromat)
Connect the FormBold form to Make.com to automate actions like sending form submissions to Google Sheets, CRMs, or other supported apps.
Follow these steps:
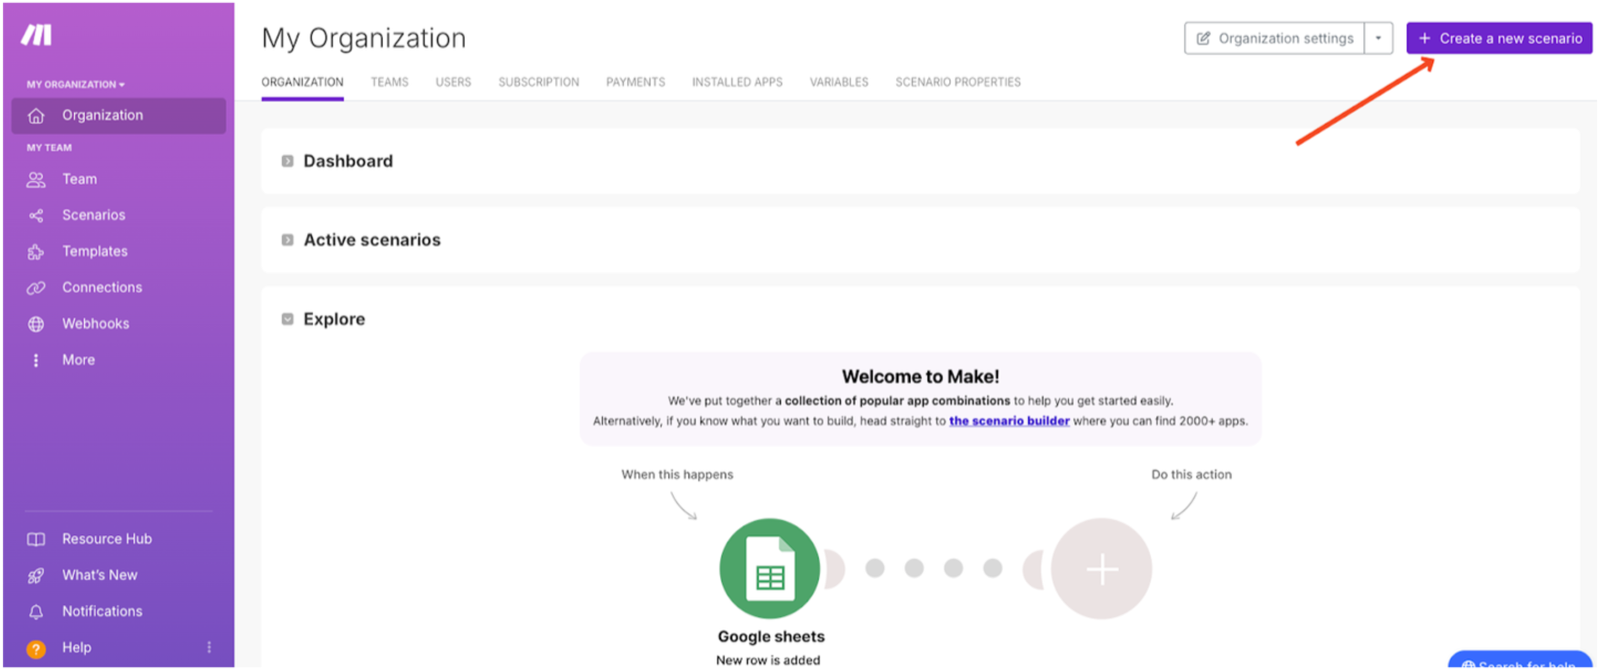
Step 1: Create a New Scenario
- Log in to Make.com
- Click New scenario to open the scenario editor
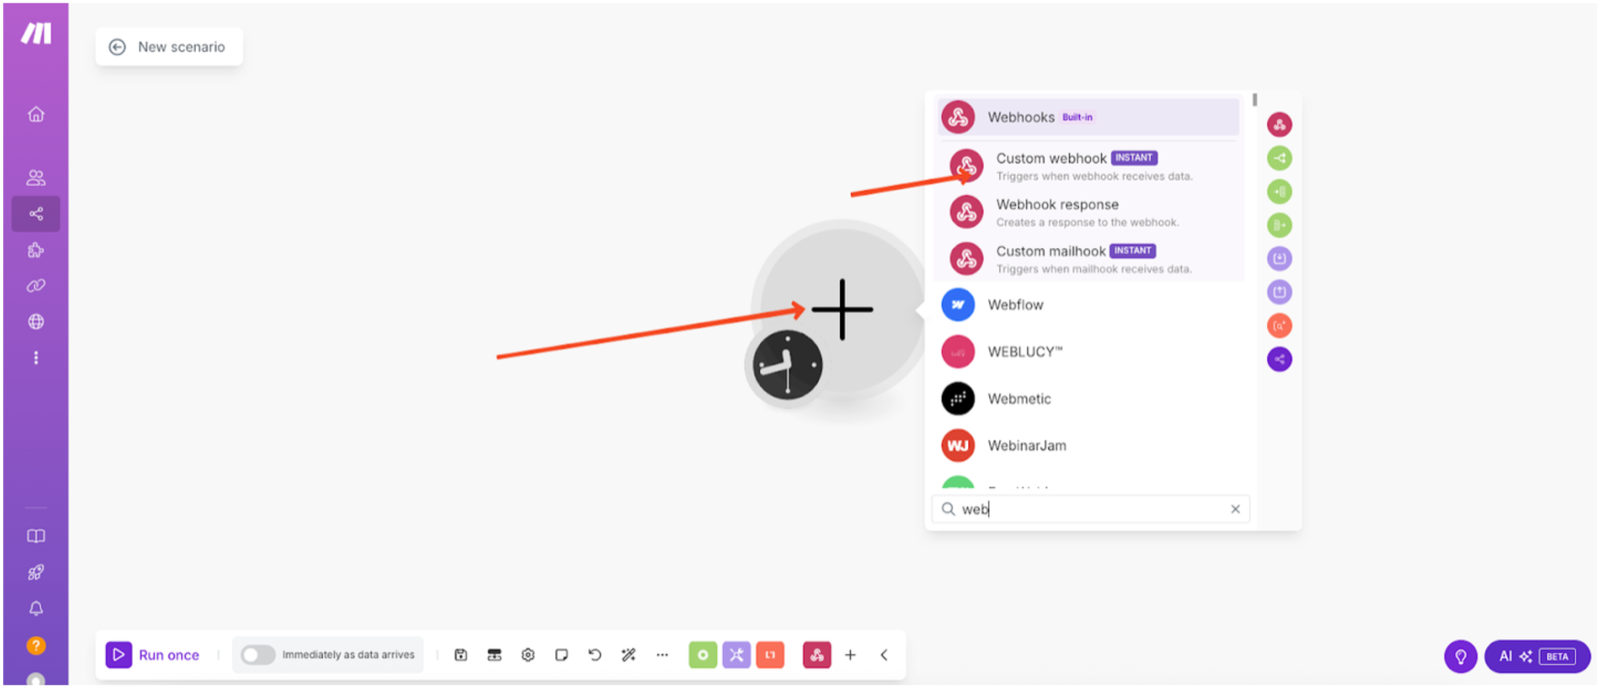
Step 2: Add a Webhook Module
- Click the + icon
- Search for Webhooks → Select Custom Webhook
- Click Create a webhook
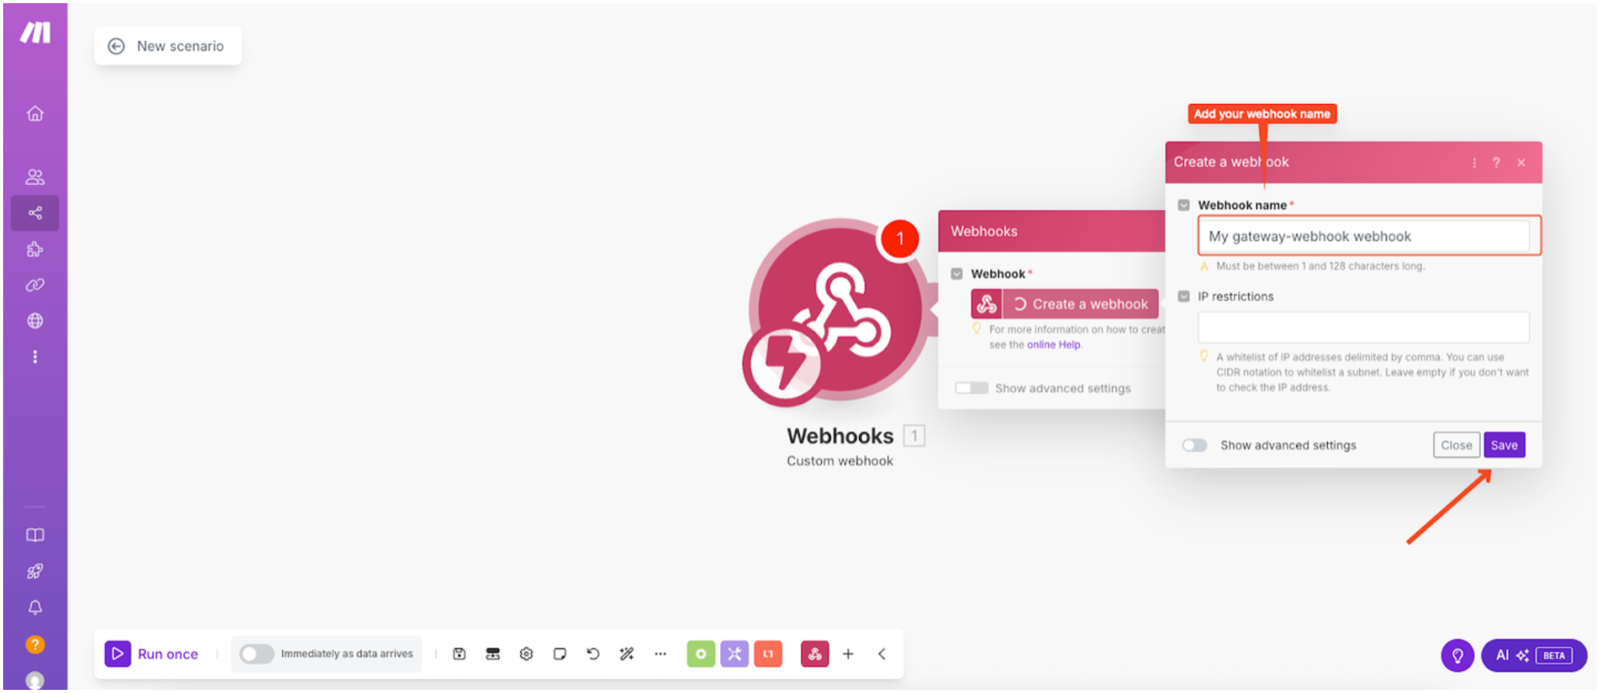
Step 3: Configure the Webhook
- Enter a webhook name (e.g.,
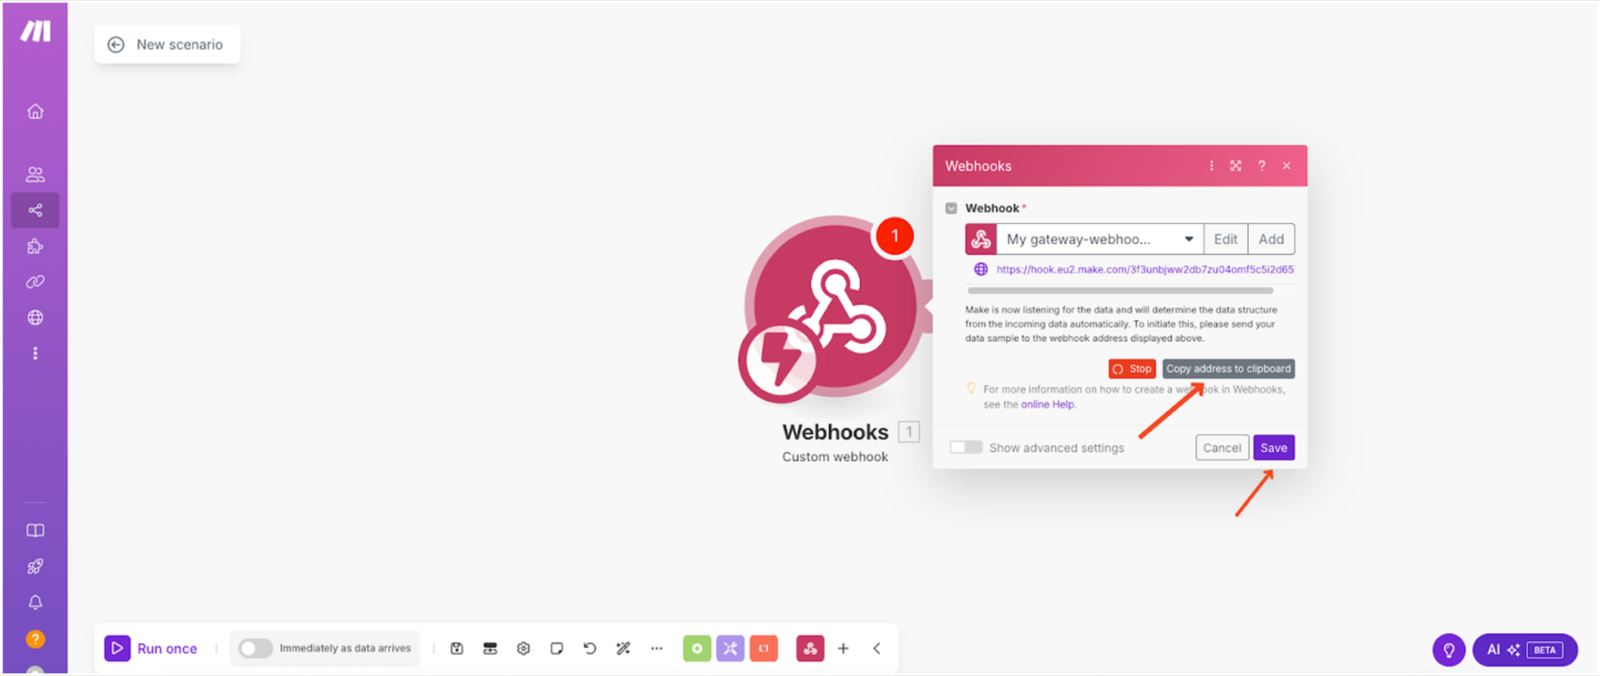
formbold-webhook) - Click Save to generate the webhook URL
- Copy the URL (e.g.,
https://hook.eu2.make.com/xxxxxx) - Submit a test form in FormBold to capture the data structure
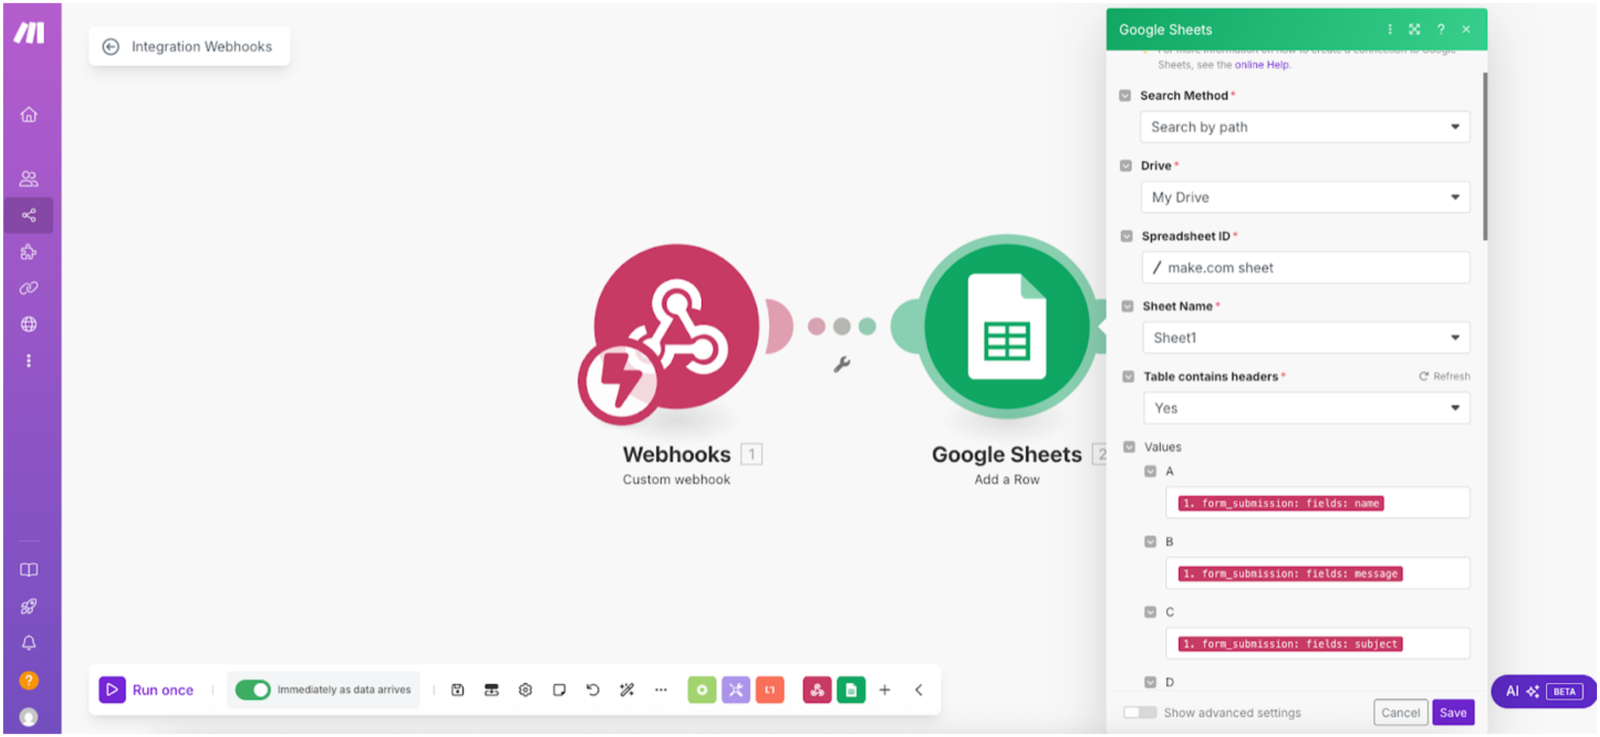
Step 4: Connect Google Sheets
- Click the + icon to add another module
- Search for Google Sheets → Select Add a Row
- Configure:
- Connection: Connect your Google account
- Search Method: Select “Search by path”
- Drive: e.g., “My Drive”
- Spreadsheet: Choose your file
- Mapping: Map webhook fields to sheet columns
- Click Save
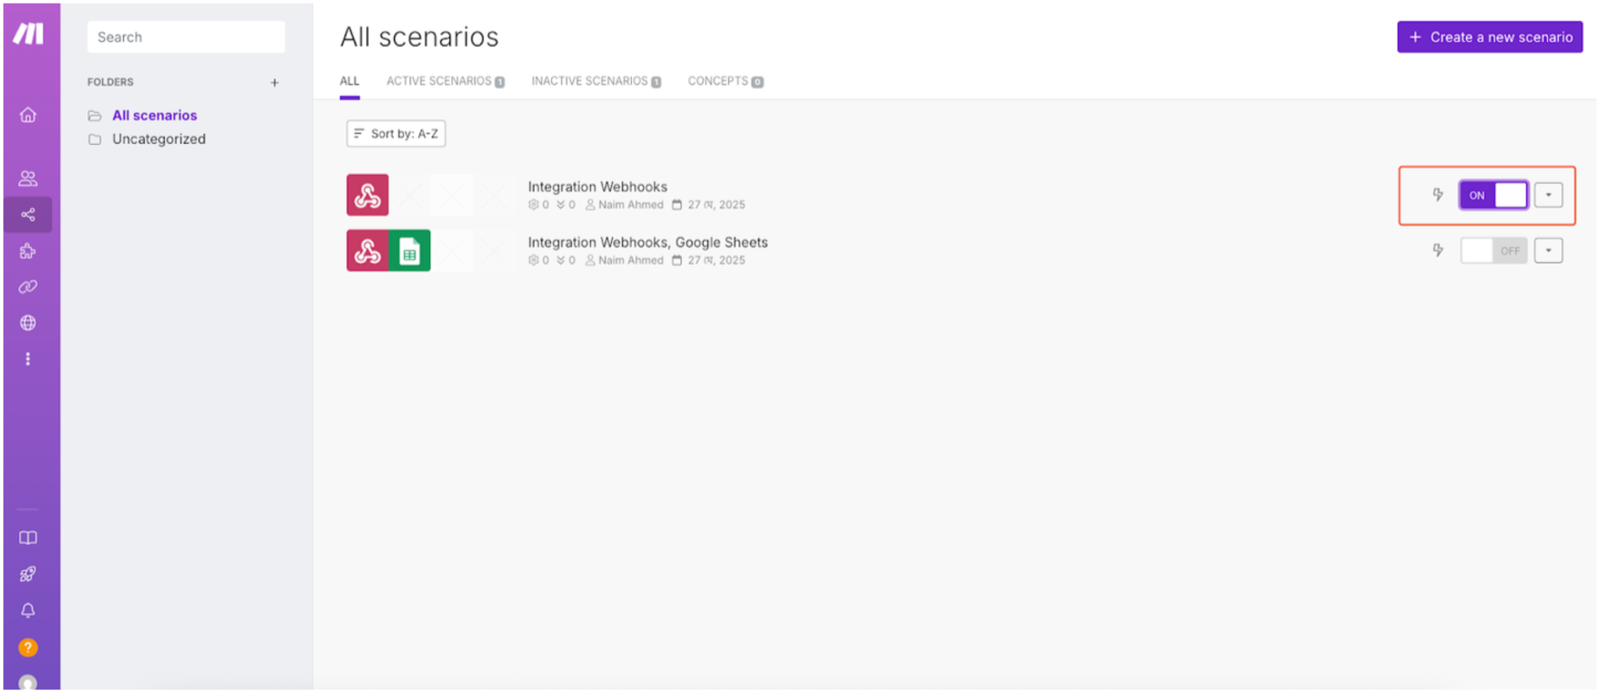
Step 5: Run and Automate
- Click Run once to test
- If successful, toggle Immediately as data arrives to enable automation
- Check the Google Sheet to confirm real-time data sync
Zapier
Use Zapier to connect the FormBold form to thousands of apps—like Google Calendar, Notion, and Trello—without writing code.
Follow these steps:
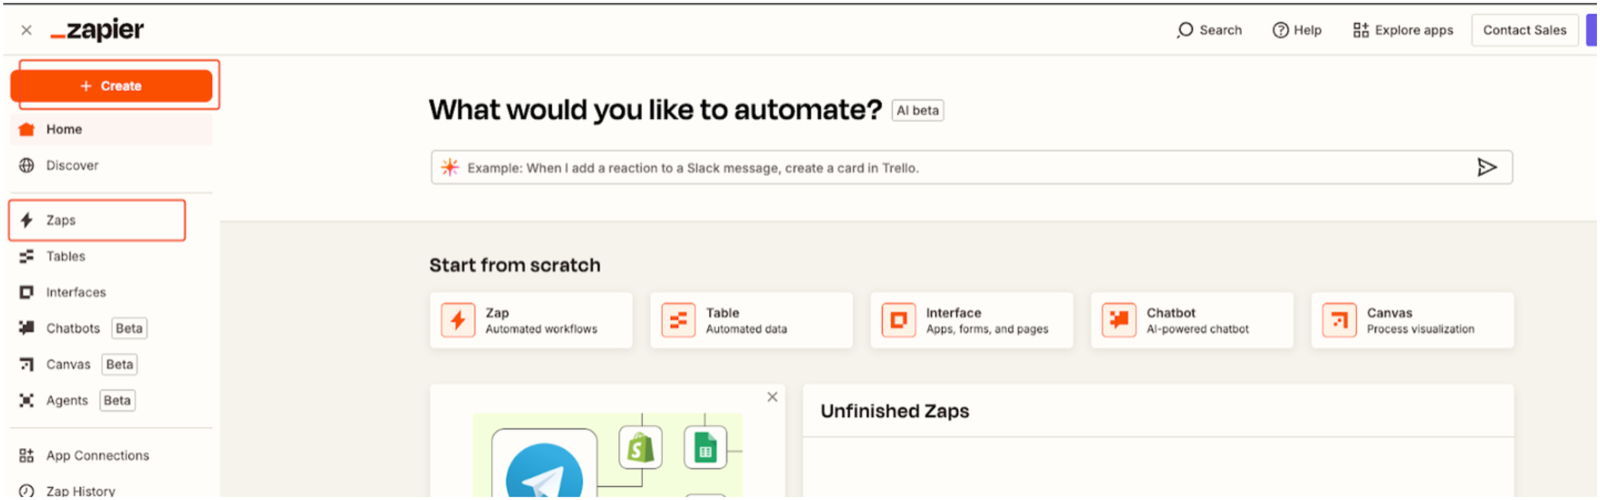
Step 1: Create a Zapier Account
Sign up at zapier.com if you don’t have an account.
Step 2: Create a Zap with Webhook Trigger
- From Zapier Dashboard, Click Create Zap
- Under Trigger, search for Webhooks by Zapier
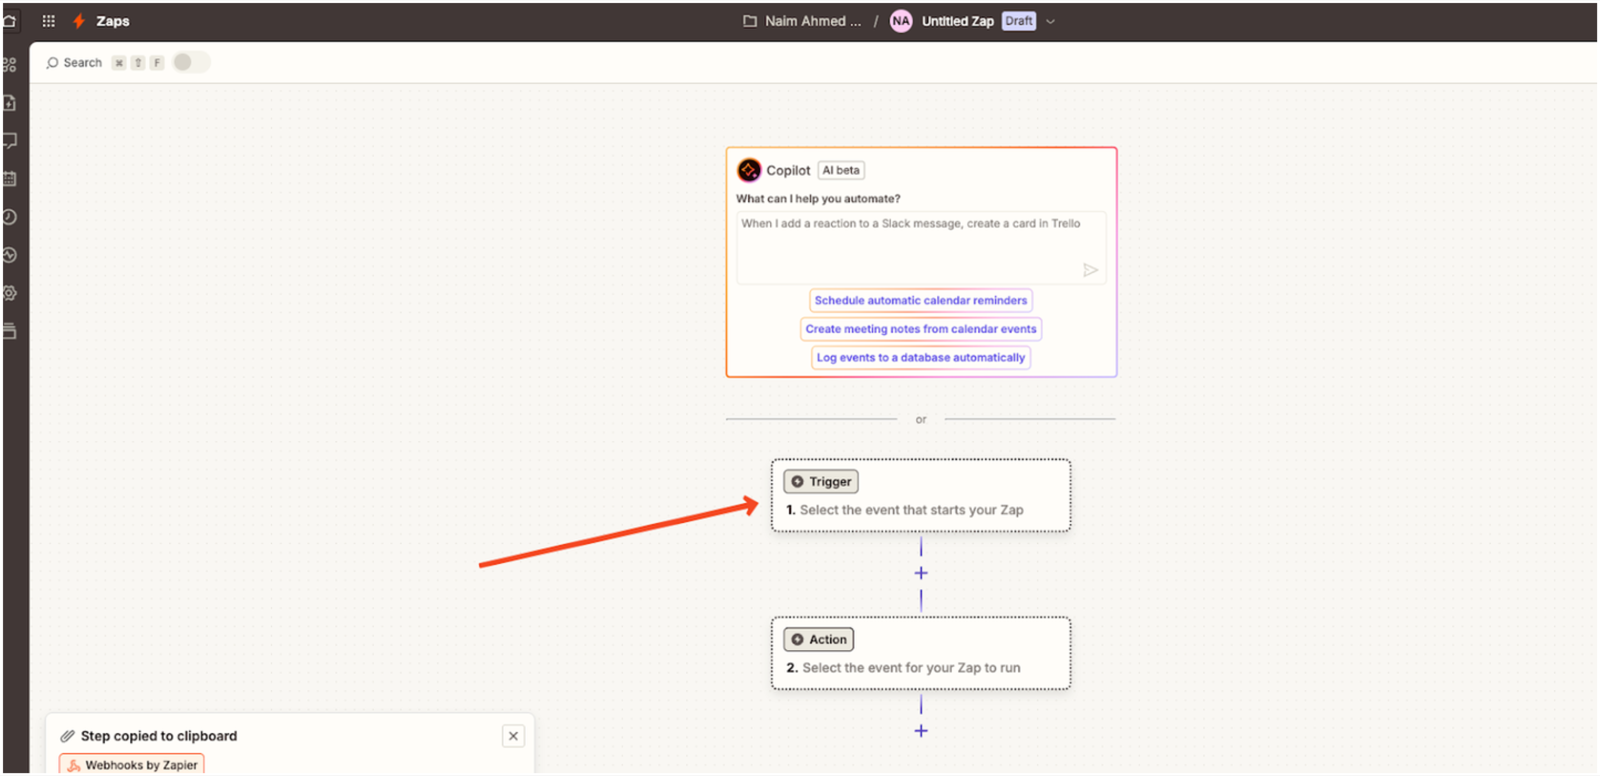

- Choose the Catch Hook event, this lets Zapier listen for incoming HTTP requests (like form submissions)
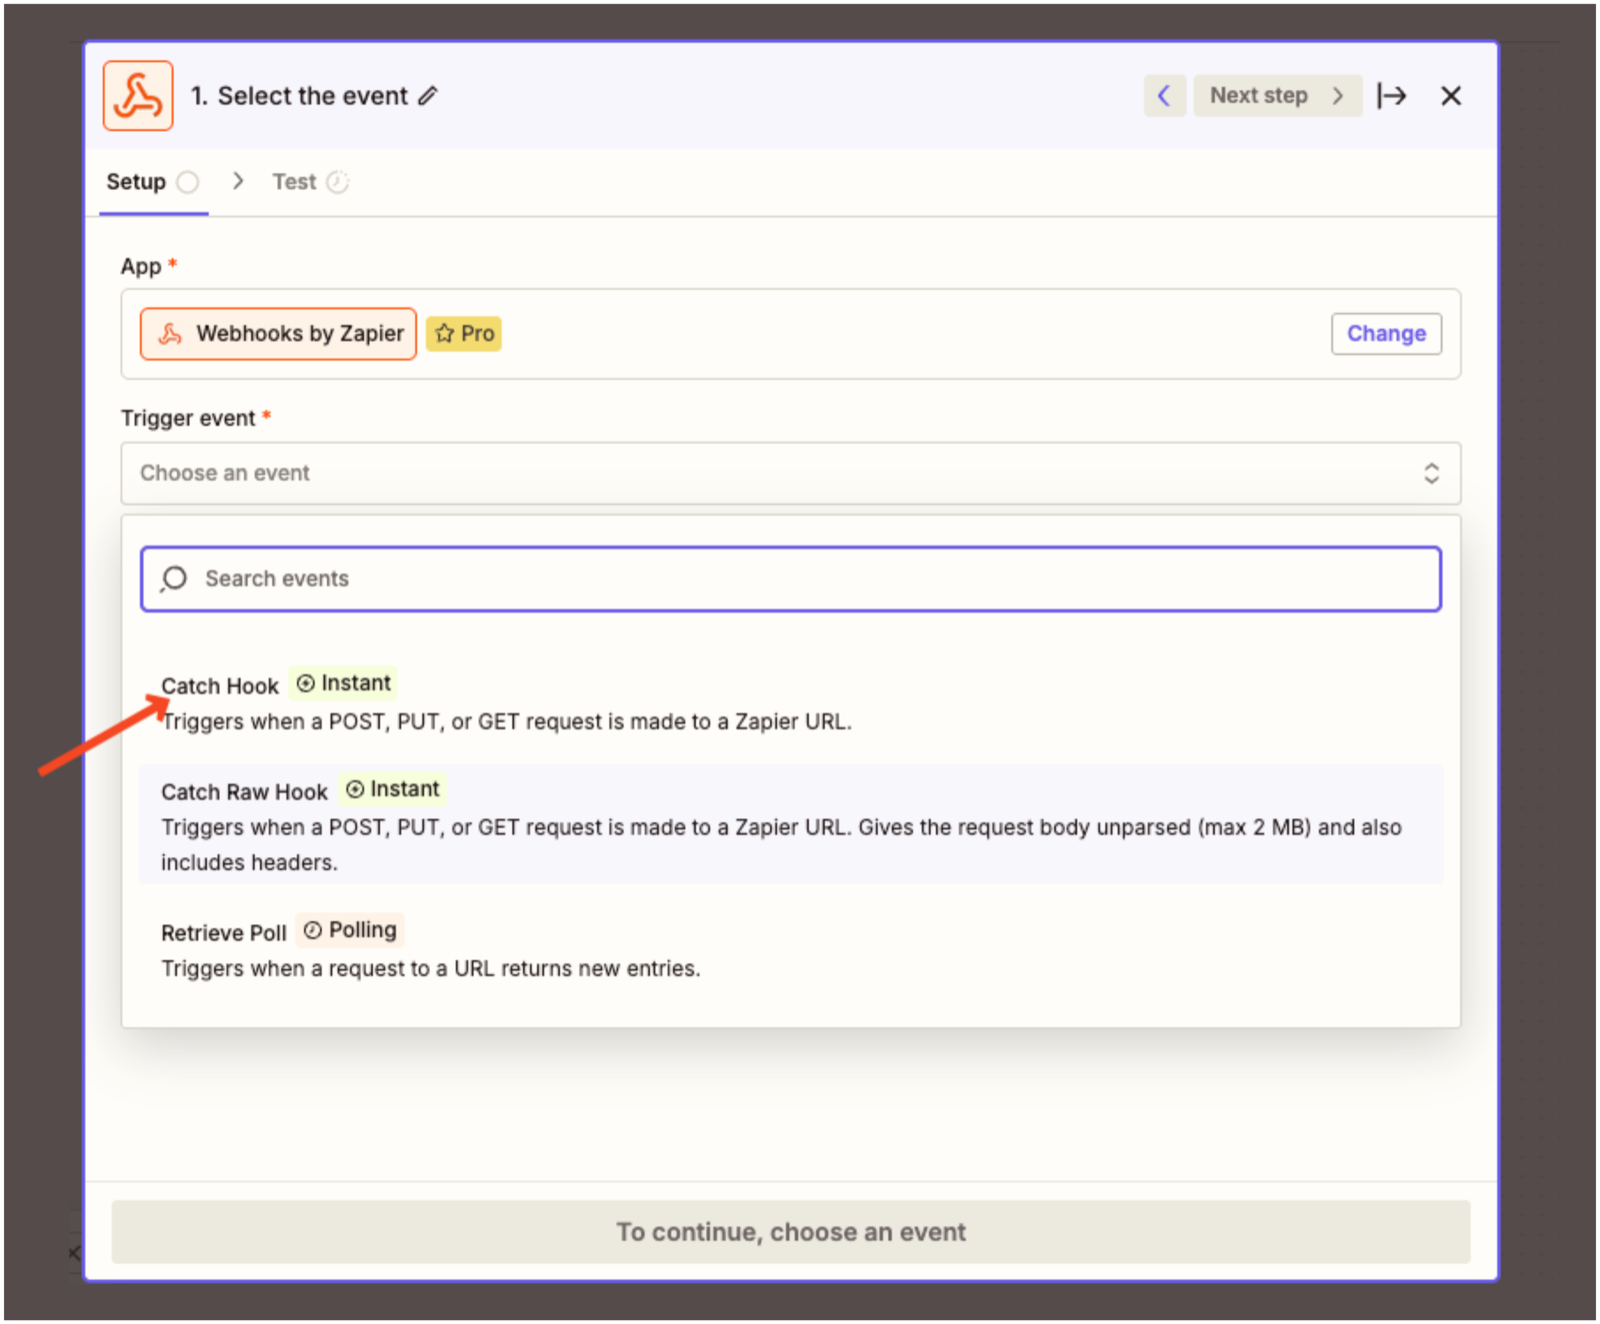
- Click Continue
Step 3: Copy the Webhook URL
-
Zapier will generate a unique Webhook URL
-
Click Copy to save it
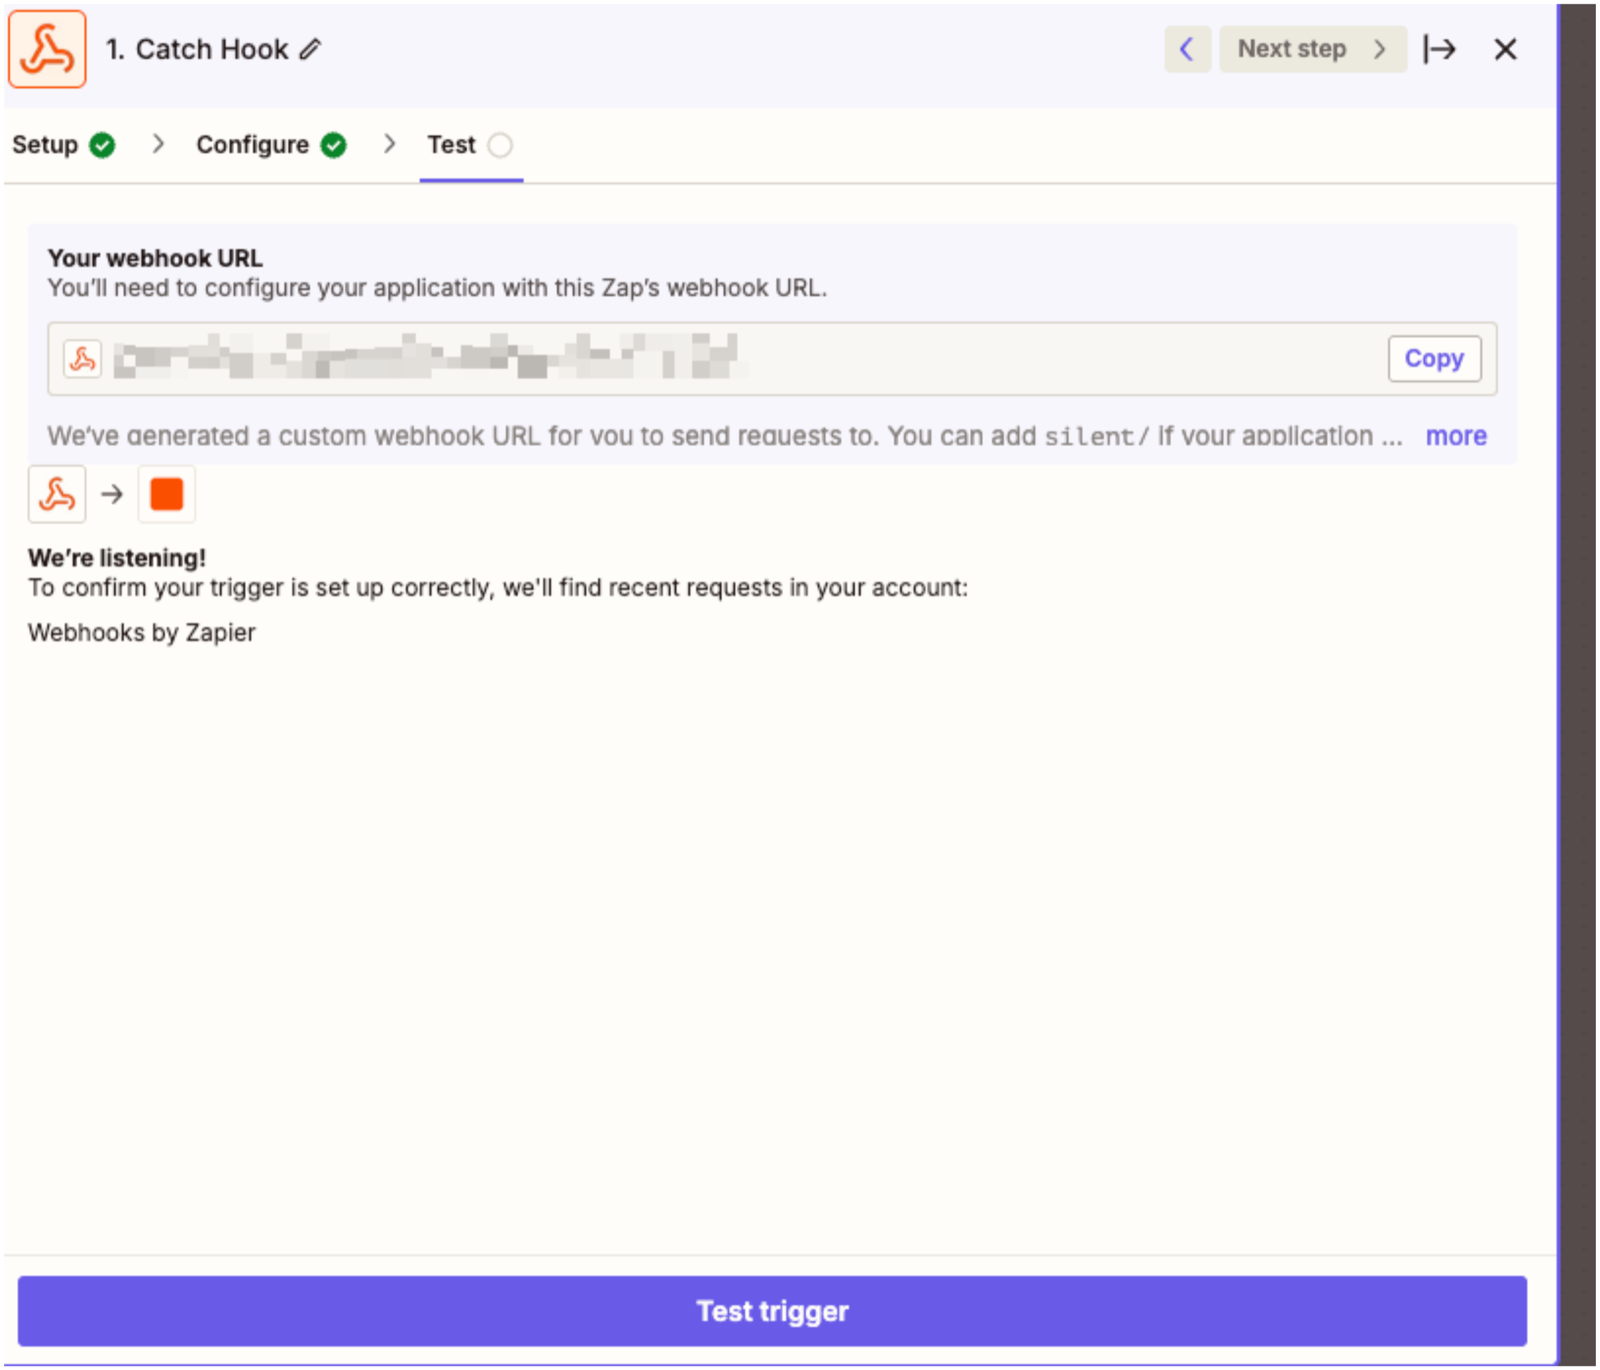
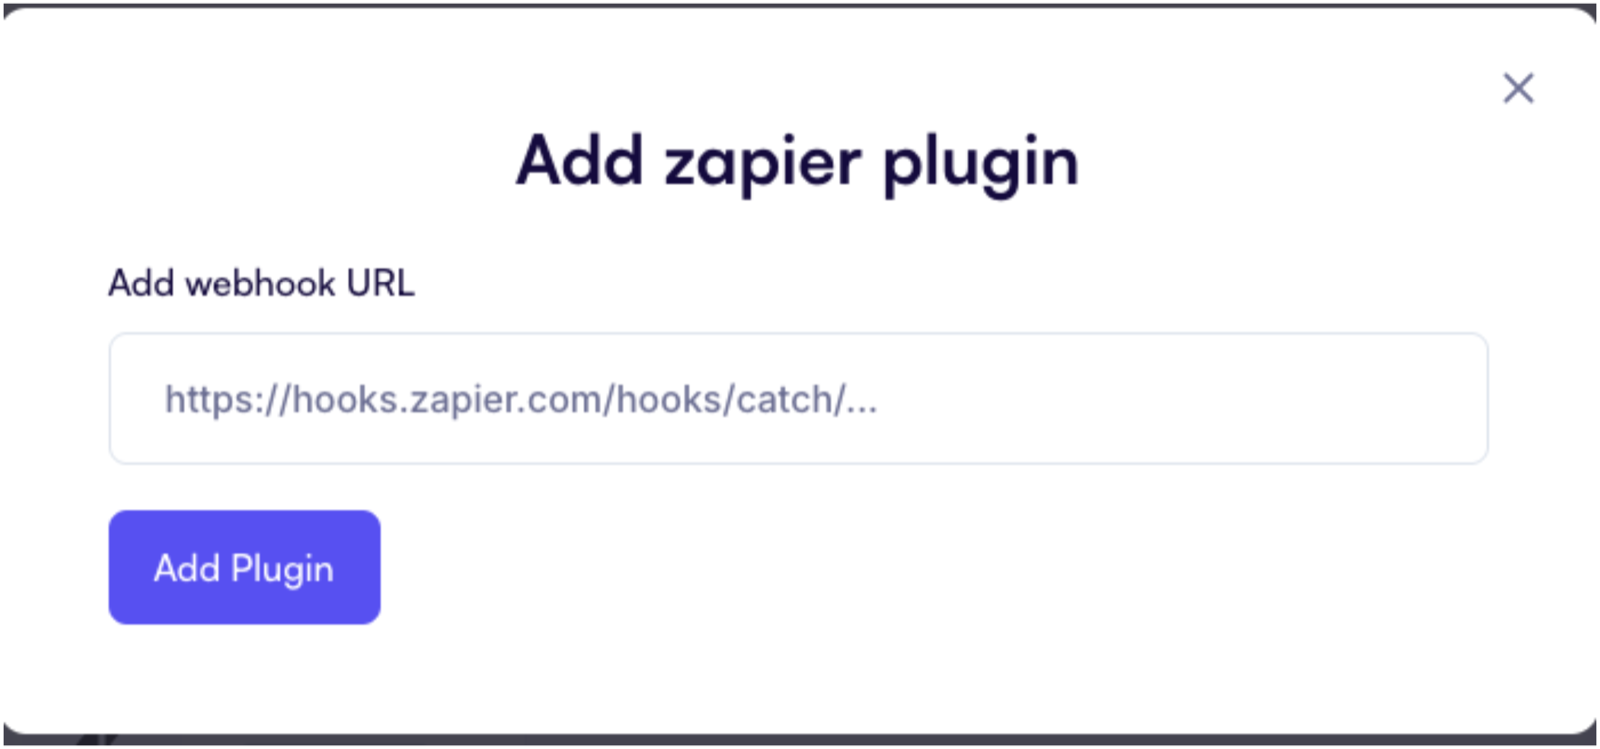
- Use this URL in the FormBold form to send a
POSTrequest
Tip: You can also test this URL with Postman or a cURL request before wiring it into your form.
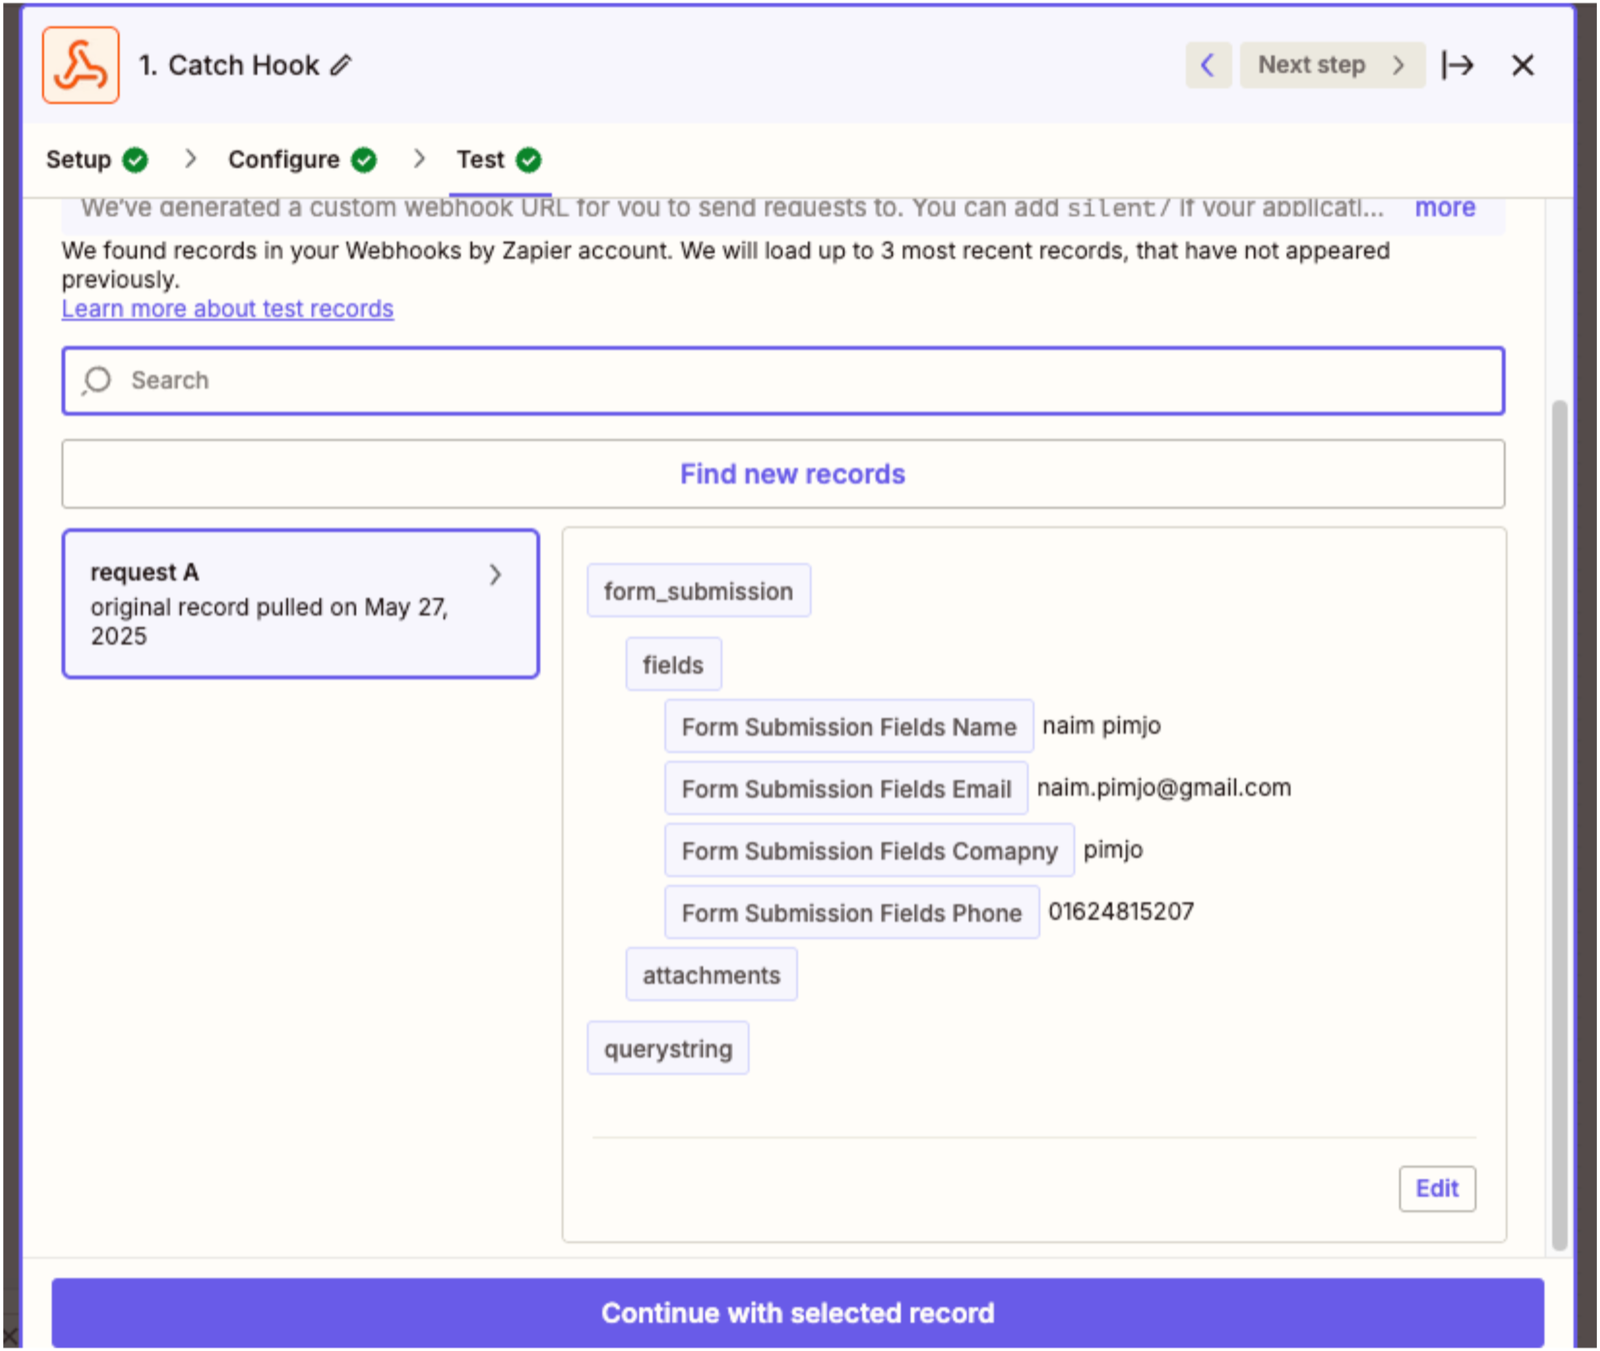
Step 4: Test the Webhook Trigger
- Submit a test form entry or send a test POST request to the copied URL
- In Zapier, click Test Trigger
- Confirm sample data is received
- Click Continue with selected record
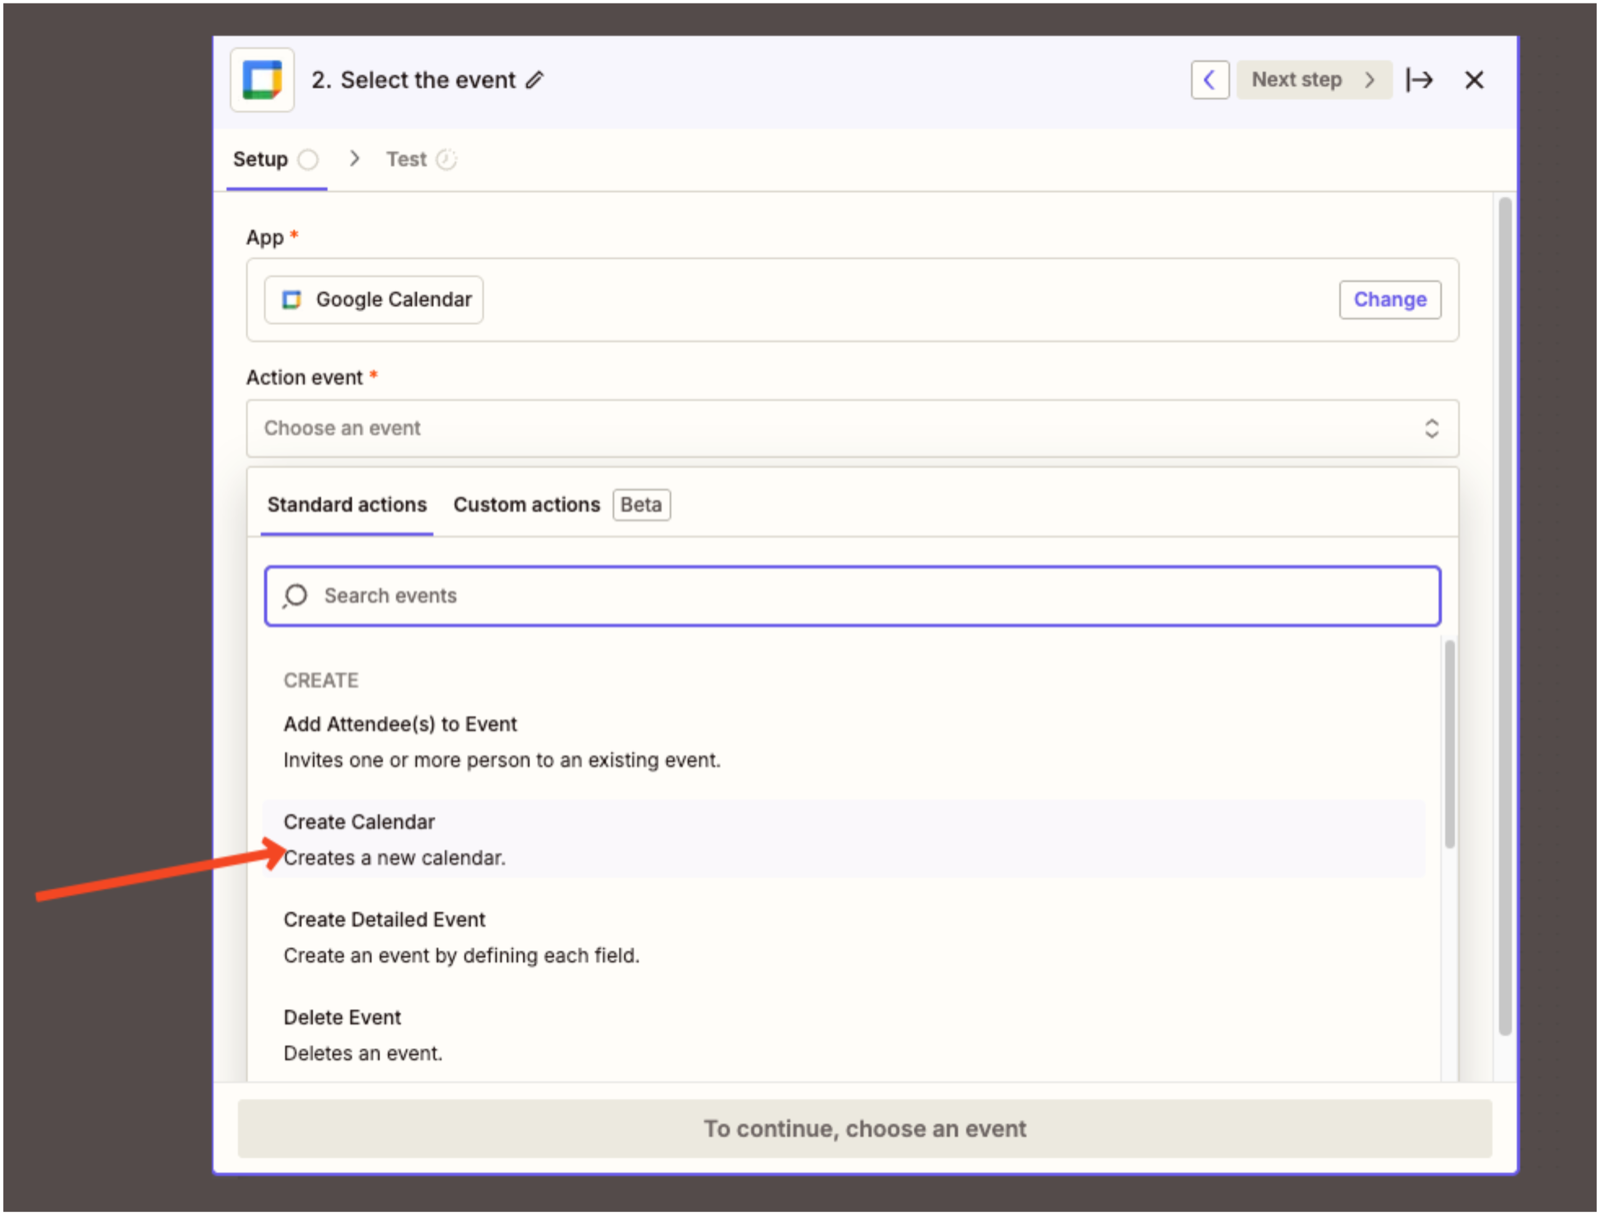
Step 5: Add Google Calendar as the Action
- Under Action, search for Google Calendar
- Select the Create Calendar event
- Click Continue
Step 6: Connect Google Account
- Sign in with your Google account
- Authorize access and Click Continue
Step 7: Map Calendar Fields Map your form fields to Google Calendar fields:
- Name → Form Submission Name
- Description → Add fields like:
- Email → Form Submission Email
- Company → Form Submission Company
- Phone → Form Submission Phone
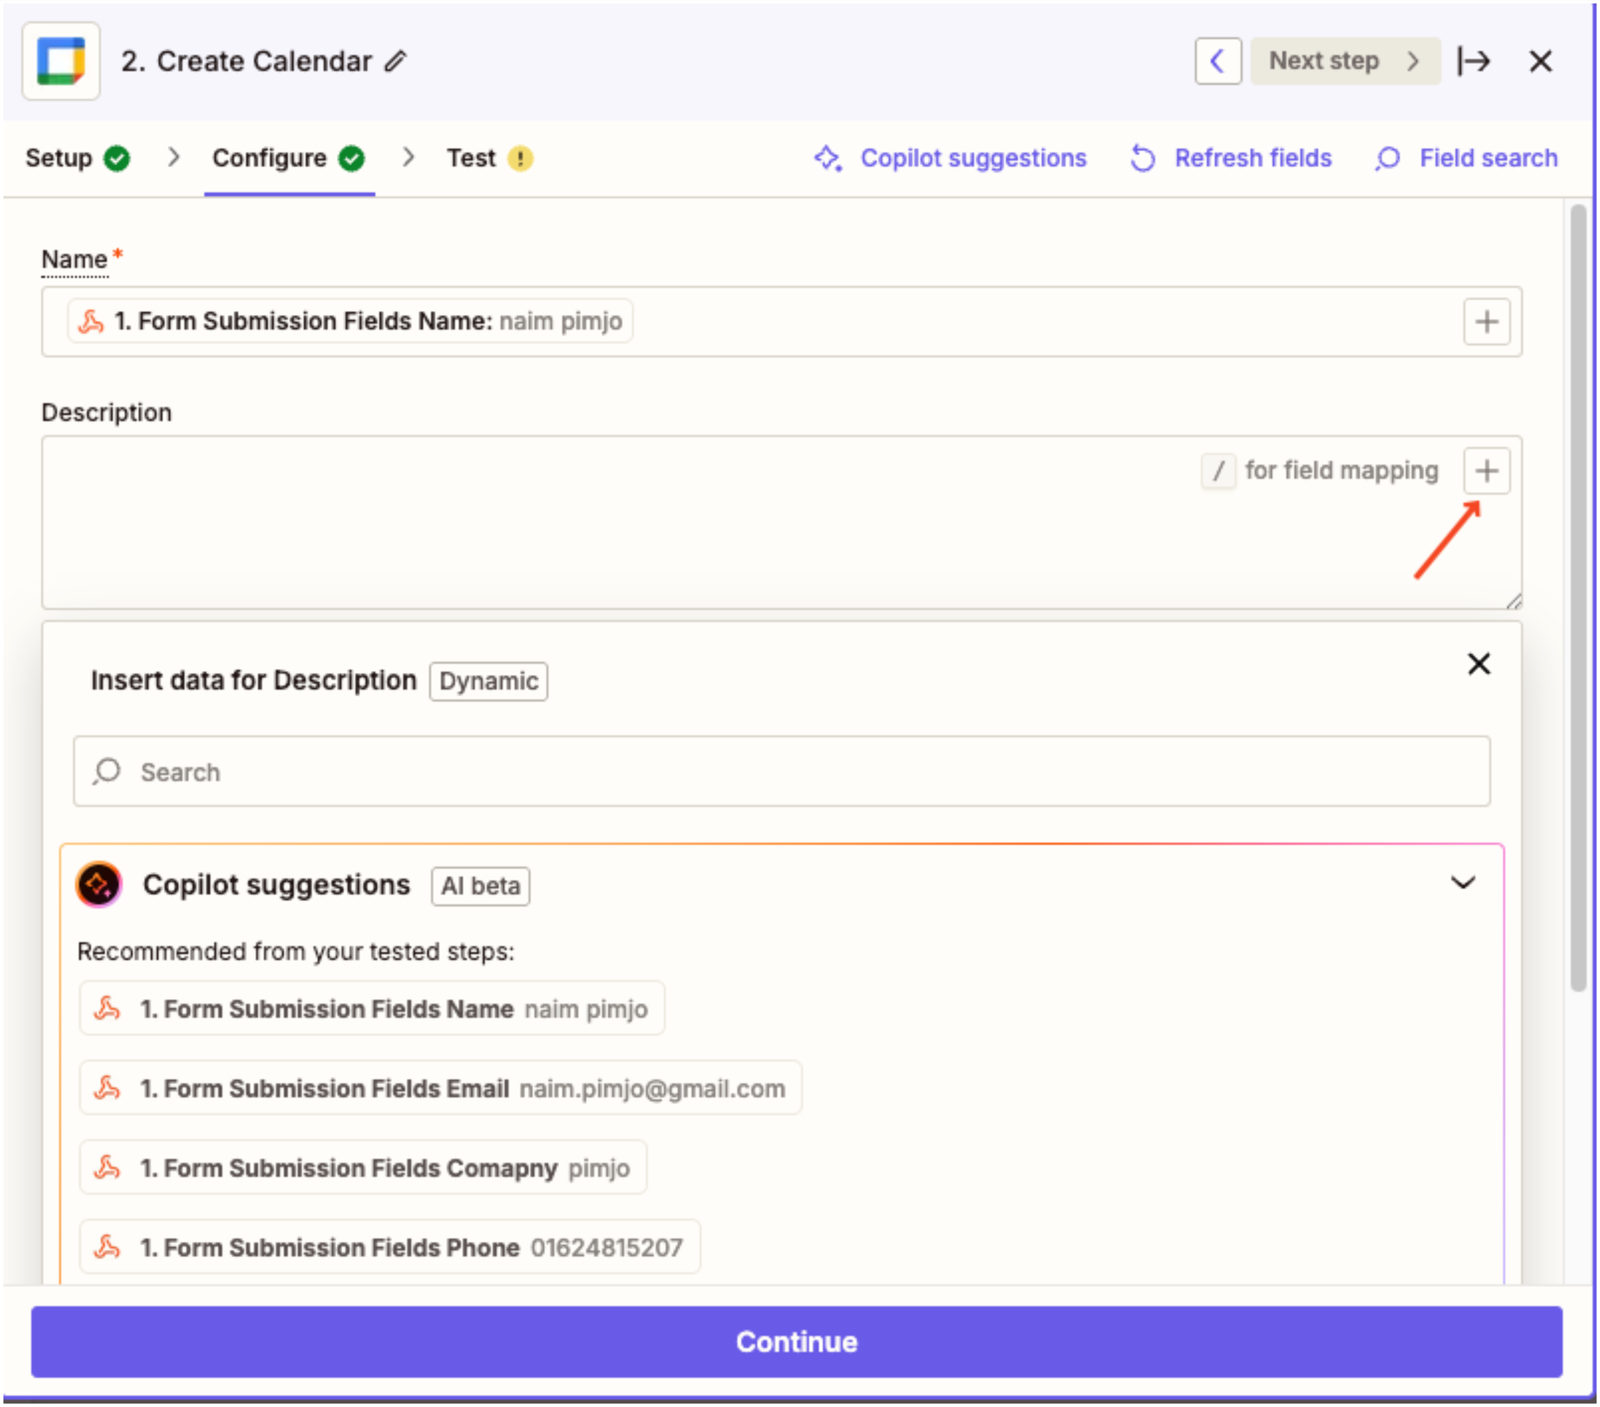
Use Copilot Suggestions in Zapier to auto-fill mappings.
Step 8: Test the Action
- Zapier will create a calendar entry based on your mapped data
- Check your Google Calendar to verify it’s working
Step 9: Publish Your Zap
- Click Publish to activate your Zap
- Your Zap will now trigger automatically on every form submission
You’ve successfully set up a live Zap that:
- Triggers on FormBold form submissions via Webhook
- Sends the data to Google Calendar as a new calendar or event
HubSpot
Connect the FormBold form to HubSpot to automatically send leads, contacts, or form data to your CRM.
Follow these steps:
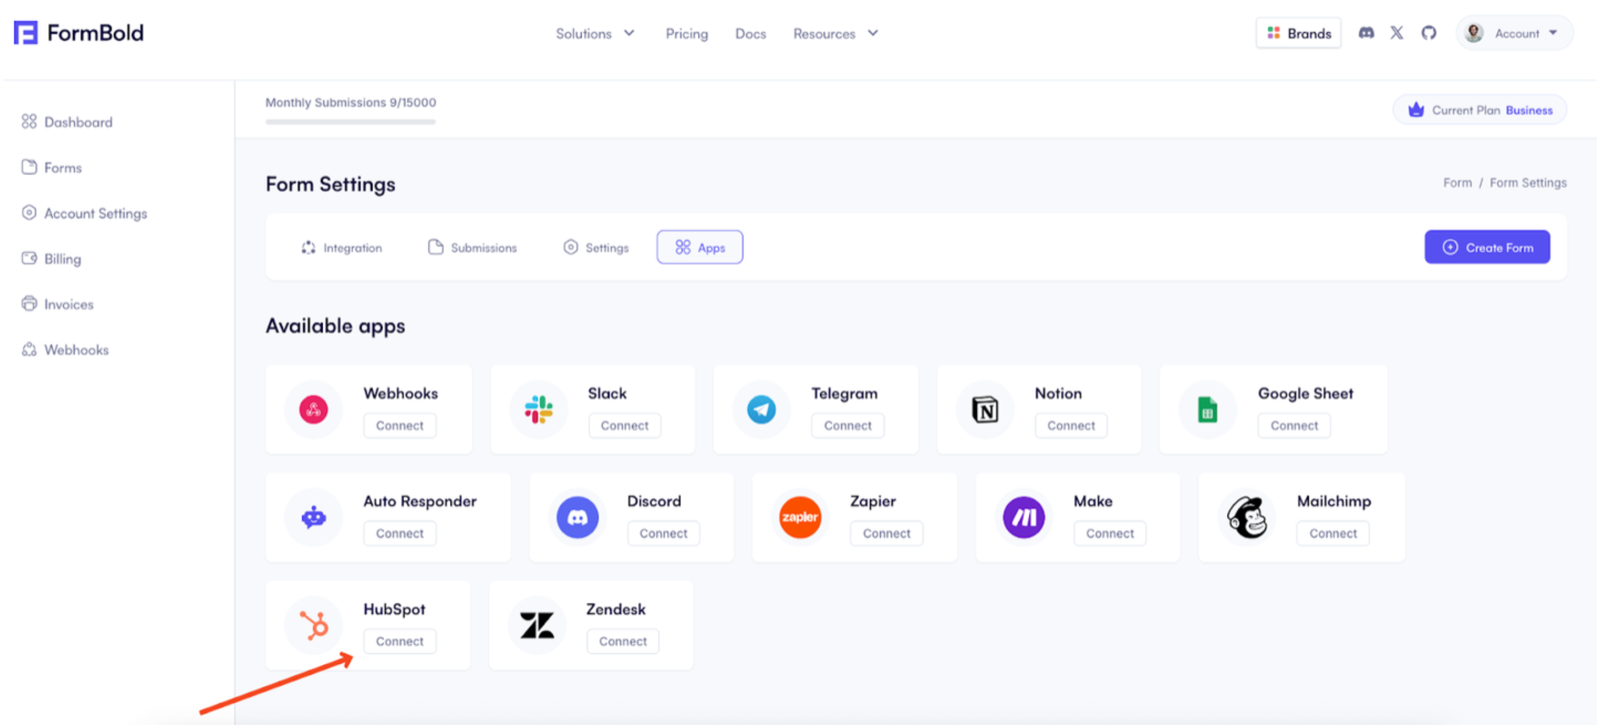
Step 1: Start the Integration
-
Go to Form Settings → Apps
-
Click the HubSpot button
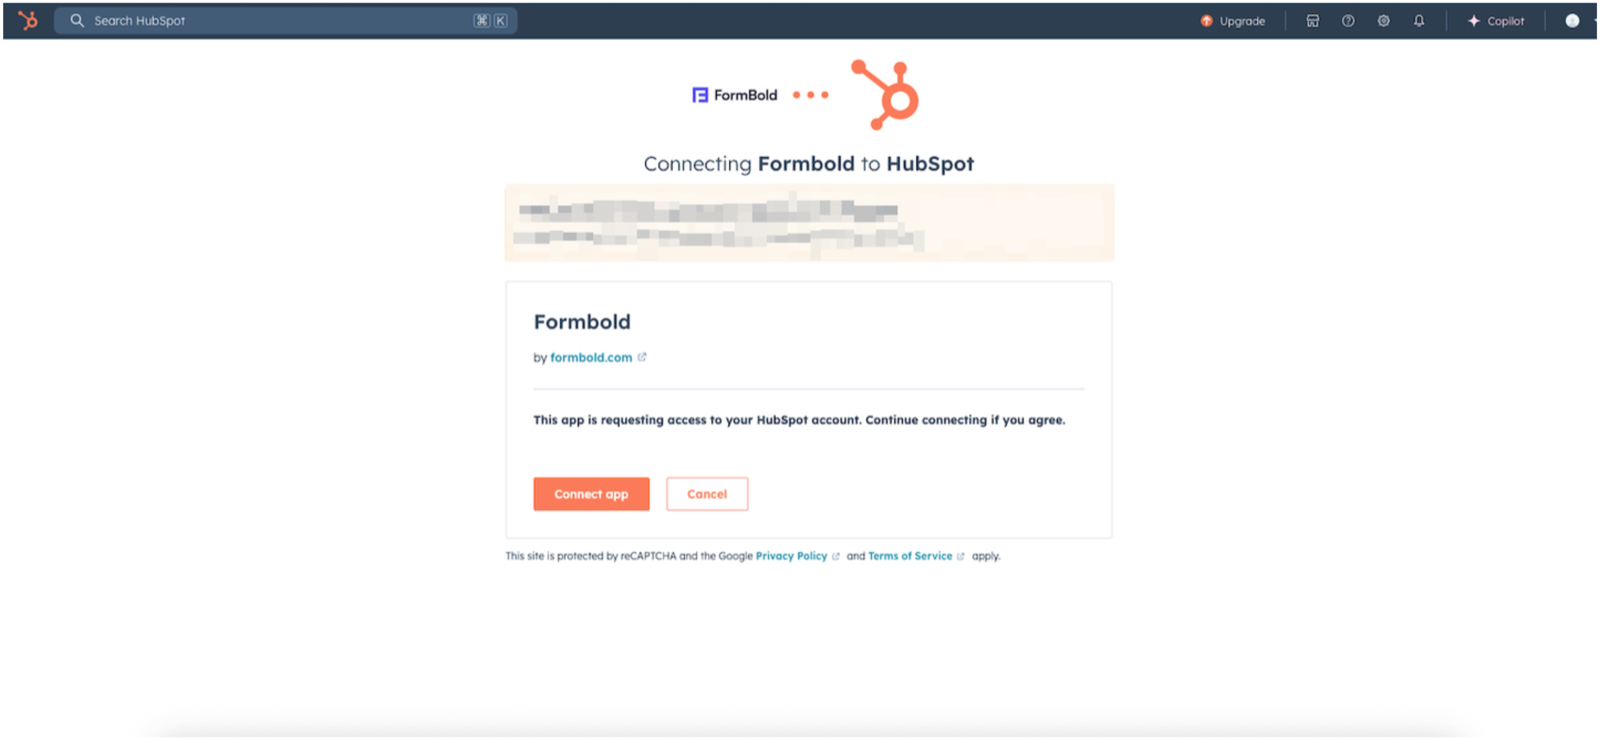
Step 2: Log In to HubSpot
-
If you’re already logged in, a permission request screen will appear
-
If not, you’ll be redirected to the login/signup page
-
Use the HubSpot account where you want to store submissions
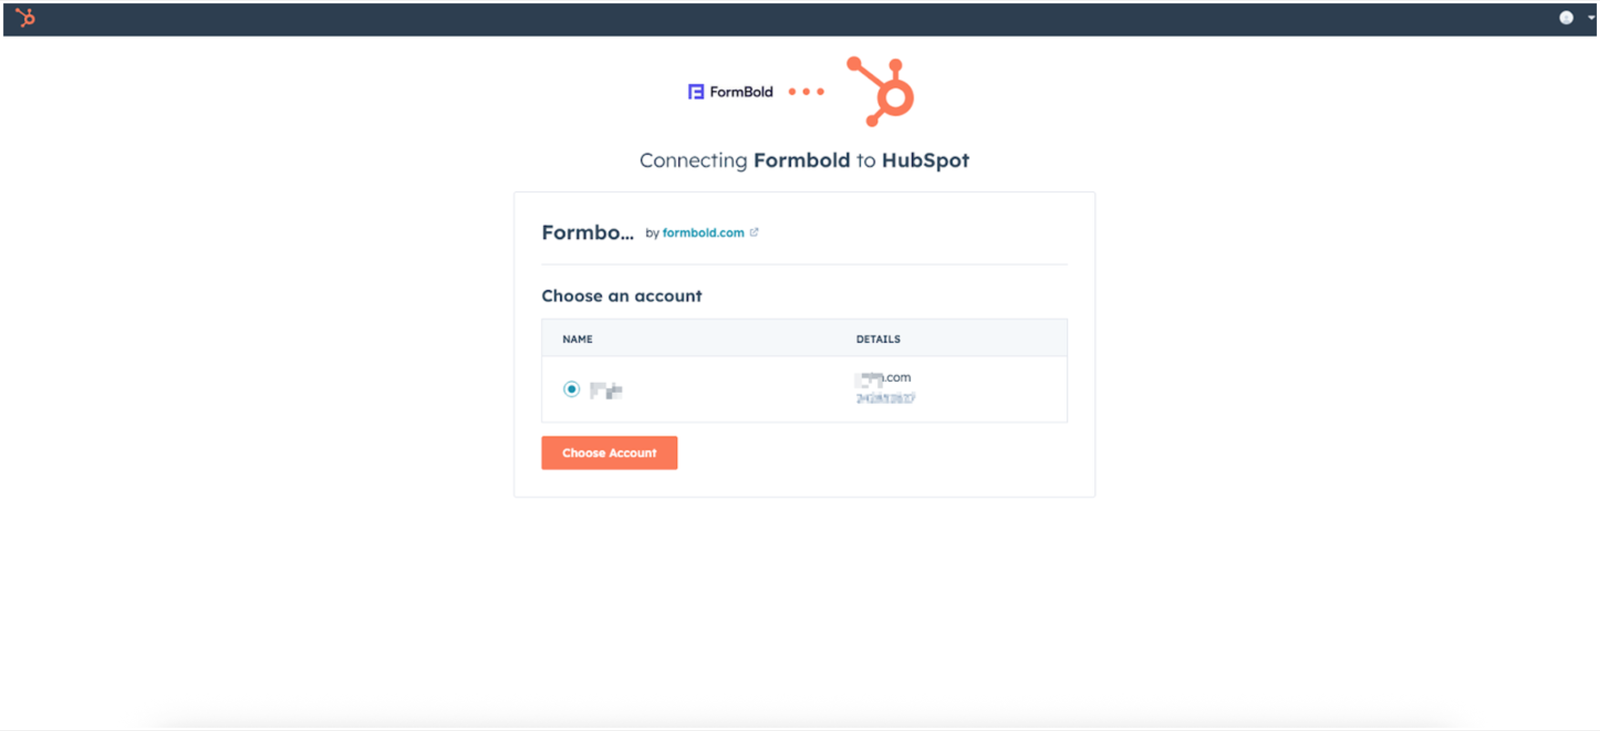
Step 3: Authorize the Connection
-
Click Connect App to authorize FormBold
-
This securely links your FormBold account to HubSpot
You’re All Set!
Once connected successfully, you’ll see a confirmation message in FormBold showing that the HubSpot integration is active.
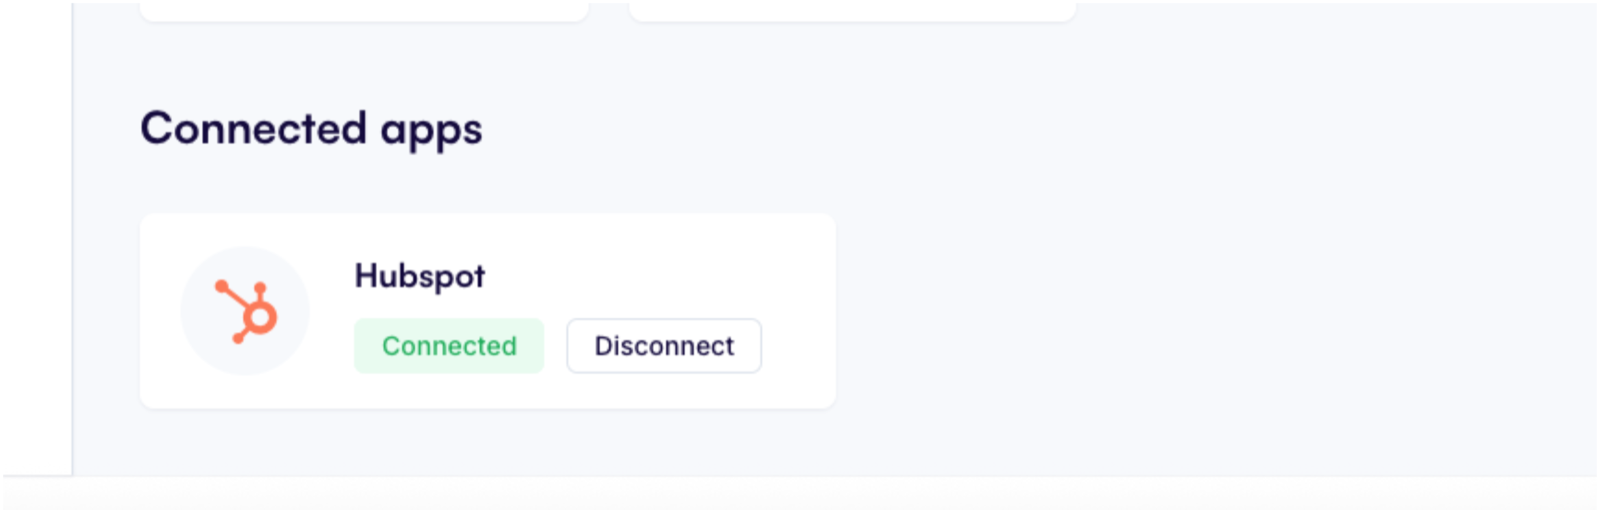
Form submissions will now automatically sync with your HubSpot CRM.