
How to Create Shareable Forms and Connect Them to Popular Apps

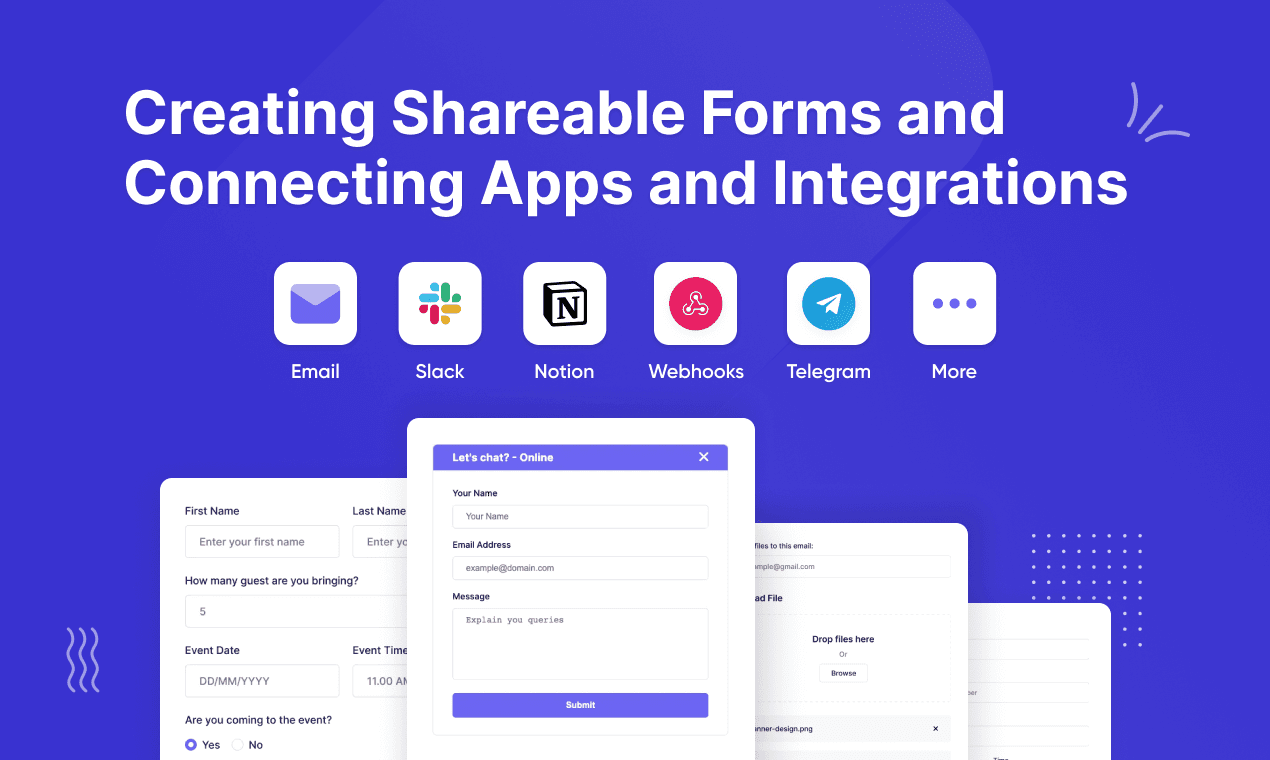
Want to create shareable forms that do more than collect data? With FormBold, you can build interactive, responsive forms in minutes using a drag-and-drop builder, without writing a single line of code.
Connect your forms instantly to tools like Slack, Notion, Telegram, Google Sheets, EmailEmailcord, and Zapier using built-in integrations—no manual setup or complex workflows.
In this guide, we’ll walk through how to design high-converting forms for real use cases like feedback collection, job applications, and event registrations, and how to automate your workflows with powerful integrations.
By the end, you’ll have forms that not only capture responses but turn them into real-time actions and insights.
Create Shareable Forms with Integration
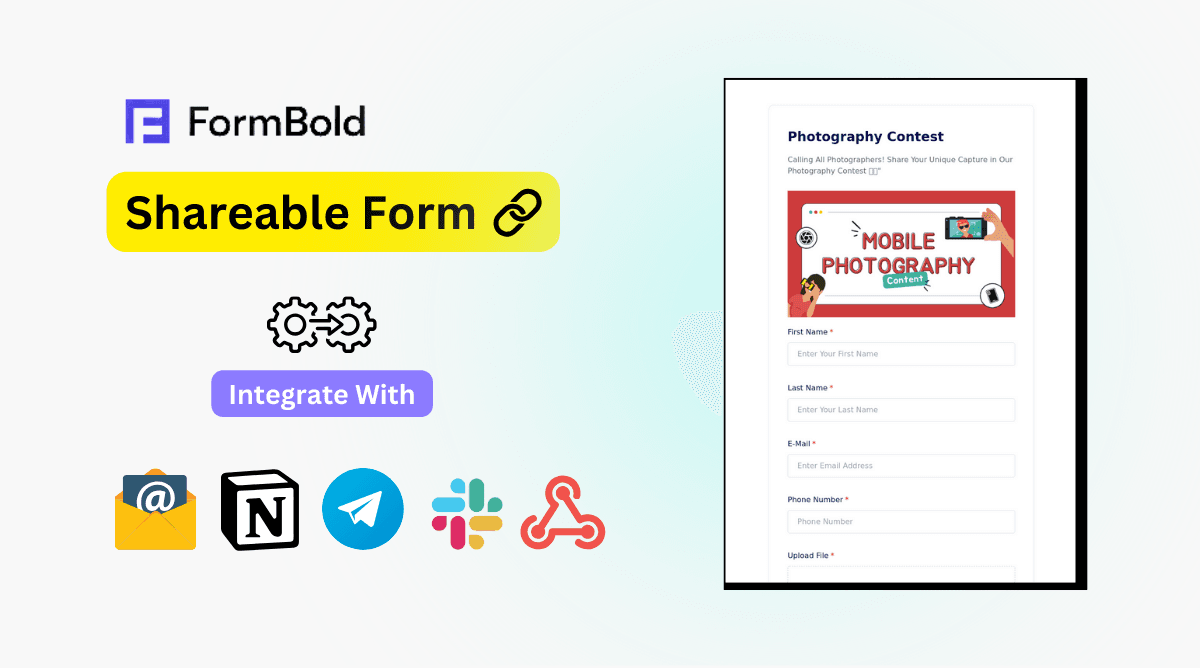
Create forms that not only collect data but also integrate with the tools you use daily, like sending emails from Google Sheets or getting notifications.
In this section, we’ll create three shareable forms using FormBold’s drag-and-drop builder:
- Feedback Submission Form
- Recruitment Submission Form
- Photography Contest Form
We’ll demonstrate how to use FormBold’s features and integrations to create interactive, functional forms.
Let’s get started.
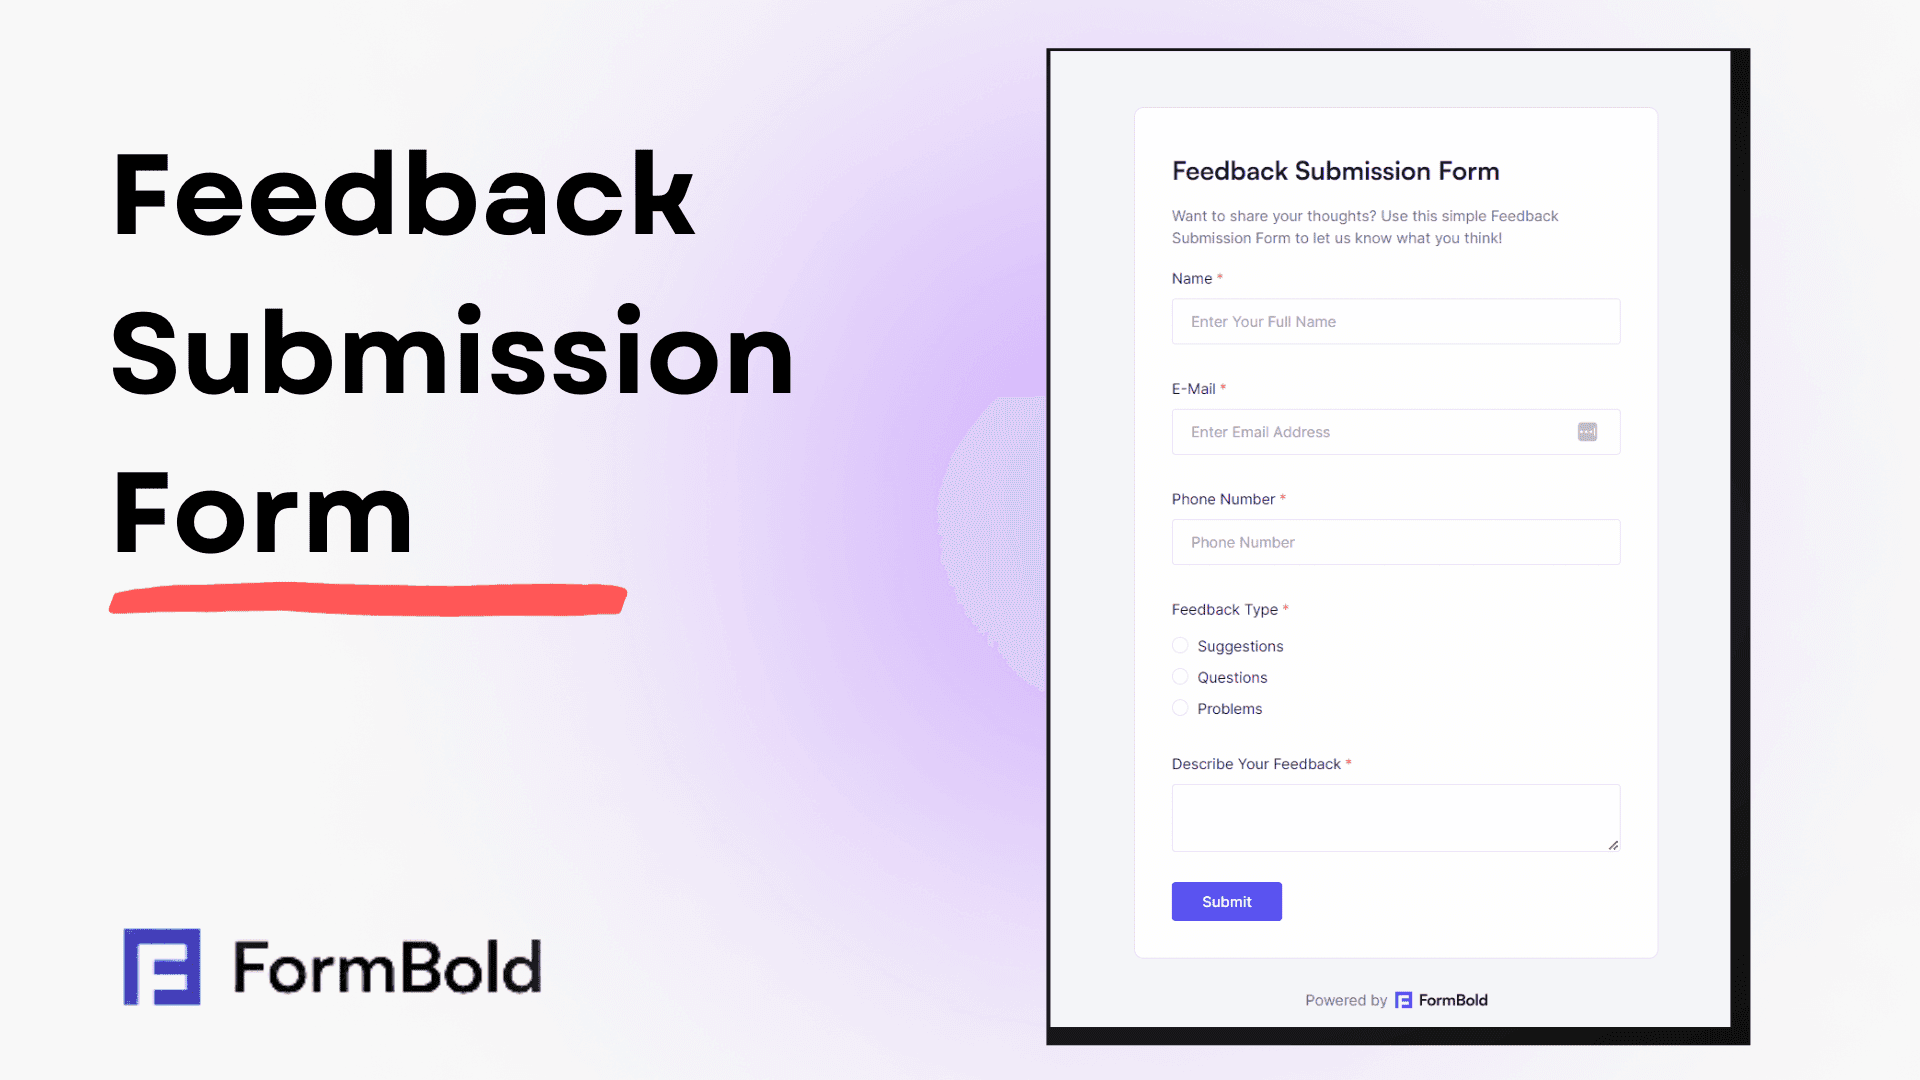
Feedback Submission Form
Let's create a Feedback Submission Form step by step using this guide. Before we proceed, ensure you've set up your FormBold account.
If you haven't done so yet, let's create one for a seamless form-building experience.
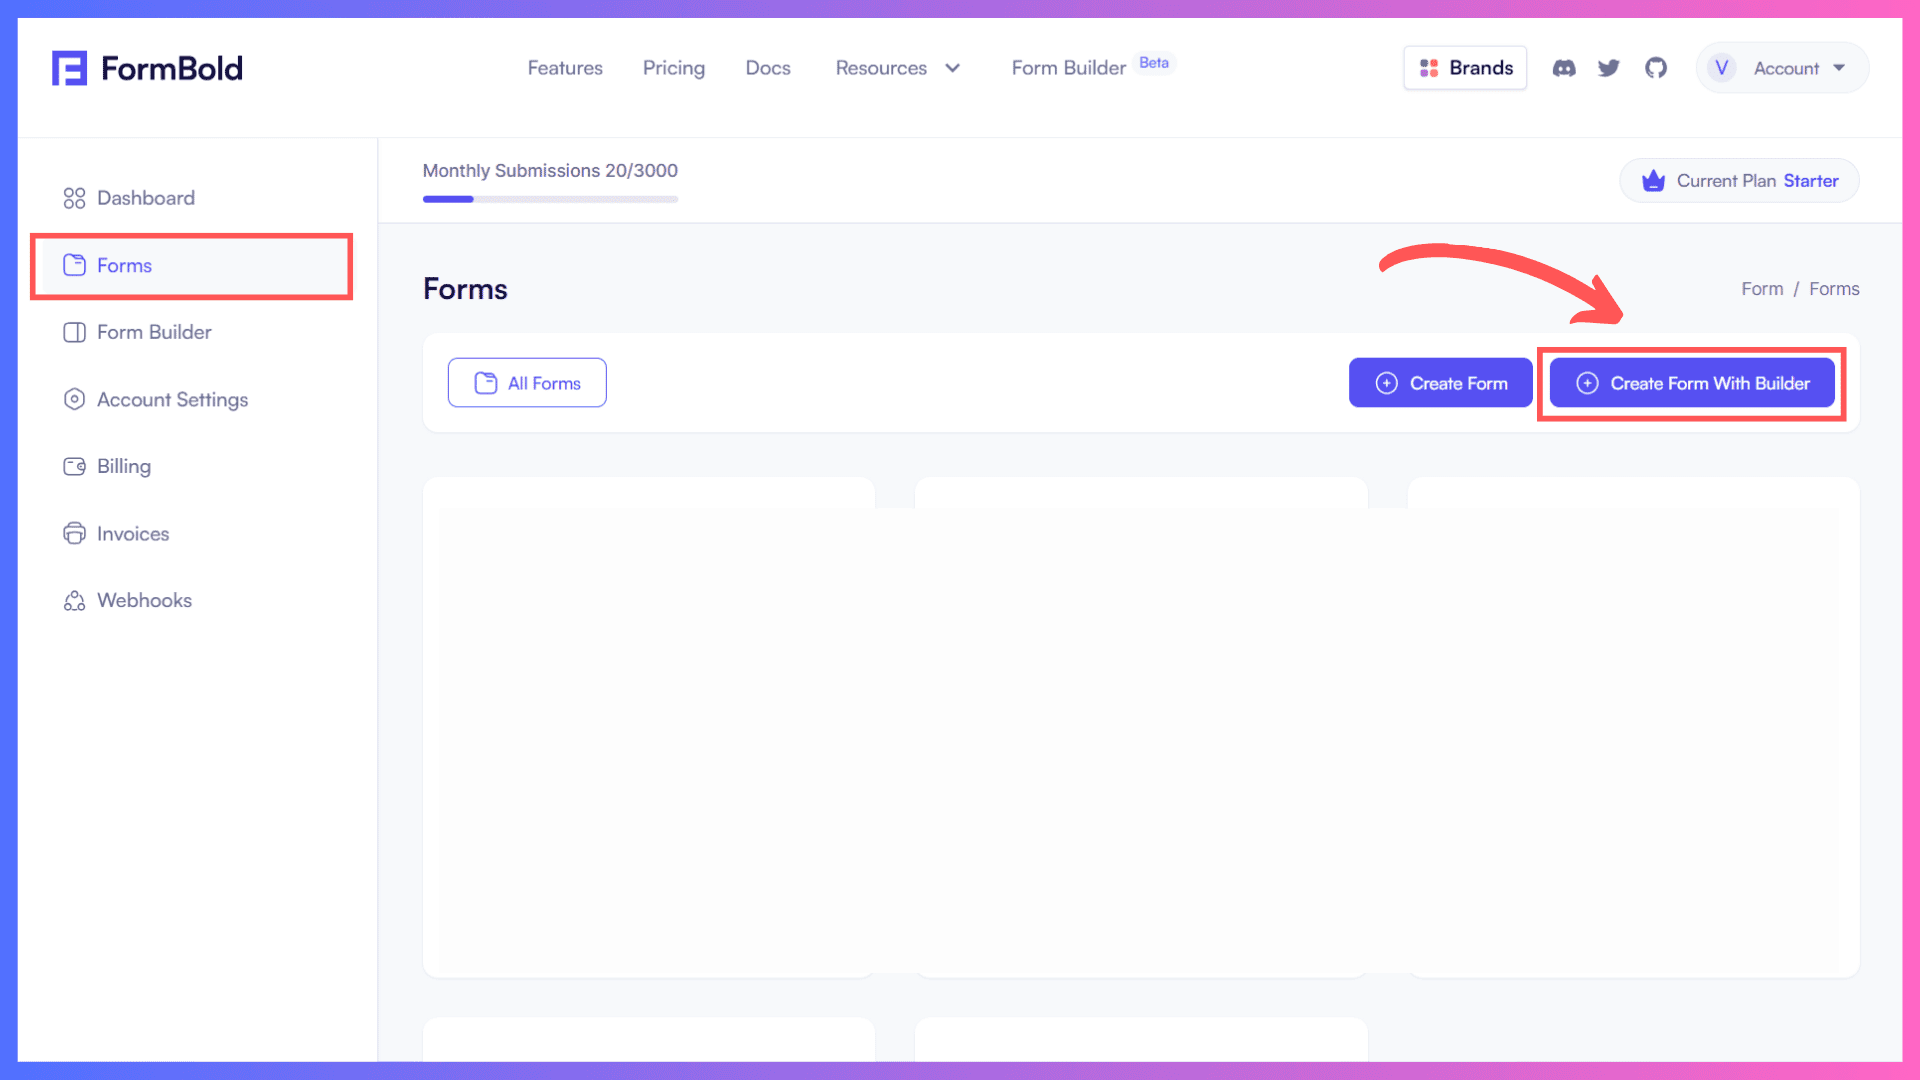
Step 1: Once you log in to your FormBold account, you will be redirected to the dashboard page. Click on the Form Tab.
Step 2: To create a form, we will use the Form Builder. So, click on the Create Form with Builder " button.
Step 3: To begin creating the Feedback form, drag the 'Heading' element from the sidebar and drop it into the dropzone area. (Follow Image.)
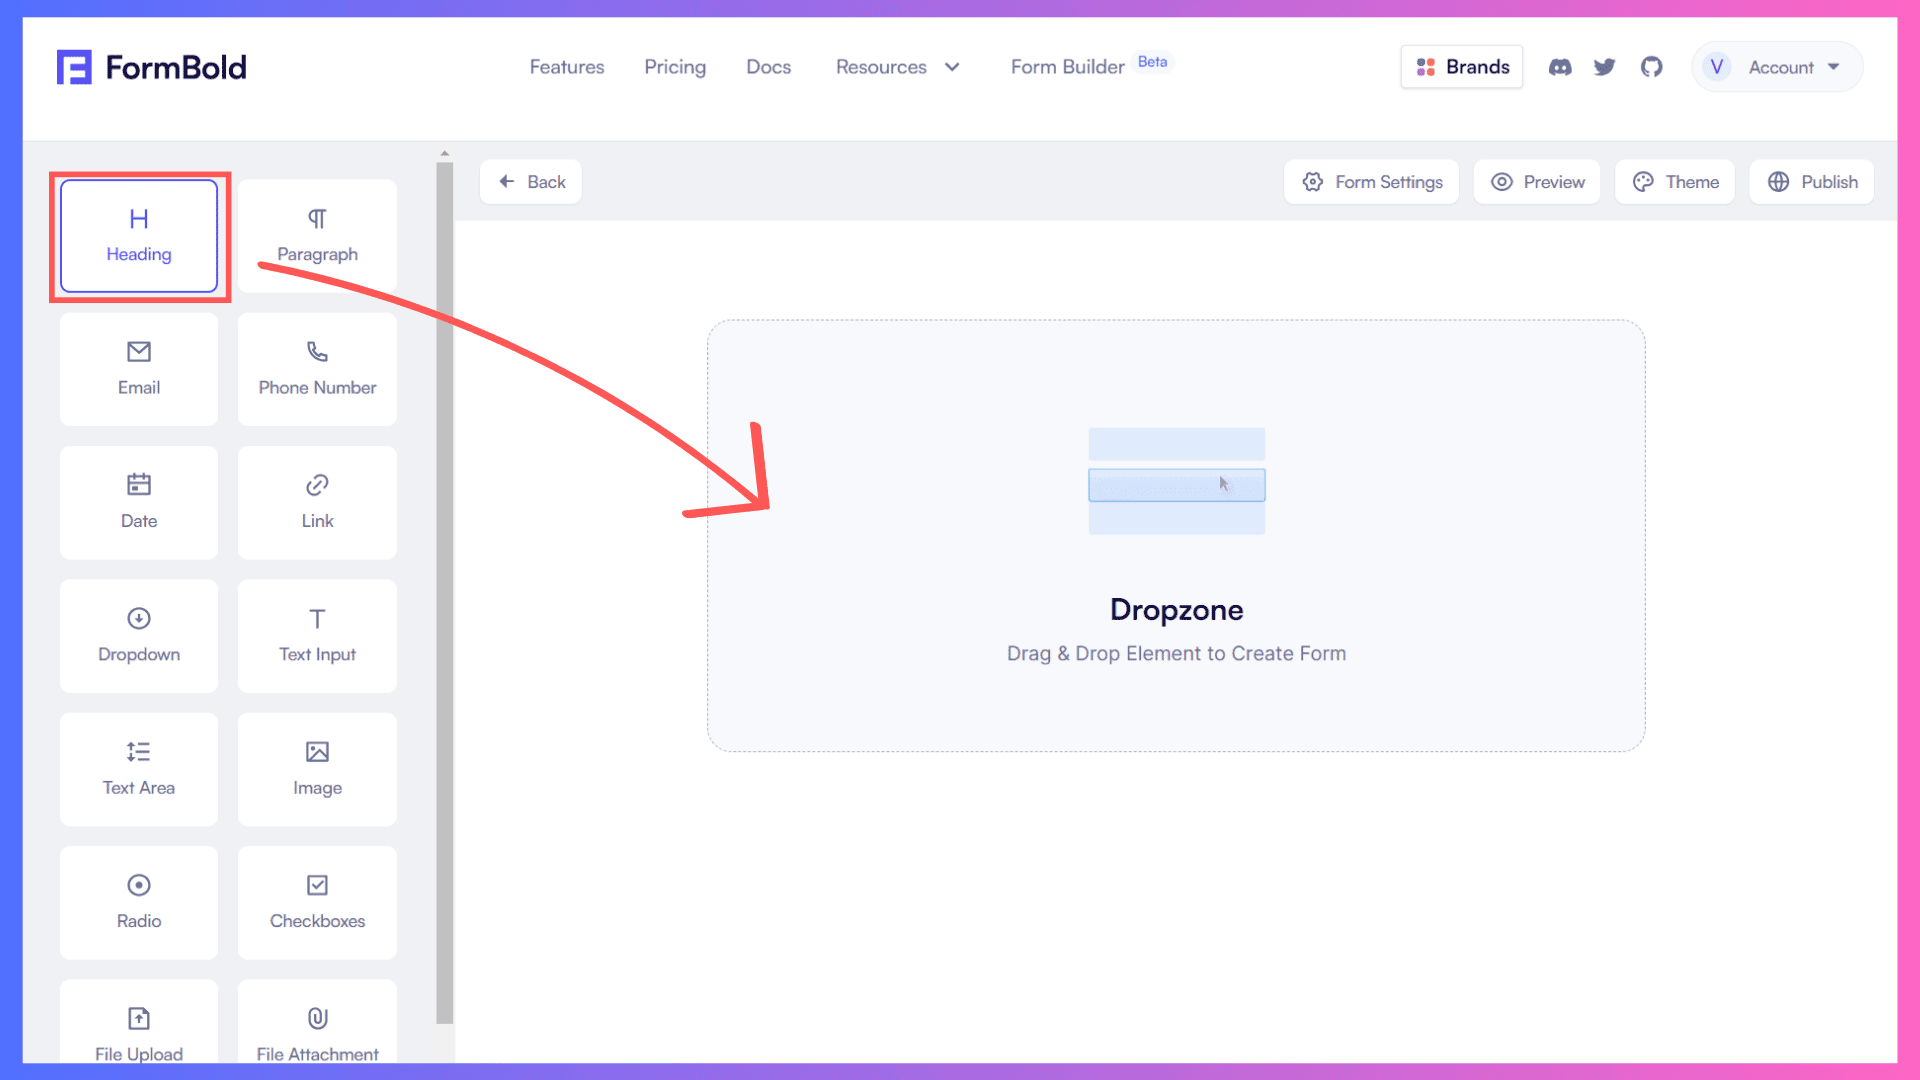
Step 4: Next, click on the 'Heading' element in the dropzone. A property editor panel will appear on the right side. Enter the heading for the Feedback Form, for instance, 'Feedback Submission Form.'
You can make it bold or italic, just by ticking the options. Don't forget to click on the 'Save' button to finalize.”
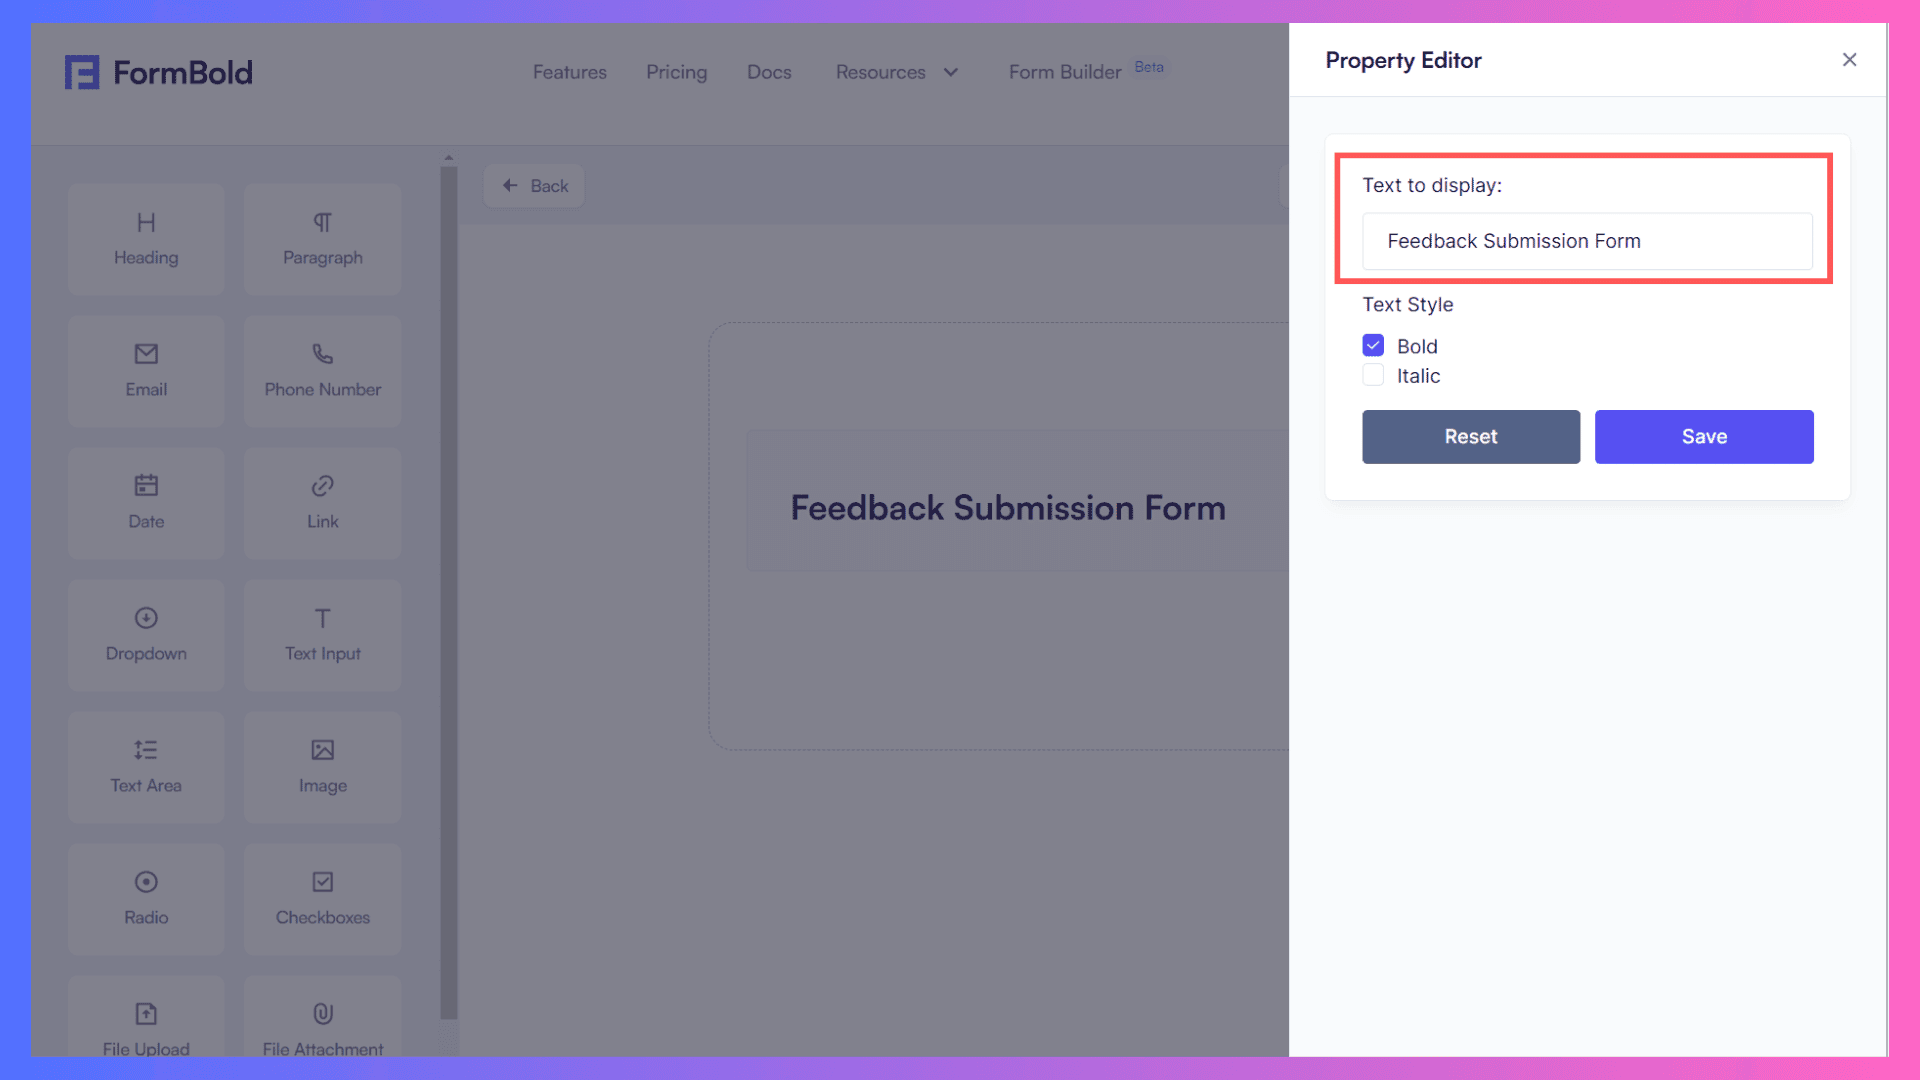
Step 5: Similarly, drag the 'Paragraph' element into the dropzone to provide a brief description of the form.
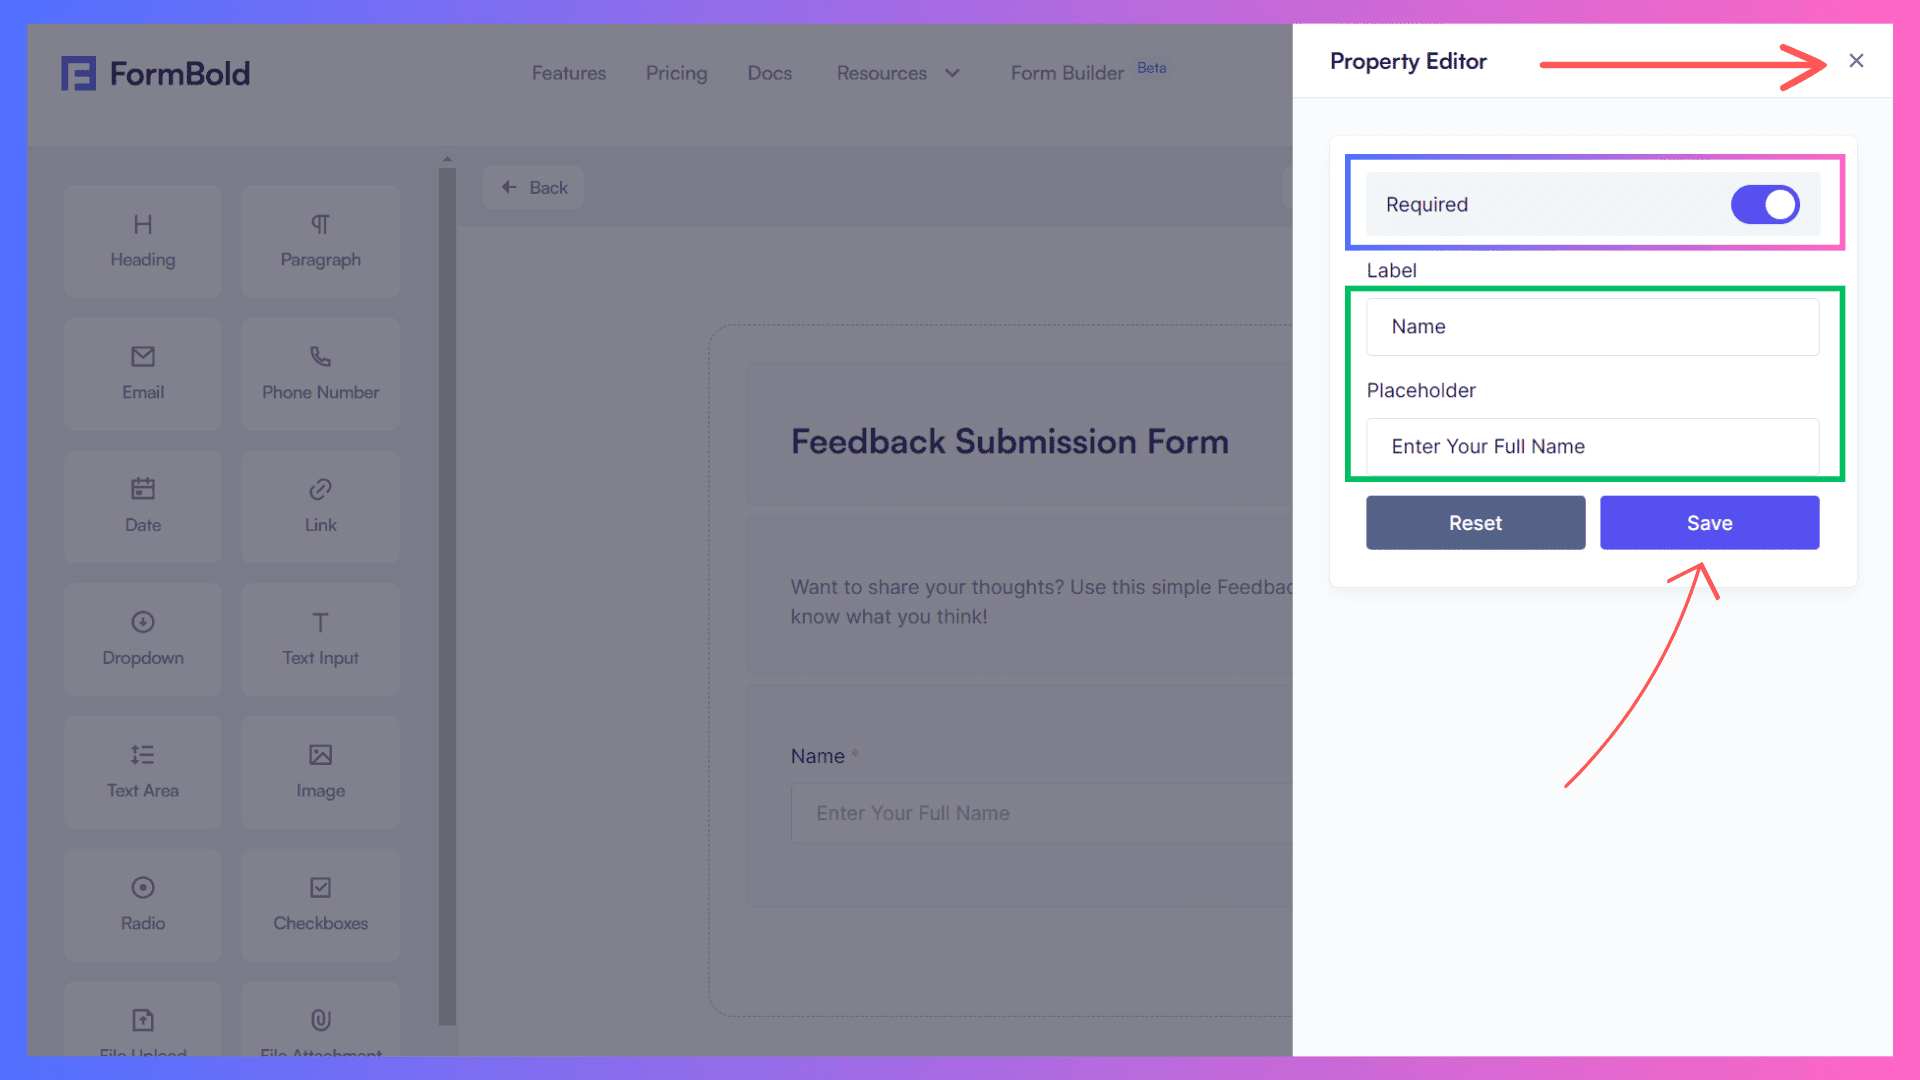
Step 6: Now, let's create input fields to collect user information. Drag the 'Text Input,' 'Email ', 'Phone Number' elements into the dropzone.
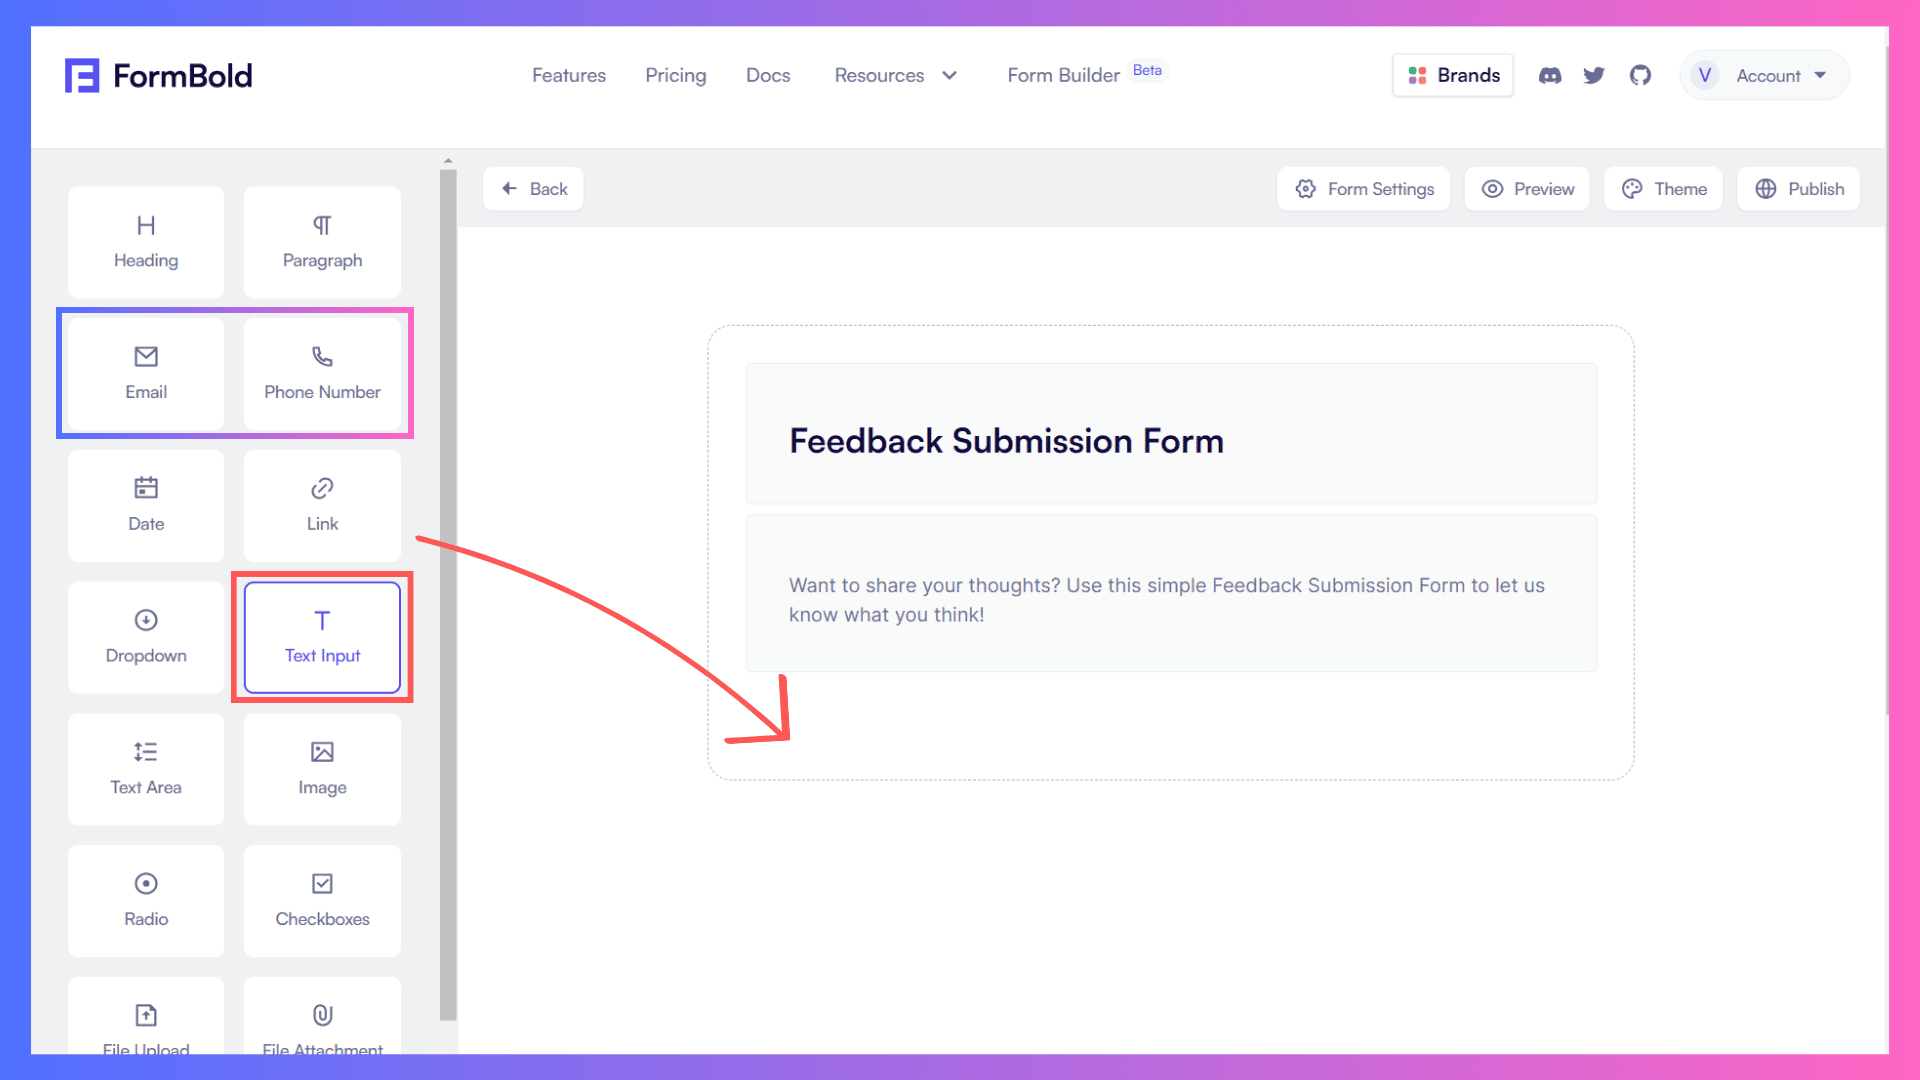
Click on each element to open the property editor and customize as needed.
Don't forget to enable the 'Requiredfield' option for each input box to ensure users provide the required information.
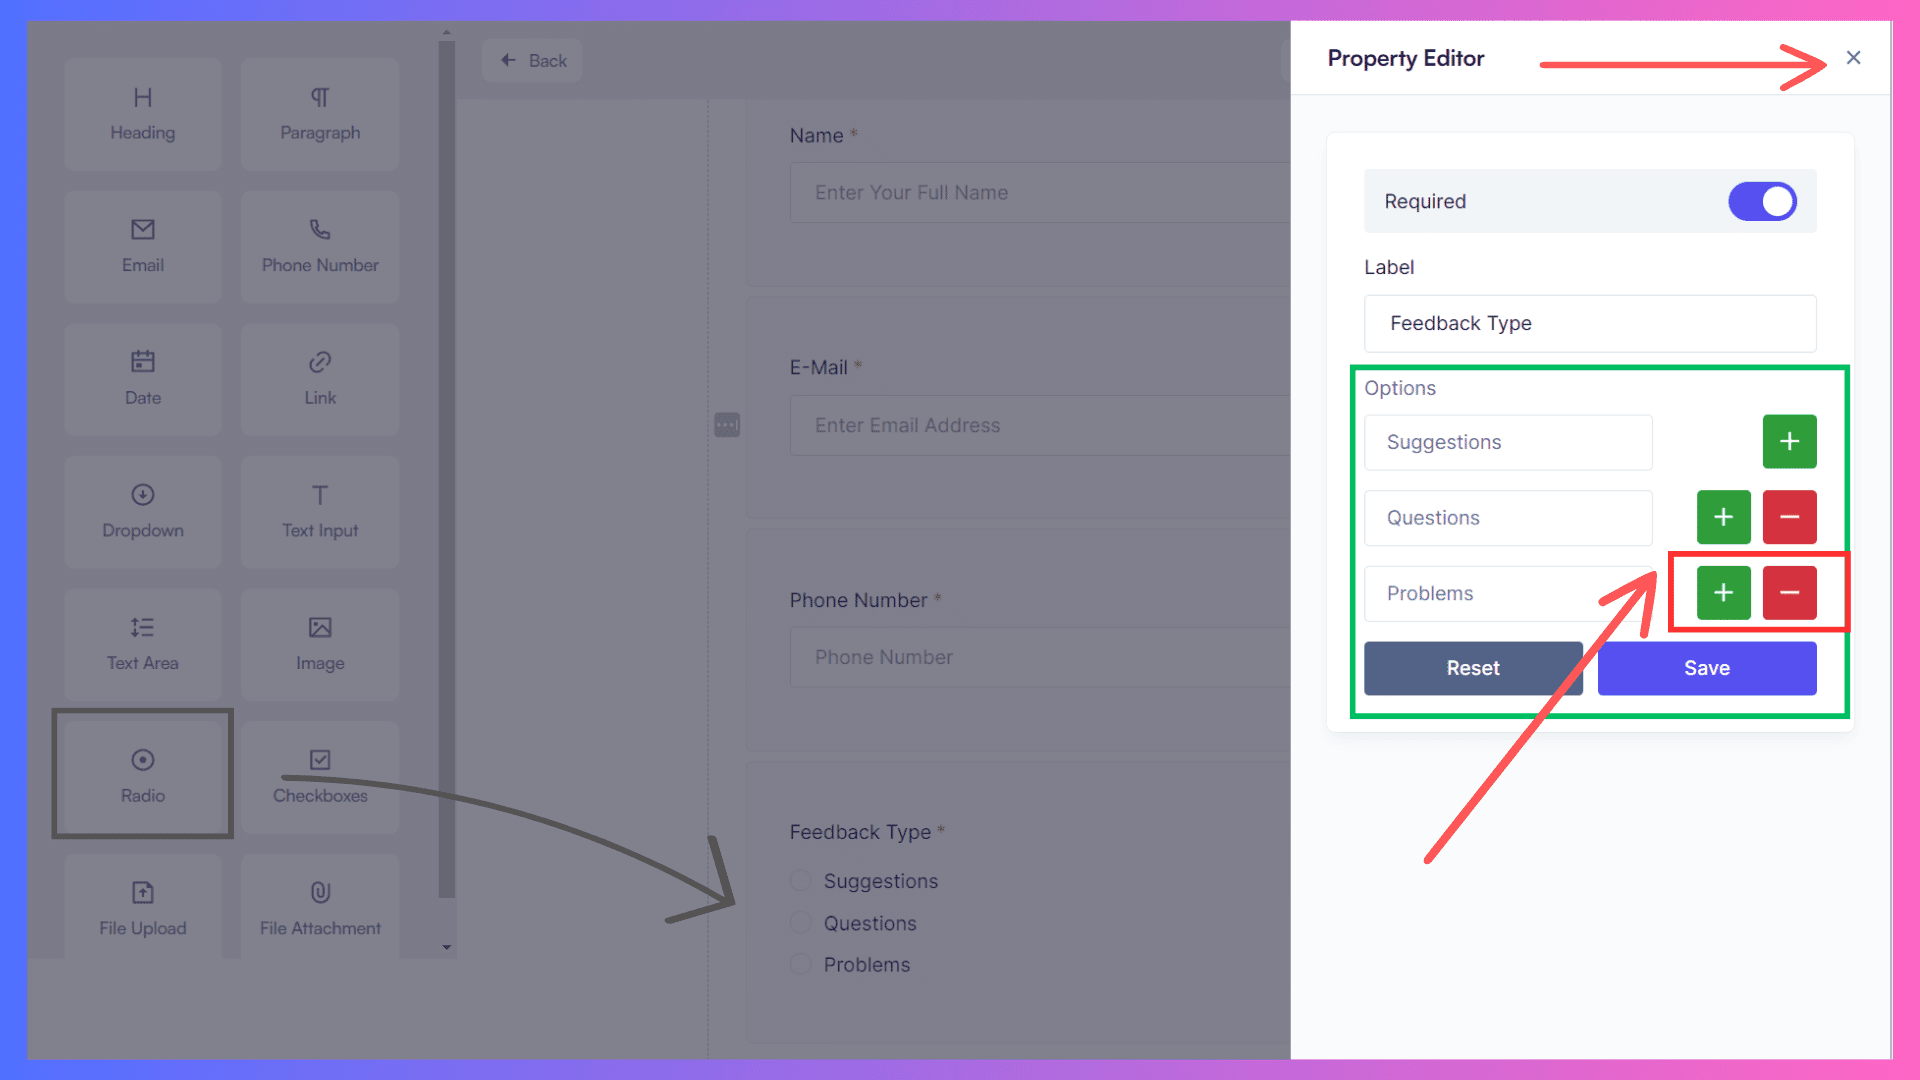
Step 7: Now, let's give users the choice of feedback type they want to submit - whether it's a 'Suggestion,' 'Problem,' or 'Question.'
Drag the 'Radio' element into the dropzone to provide these options.
Refer to the image for clarity. Use the '+' and '-' signs to add or remove options according to your preference.”
Step 8: Now, let's allow users to provide feedback by dragging the 'Text Area' element into the dropzone to create a designated space for the input.
Don’t forget to enable the Required option.

Note that there's no need to add a submit button as one is provided by default.
We have successfully added all the required elements to our feedback submission form.
Now explore the action section.
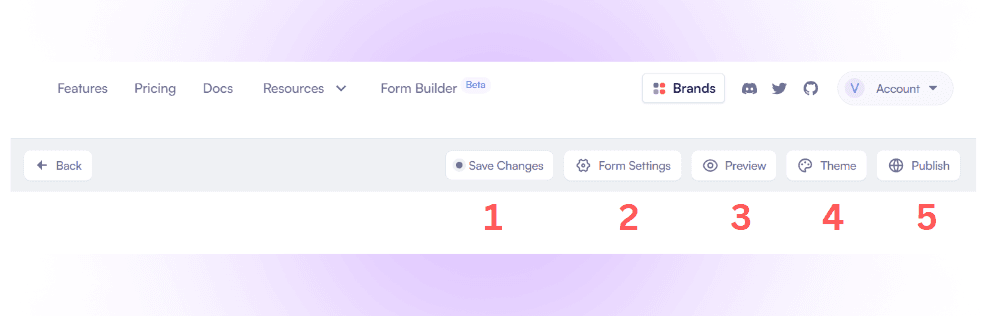
The action section contains 5 options:
- Save Changes: To save the changes.
- Form Setting: Make the form name change to formss.
- Preview: To preview the live form.
- Theme: To change the color of the form.
- Publish: To publish the form publicly.
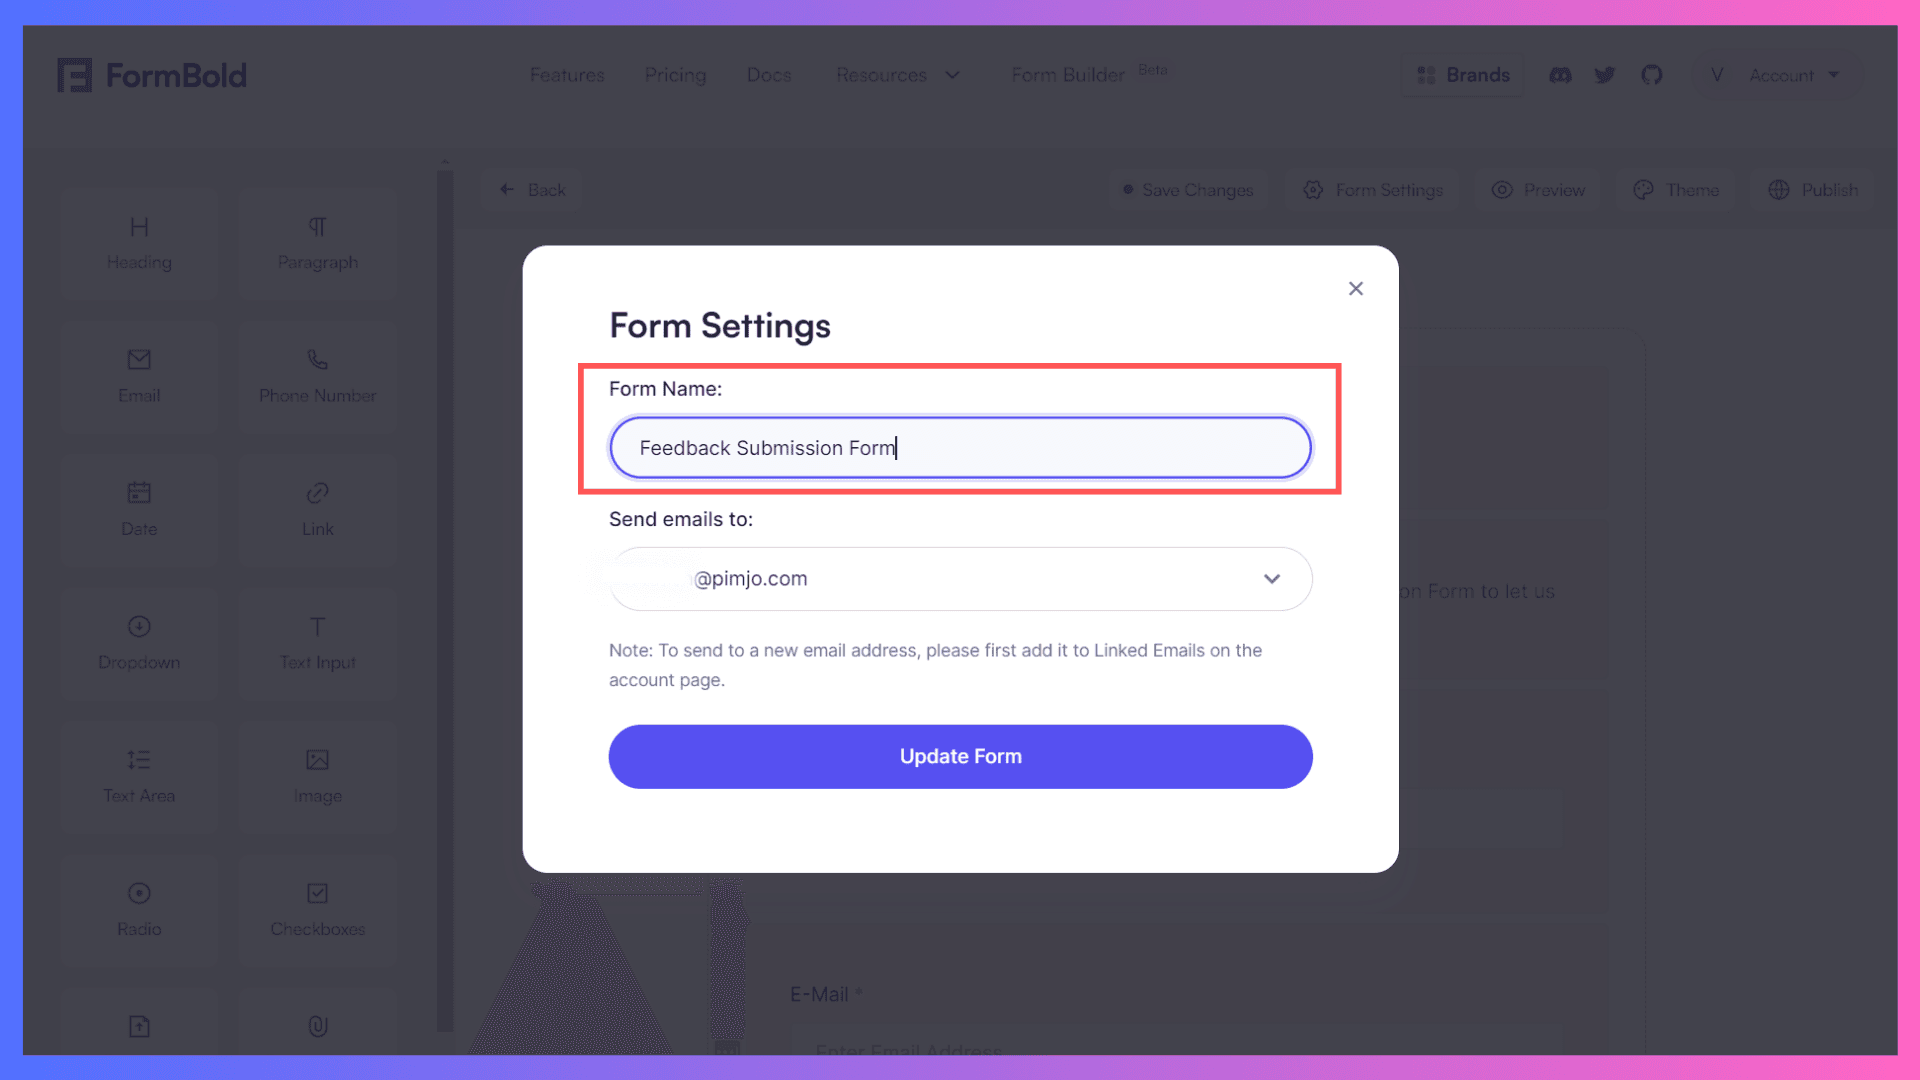
Step 9: Please refer to the image above and click option 2, 'Form Settings,' to set the form name. And use option 3 to preview the form.
Click on the Update Form button to save changes.
Step 10: Now, click Option 5 (refer to the image above) to publish the form and obtain the shareable link, as shown in the image below.
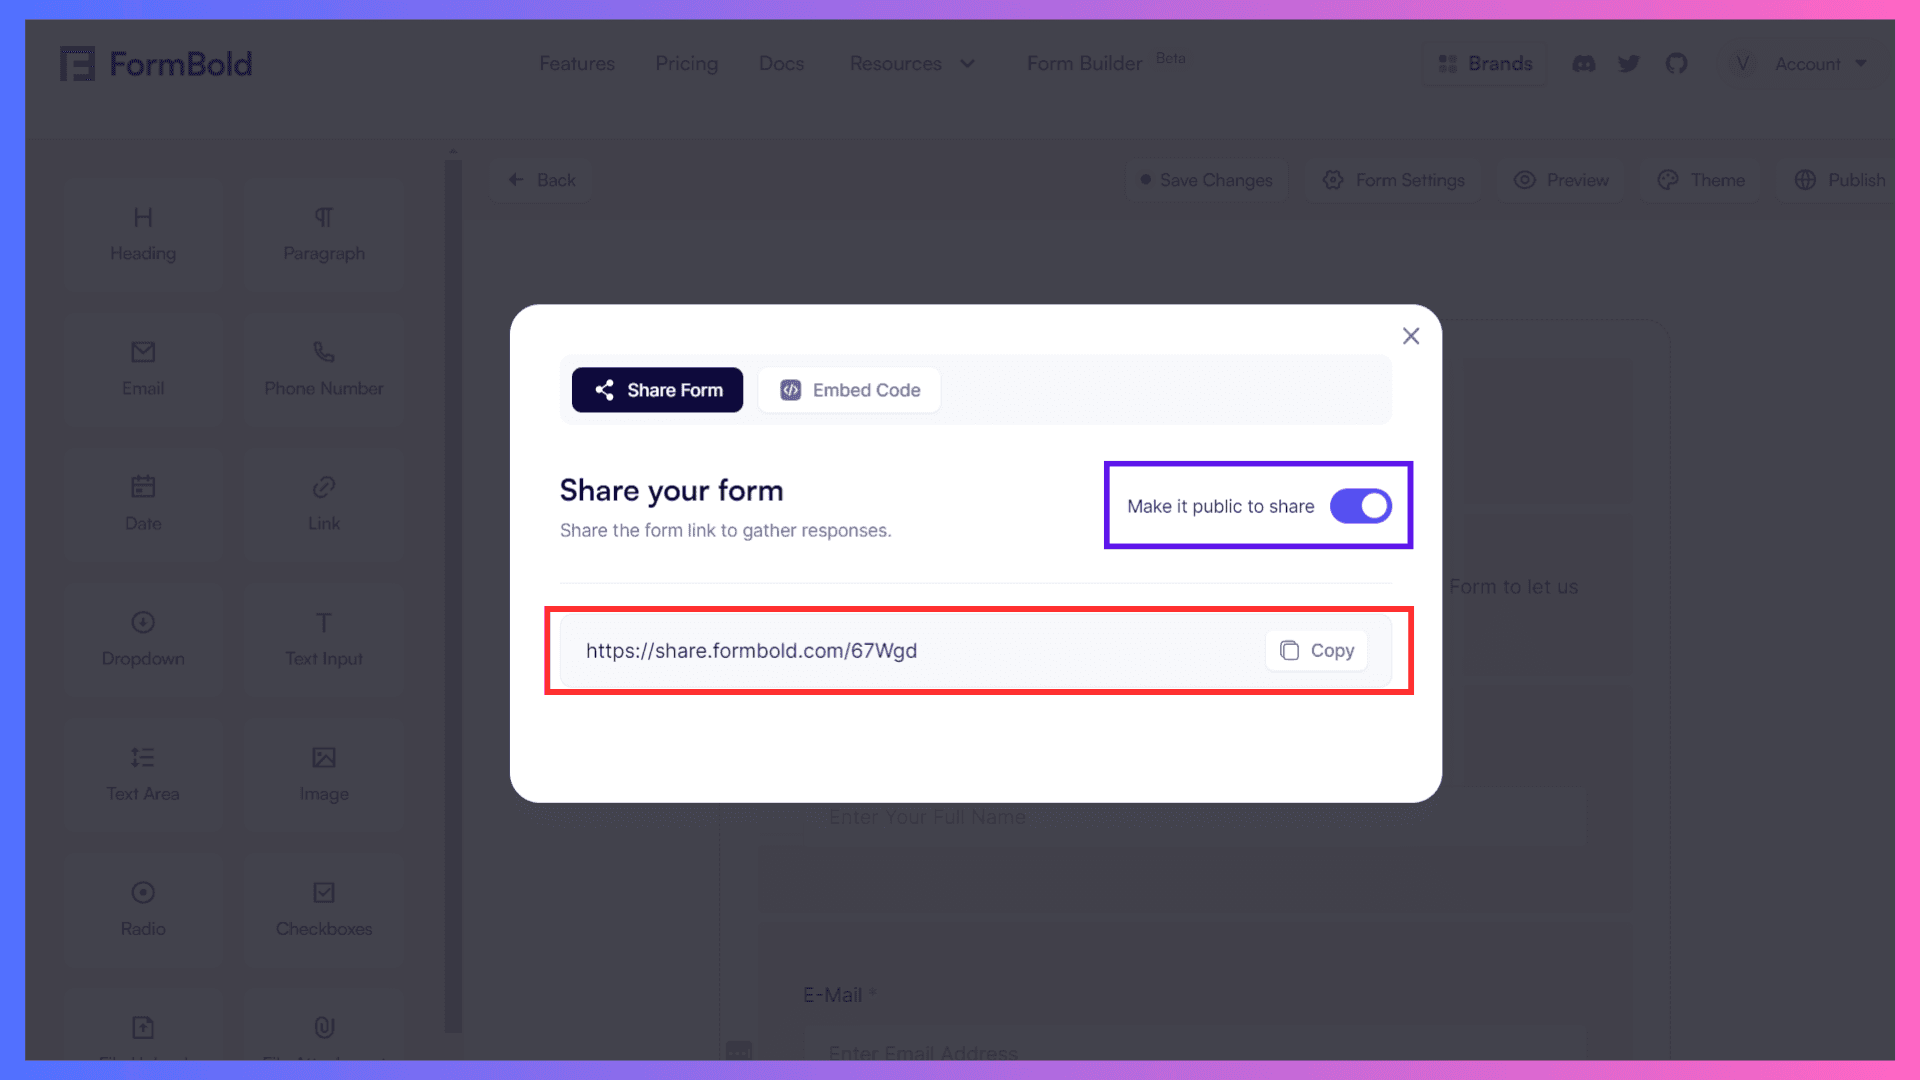
Voila! You've successfully created a shareable Feedback Submission Form. Copy the link and start accepting responses.
Now, let’s create a Recruitment Submission Form to explore additional elements and functionalities.
Recruitment Submission Form
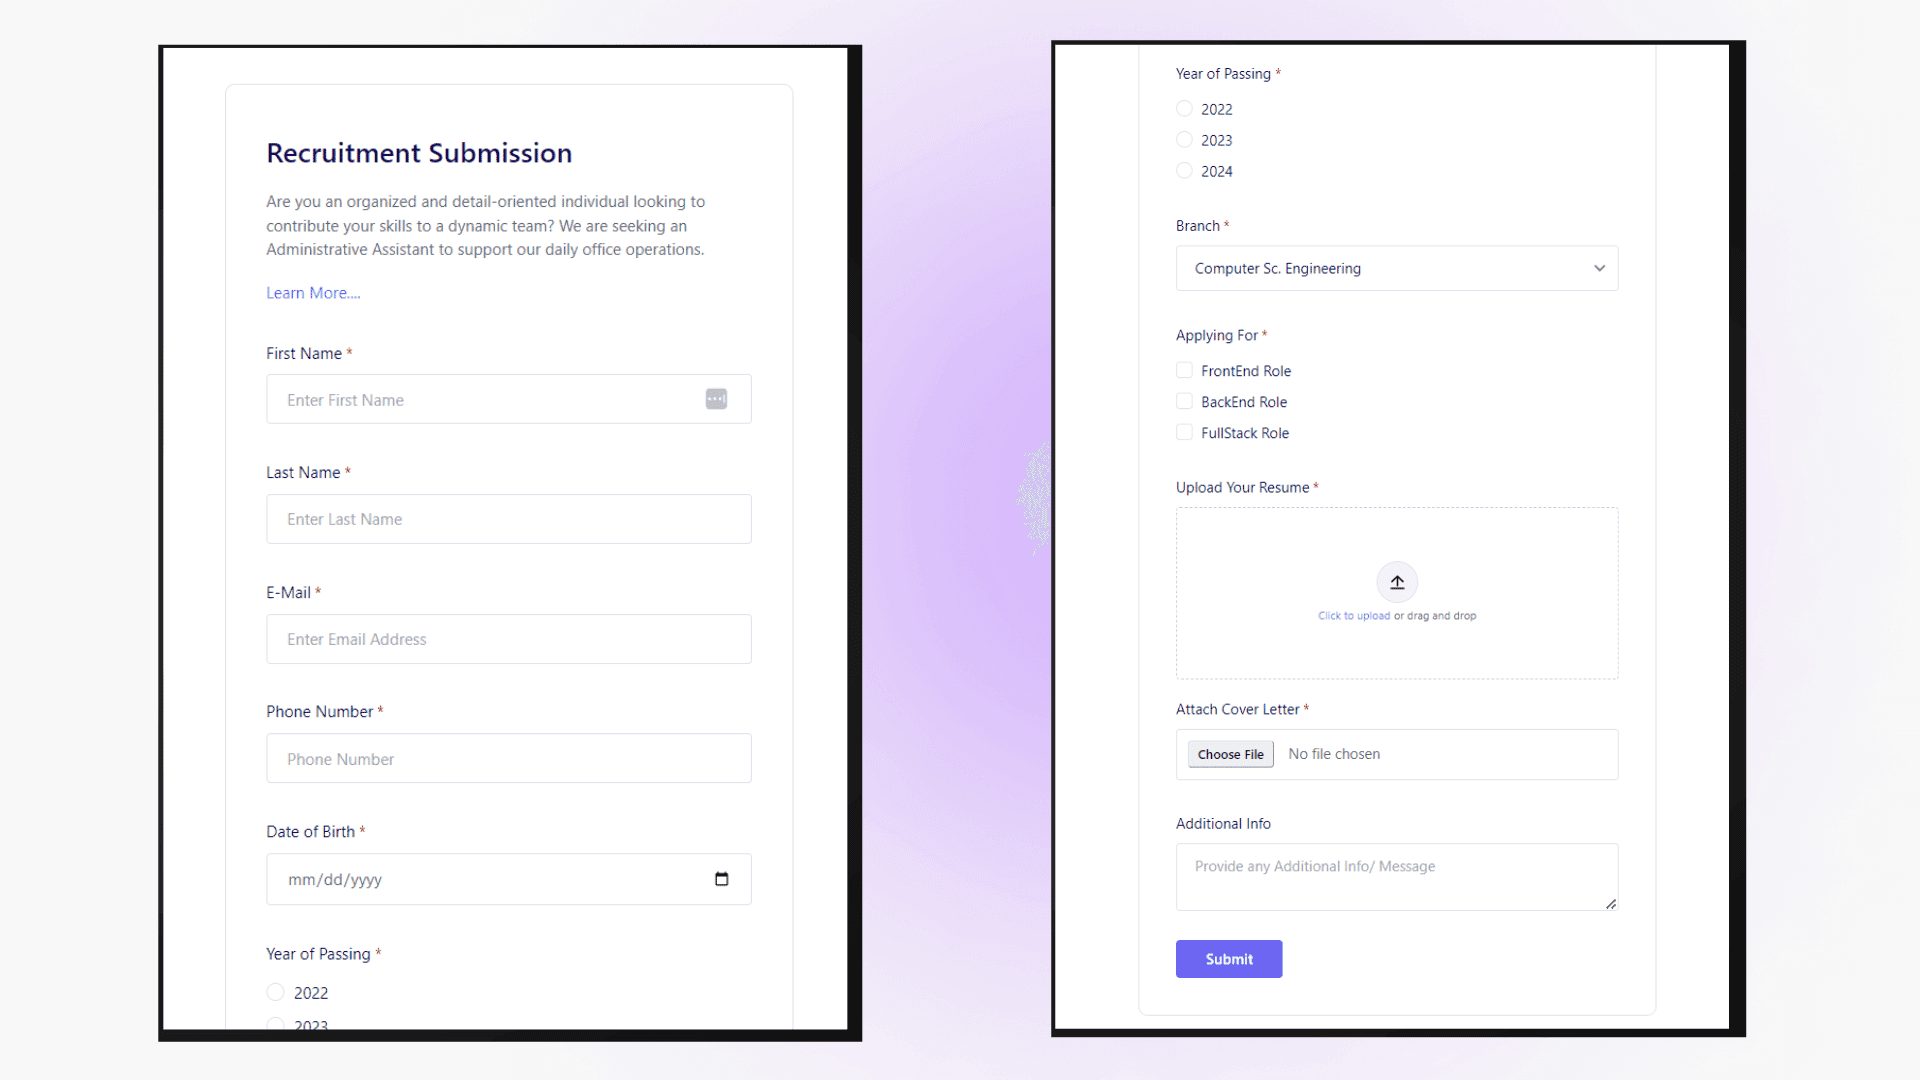
Let's begin creating the recruitment submission form. This is crucial for effectively managing applications and selecting suitable candidates.
Follow these steps to create a Recruitment Submission Form:
Step 1: Click on the “Create Form With Builder” Button on the forms dashboard to create a new form.
Step 2: Now, let's drag and drop the 'Heading' and 'Paragraph' elements into the drop zone to create the heading and paragraph for the Recruitment Submission Form.
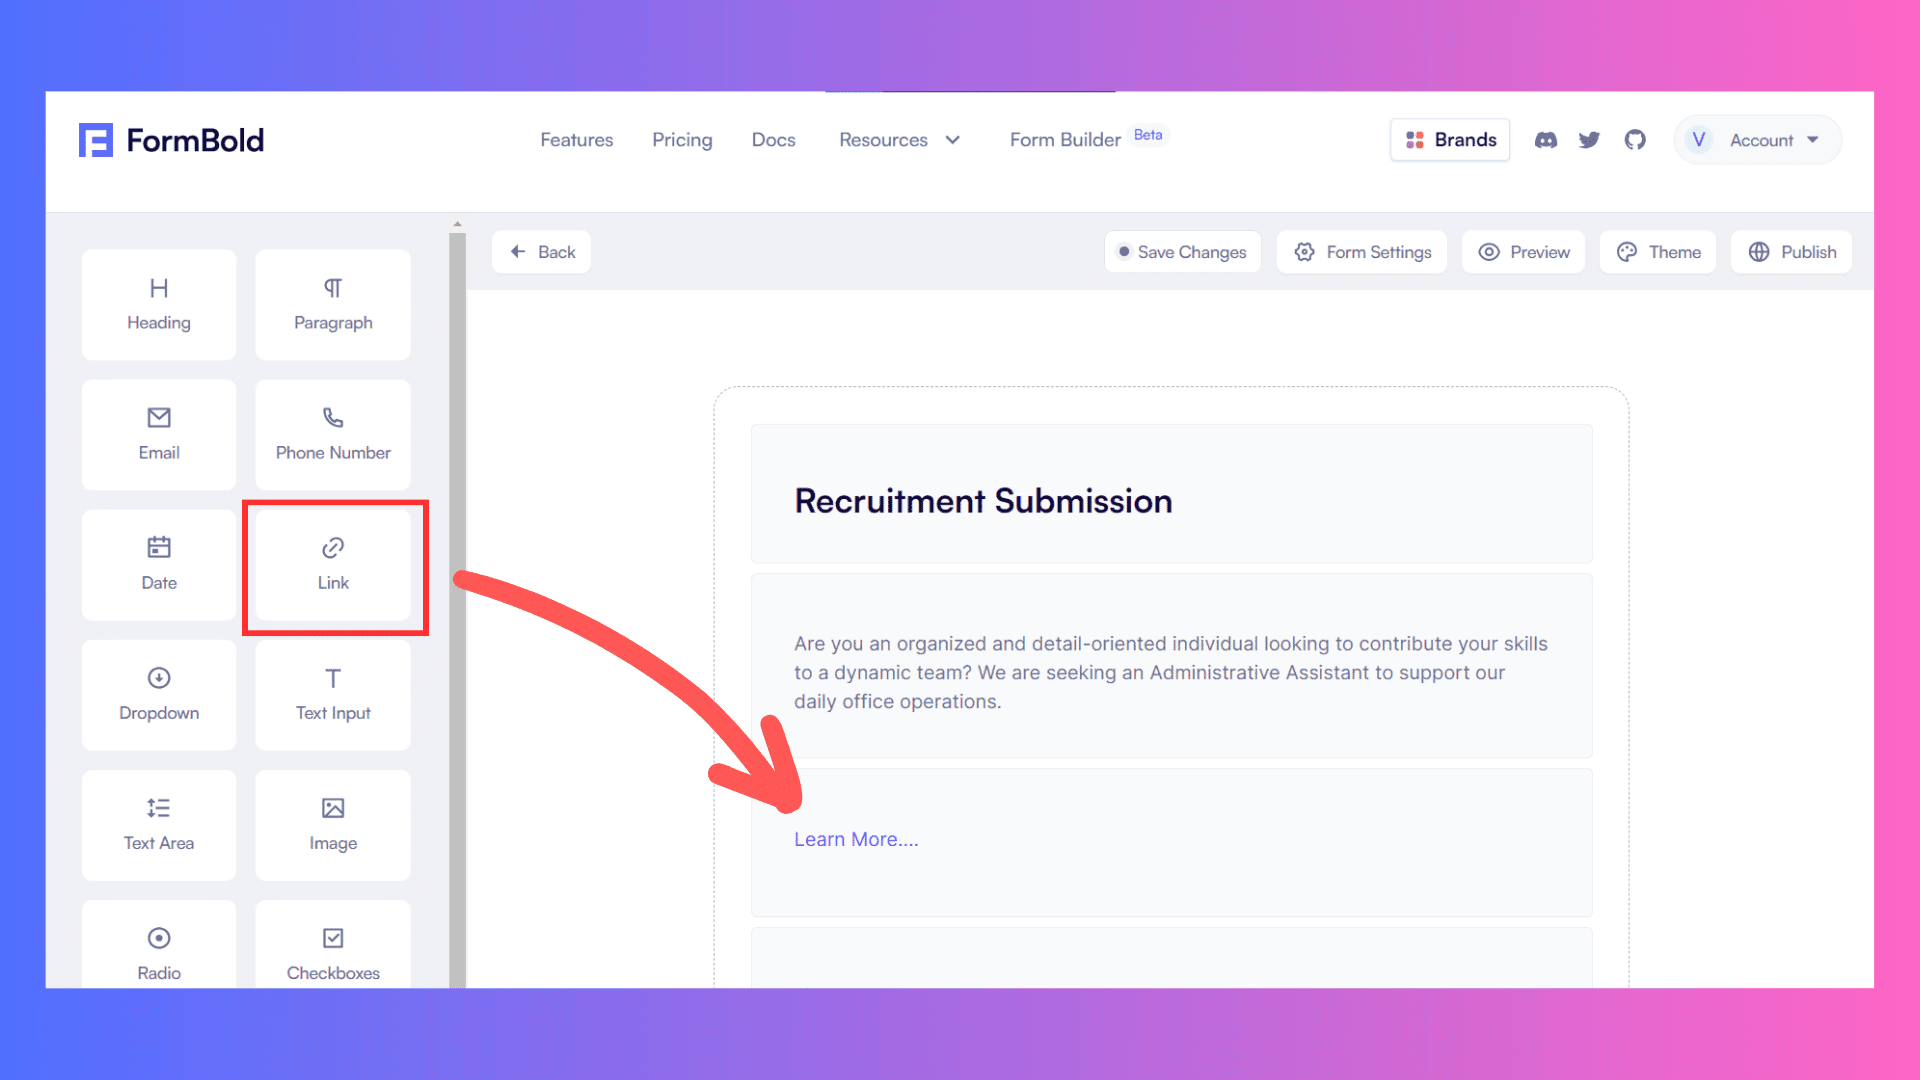
Step 3: Next, let's drag and drop the 'Link' element into the drop zone to create a link for additional information.
Step 4: Now, let's proceed to create input boxes for collecting user information. Drag the 'Text Input,' 'Email 'Phone Number' elements into the drop zone to create fields for 'First Name,' 'Last Name,' 'Email 'Phone Number.'
As we did earlier, click on each element to open the property editor and customize it.
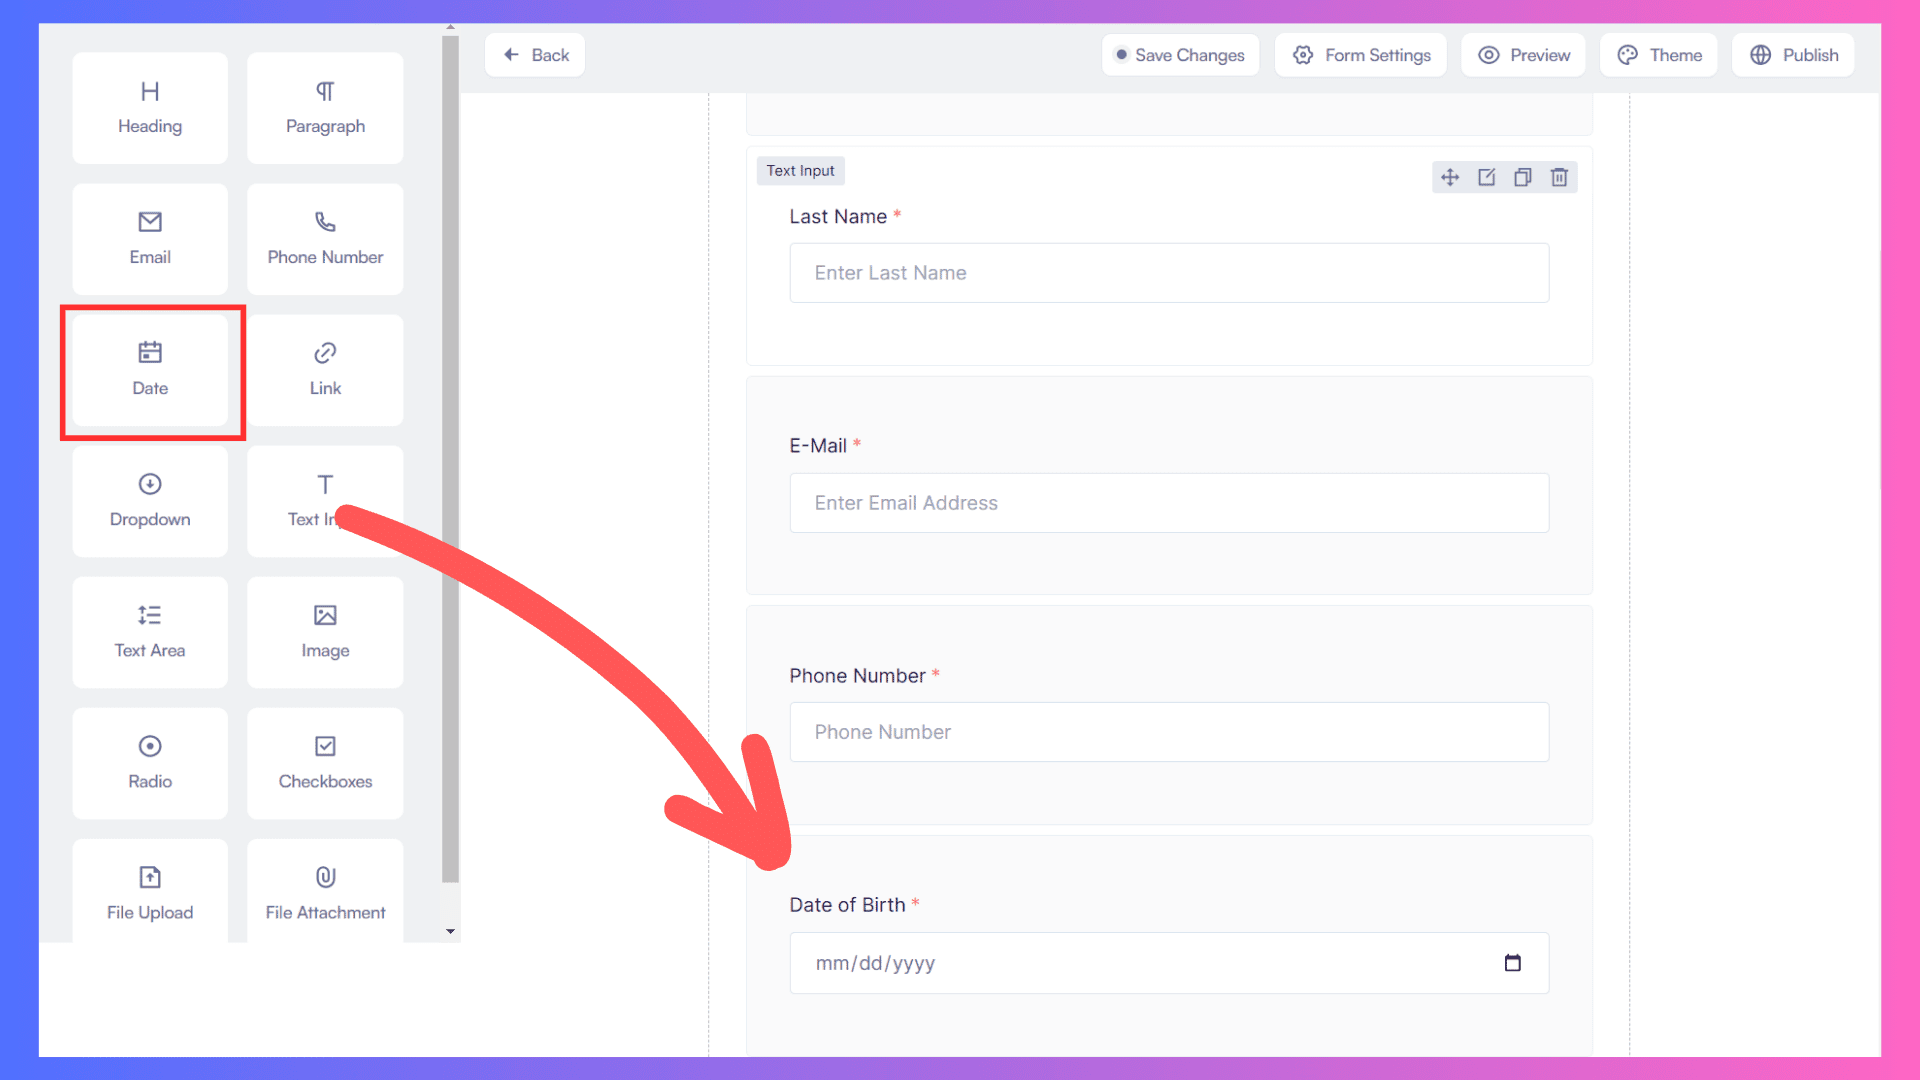
Step 5: Now, let's drag and drop the 'Date' element into the drop zone to collect the date of birth of the candidate. Don't forget to turn on the 'Required' option.
Step 6: Let's add an option for choosing a batch. Drag the 'Radio' element into the drop zone to provide options. Add options like 2021,2022,2023,2024
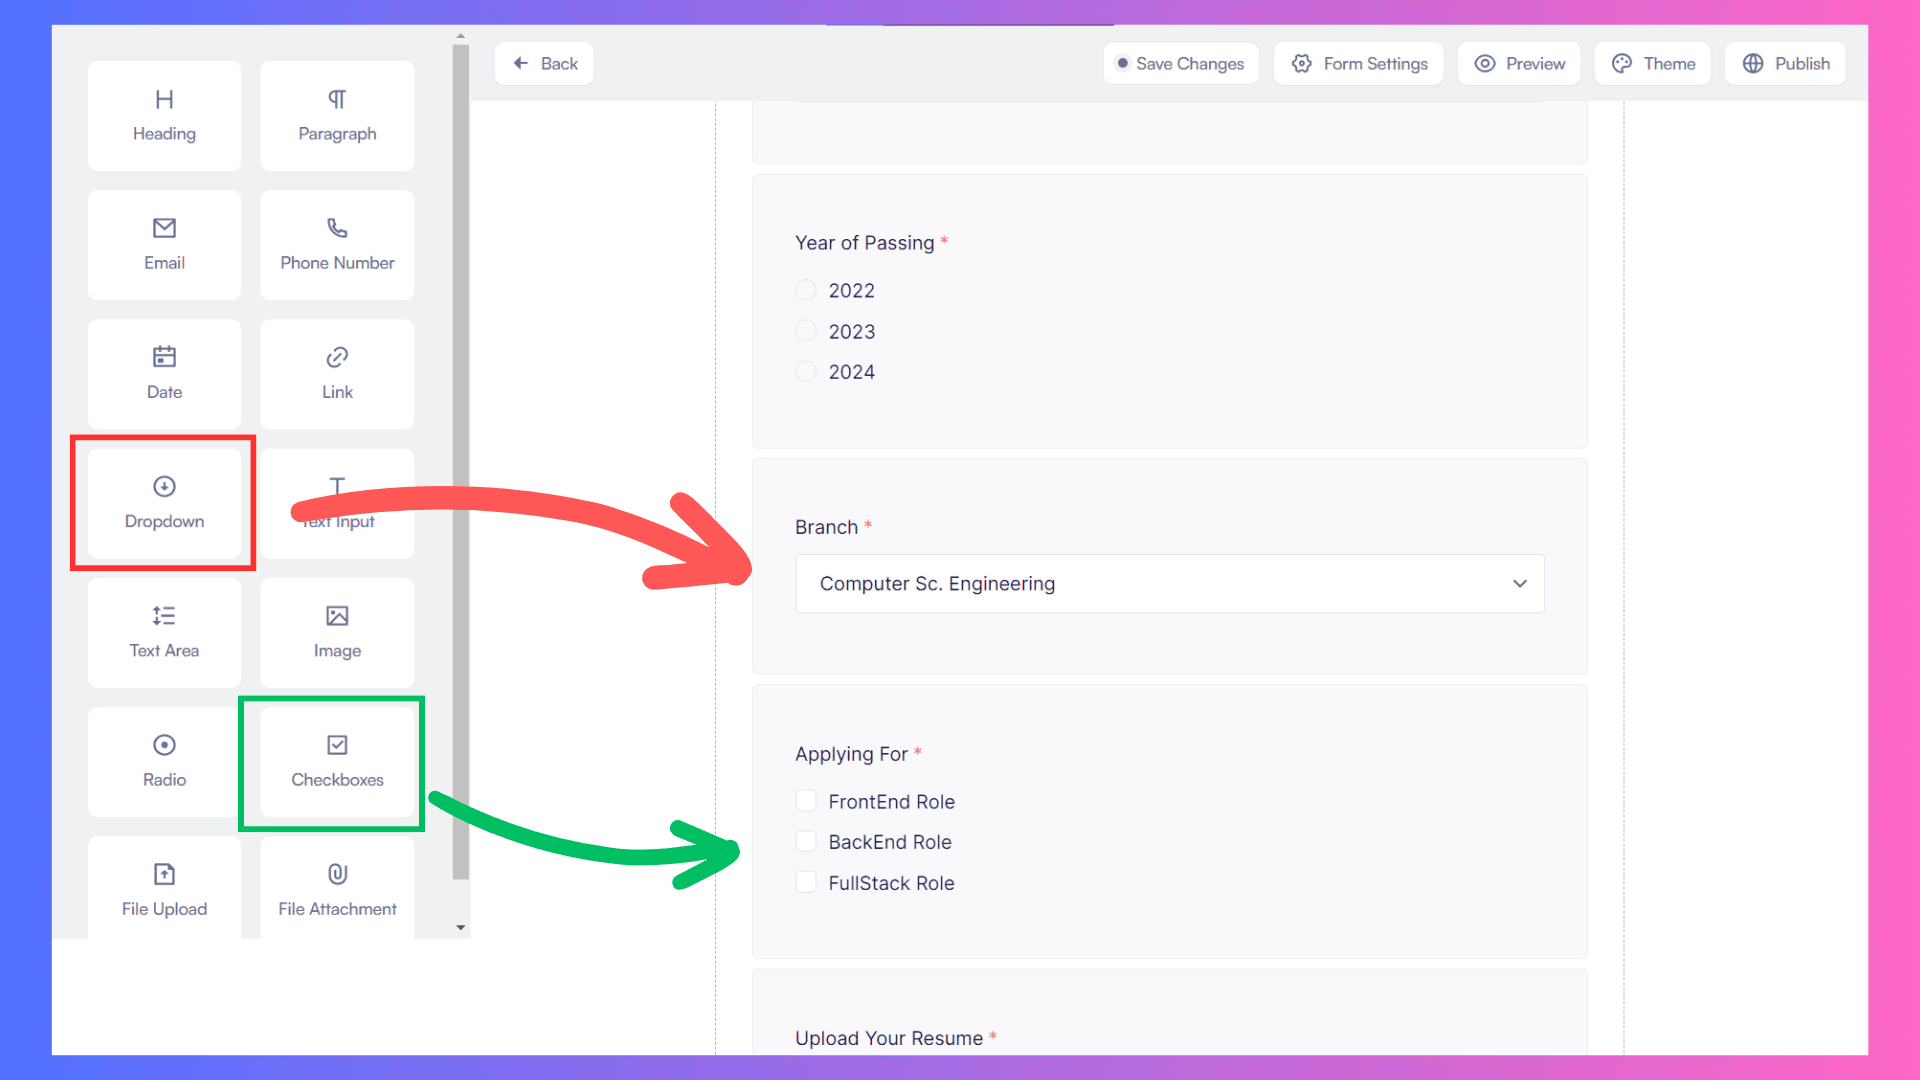
Step 7: Next, create a dropdown menu for branch selection by dragging the 'Dropdown' element into the drop zone. Open the property editor to customize them.
Step 8: Now, let's create a checkbox for the roles they want to apply for. This allows them to select multiple options. Drag the 'Checkbox' element into the drop zone.
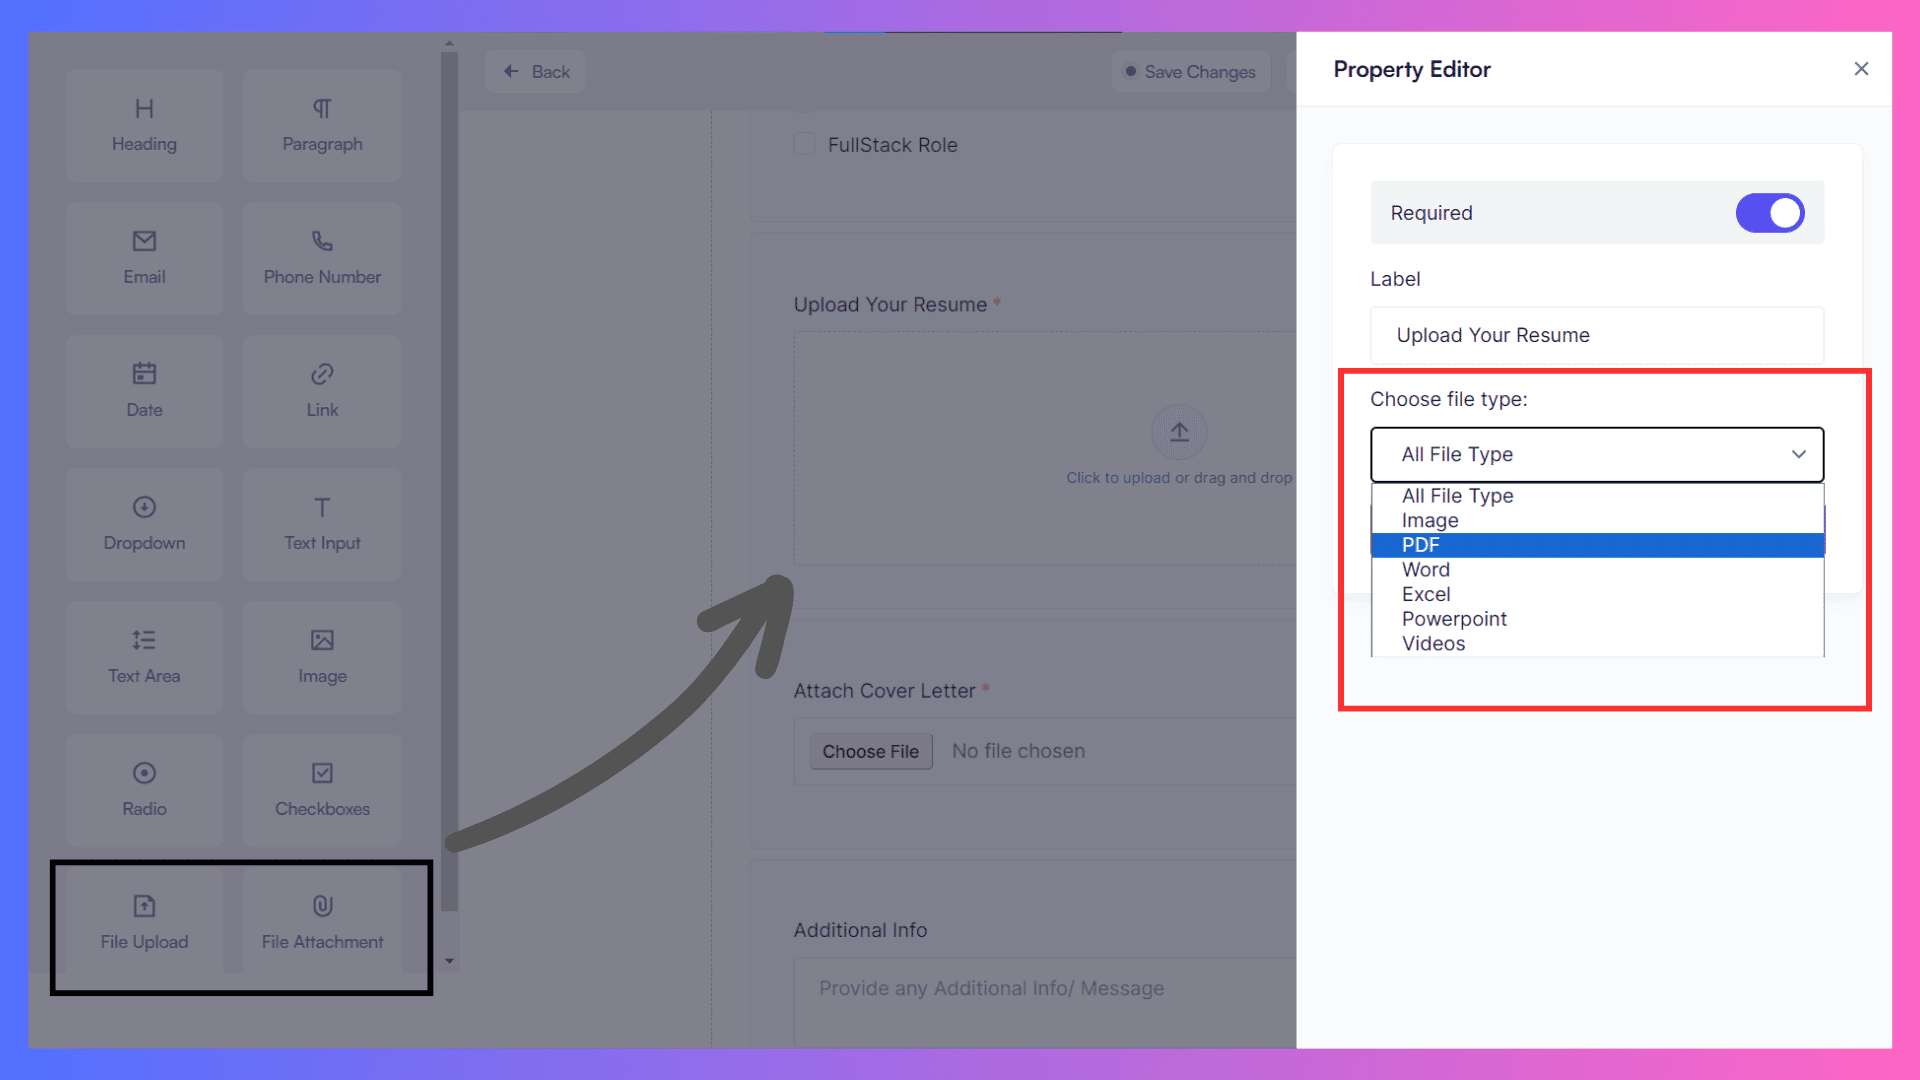
Step 9: Now, to allow candidates to upload their resume and CV, we need to add the 'Upload File' element if we want to specifically accept PDF files. If we want to allow any file format for CV, we'll use the 'Attach File' element.
So, let's drag and drop the 'Upload File' and 'Attach File' elements into the drop zone. Customize the file type for the 'Upload File' element as PDF.
Step 10: Now, let's allow users to provide extra info by dragging the 'Text Area' element into the dropzone, to provide a specified space for the input.
Don’t forget to enable the Required option.
Congrats, you have successfully created a Recruitment form.
Now, please follow the steps discussed in the Feedback Submission Form to save, publish, and share…
Photography Contest Form
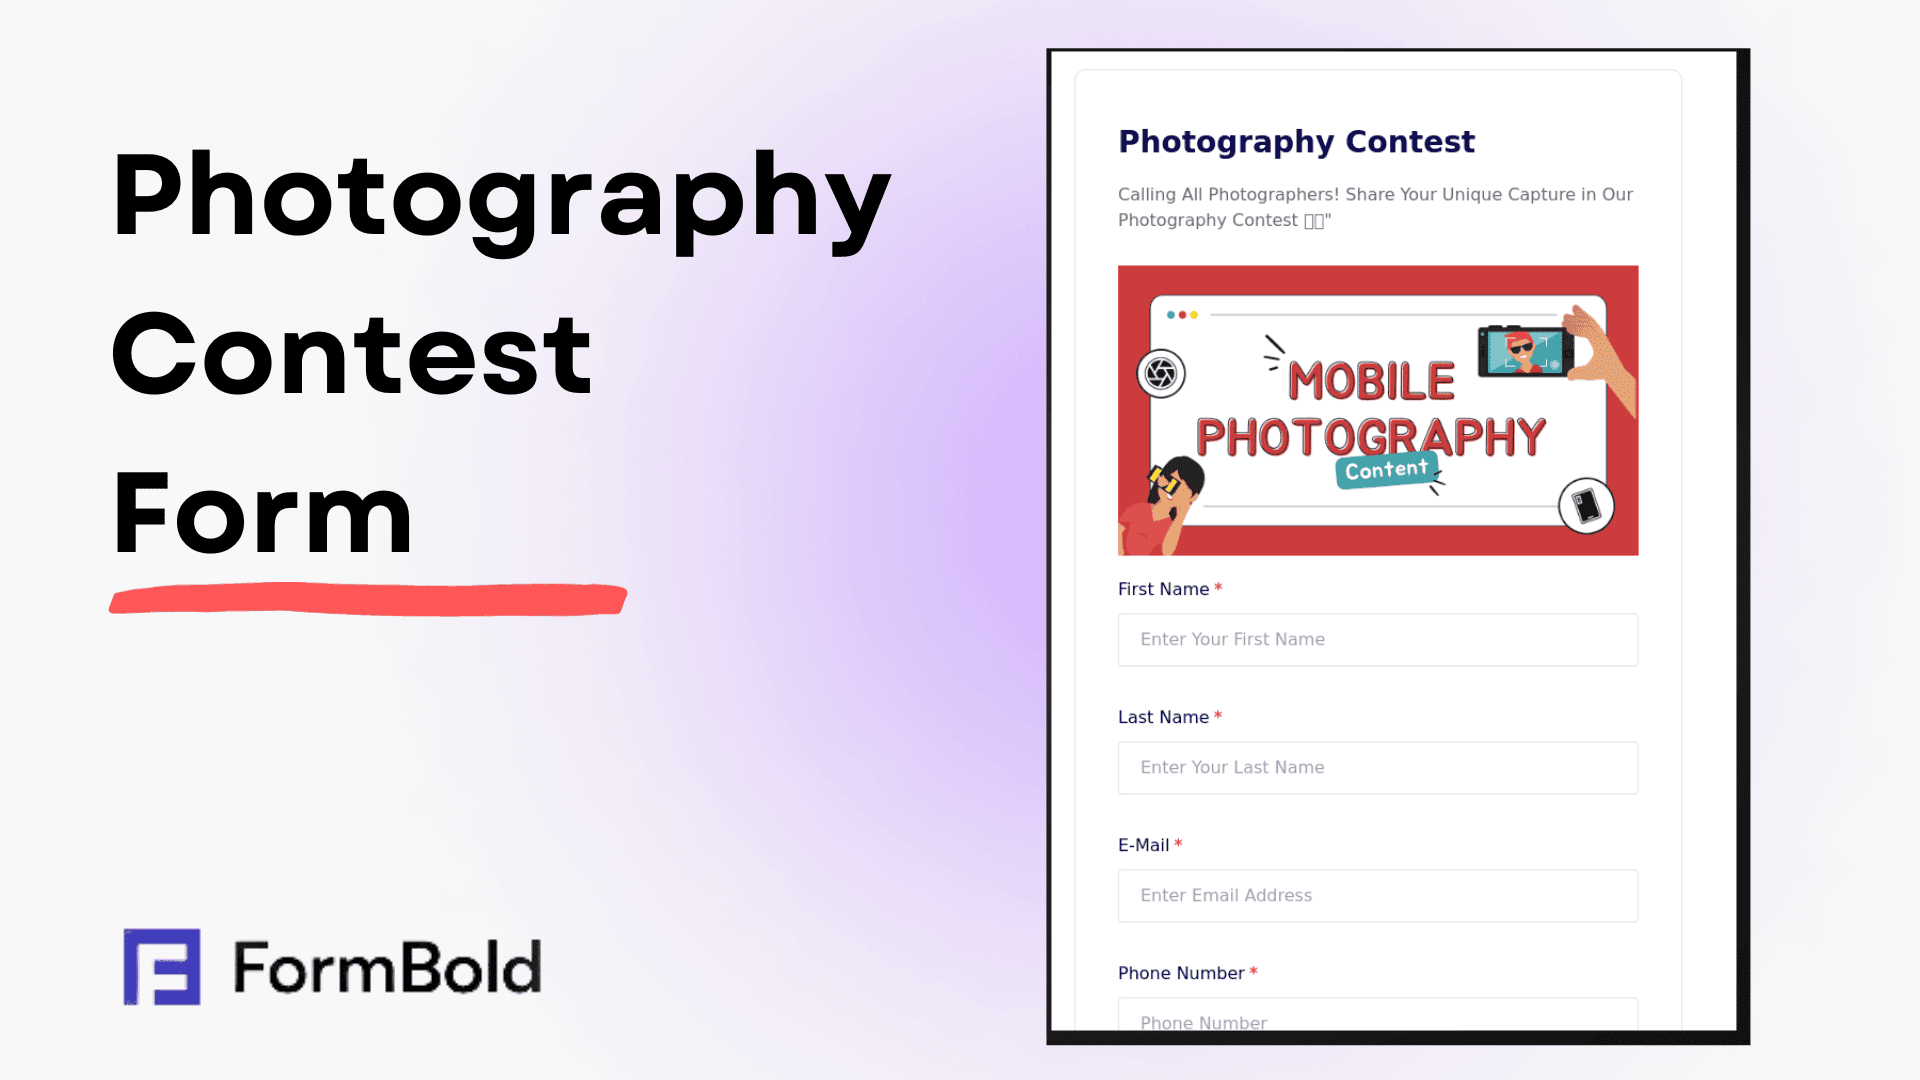
Let's design a Photography Contest Form using FormBold. This form will allow photographers to submit their masterpieces for an exciting contest.
In this section, we will guide you to create a photography contest form using Formbold Form Builder.
However, we won't discuss each and every step for this form. I encourage you to follow the above form creation steps to enhance your proficiency in creating forms.
Let's check out this process.
Just providing a basic overview to guide you in creating a Photography Contest Form. I encourage you to try it out on your own.
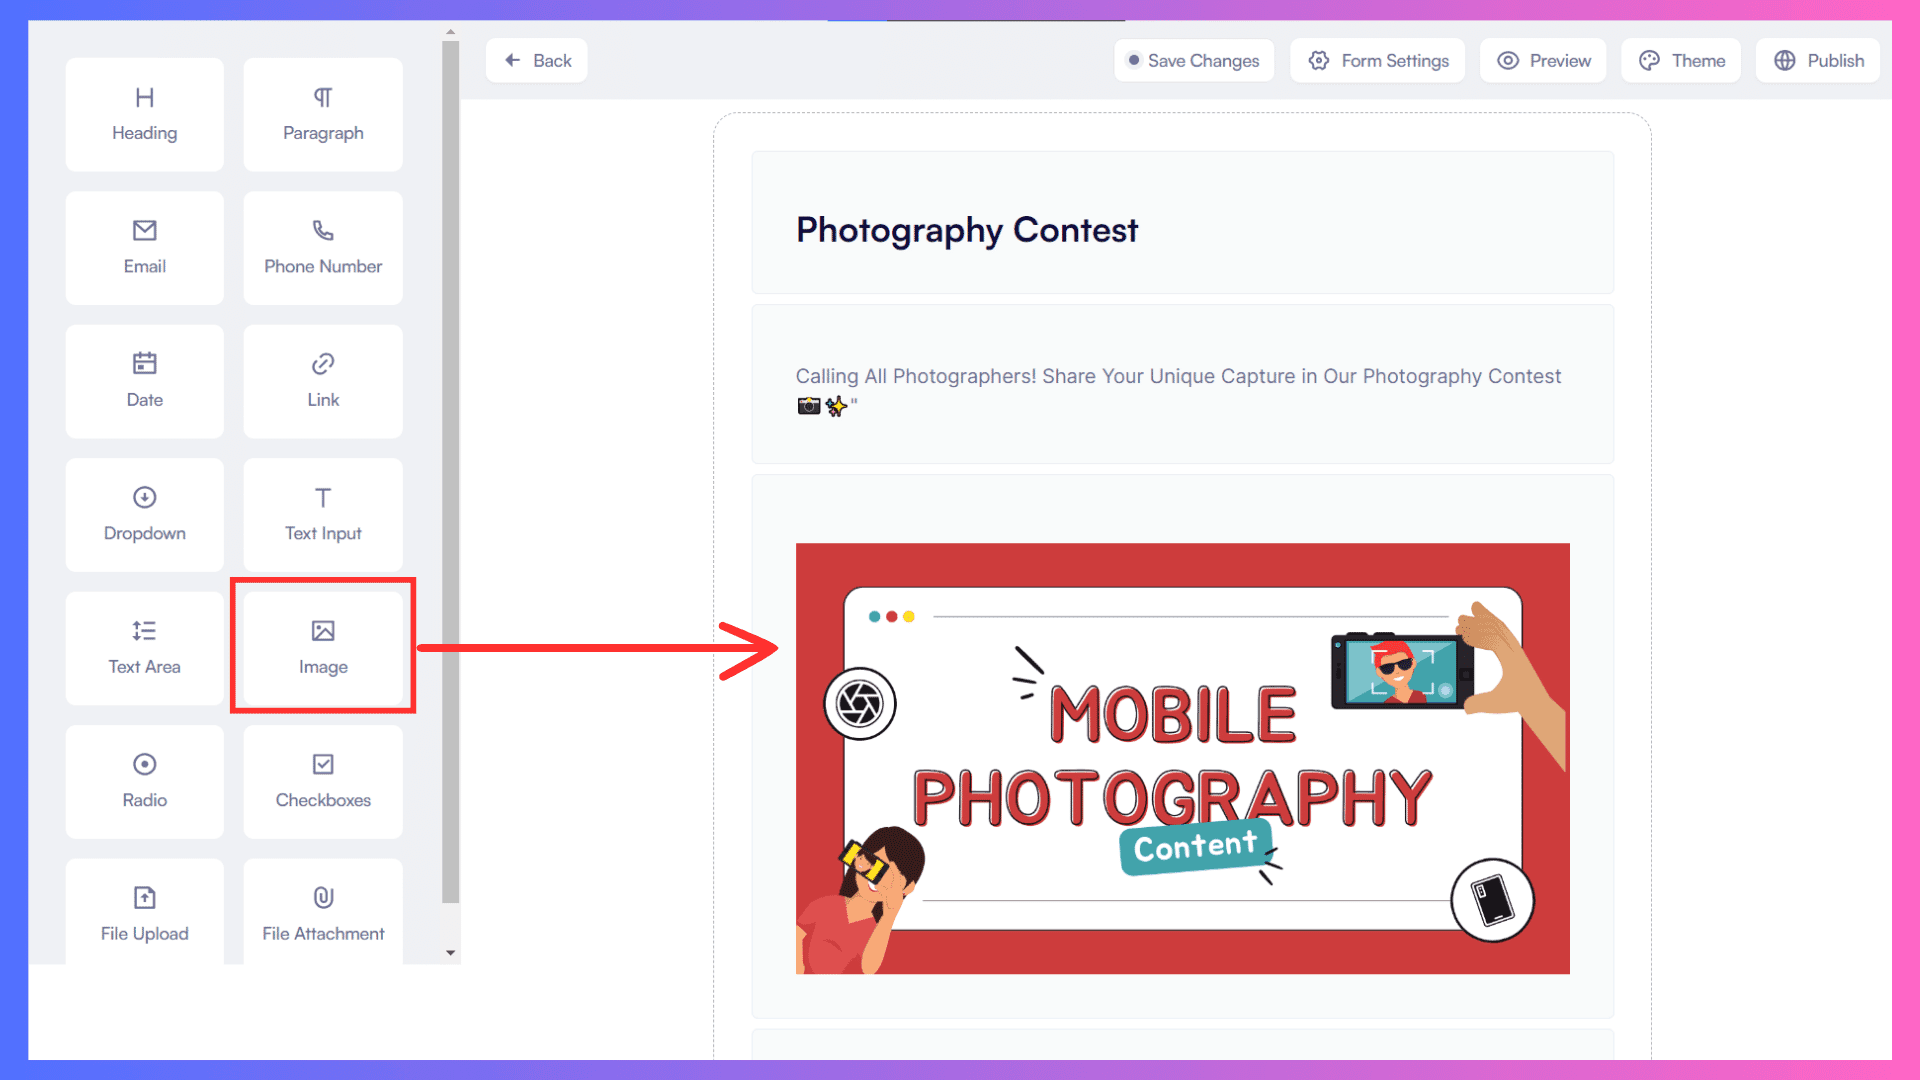
Step 1: Create a Heading and give a short description using the “Heading” and “Paragraph” elements.
Step 2: Now add an image at the top using the “image” element.
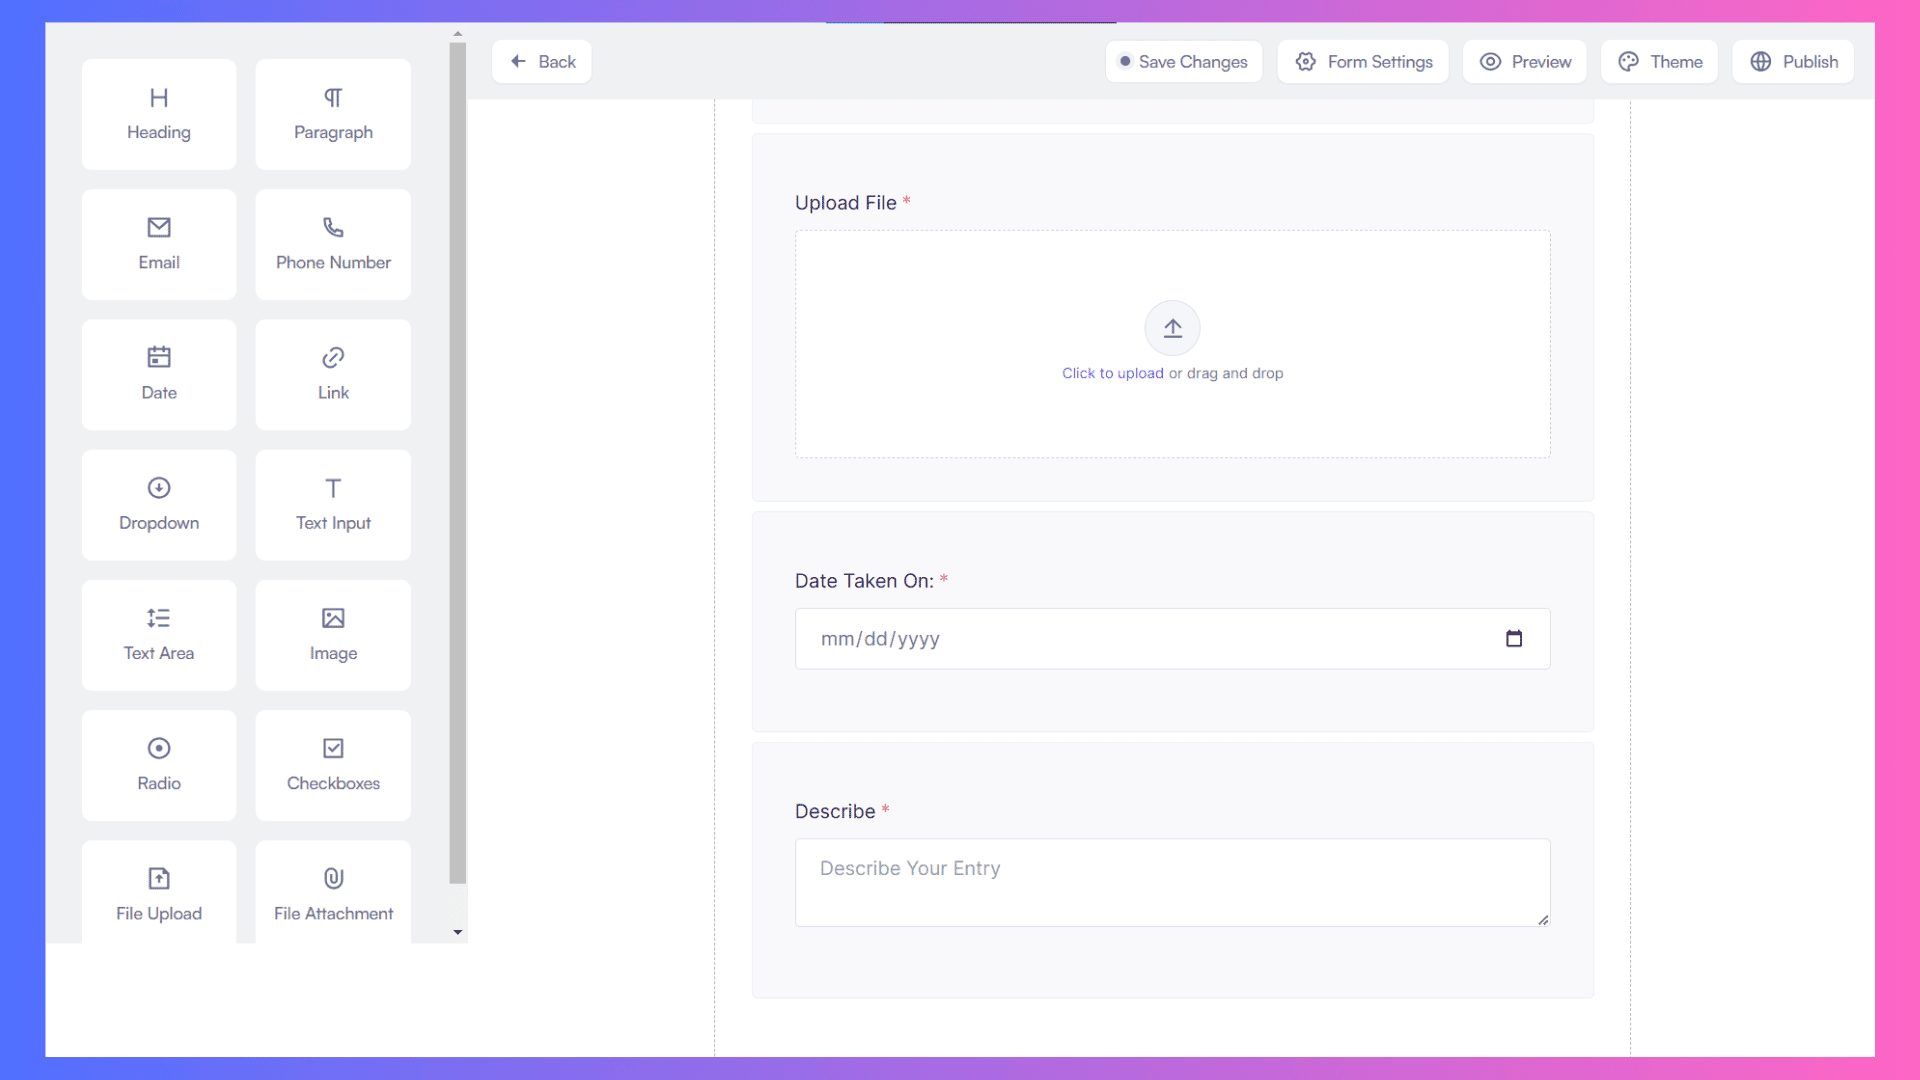
Step 4: Next, add an option to submit an image file using the “Upload File” element.
Step 5: Utilize the 'Date' element to prompt users to provide the date on which the image was taken. Additionally, include a 'Text Area' element to allow users to describe their submissions.
That's it! We've covered all the essential elements needed for a photography contest form. Feel free to add more if needed.
Happy form creation!
Now, go through the step-by-step guide on the different integrations to receive responses on different channels.
Integration with Email
Emaile successfully created various forms, including the Feedback Submission Form, Recruitment Submission Form, and Photography Contest Form, using every element of the Form Builder. Now, it's time to see these forms in action.
FormBold seamlessly integrates with email, ensuring you receive timely notifications upon form submission.
However, let's go through the integration steps in case you'd like to customize or make modifications.
For this purpose and all upcoming app integration demonstrations, we'll utilize the Feedback Submission Form we created earlier.
Let's go through the steps to integrate.
Step 1: Navigate to the Form Dashboard and click on 'Settings' in the action section for the Feedback Submission Form. You can do the same for other forms as well.
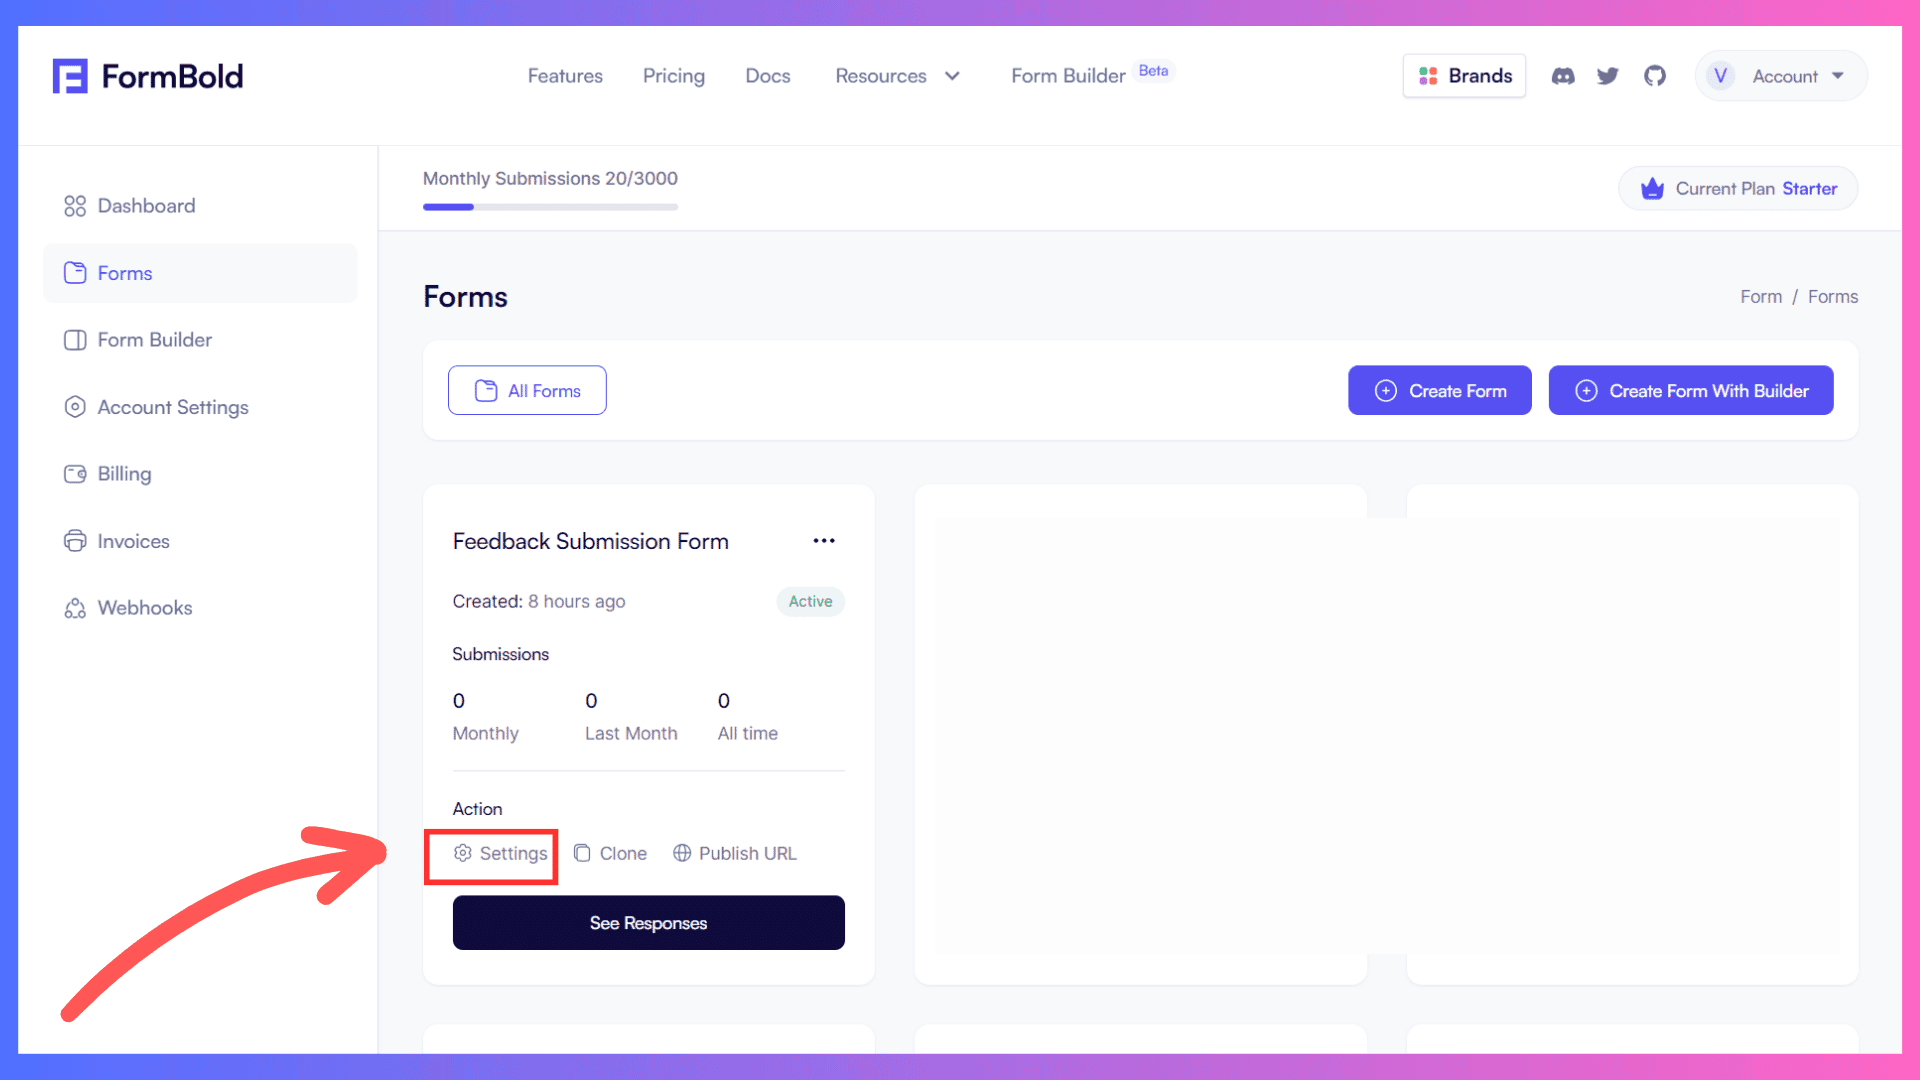
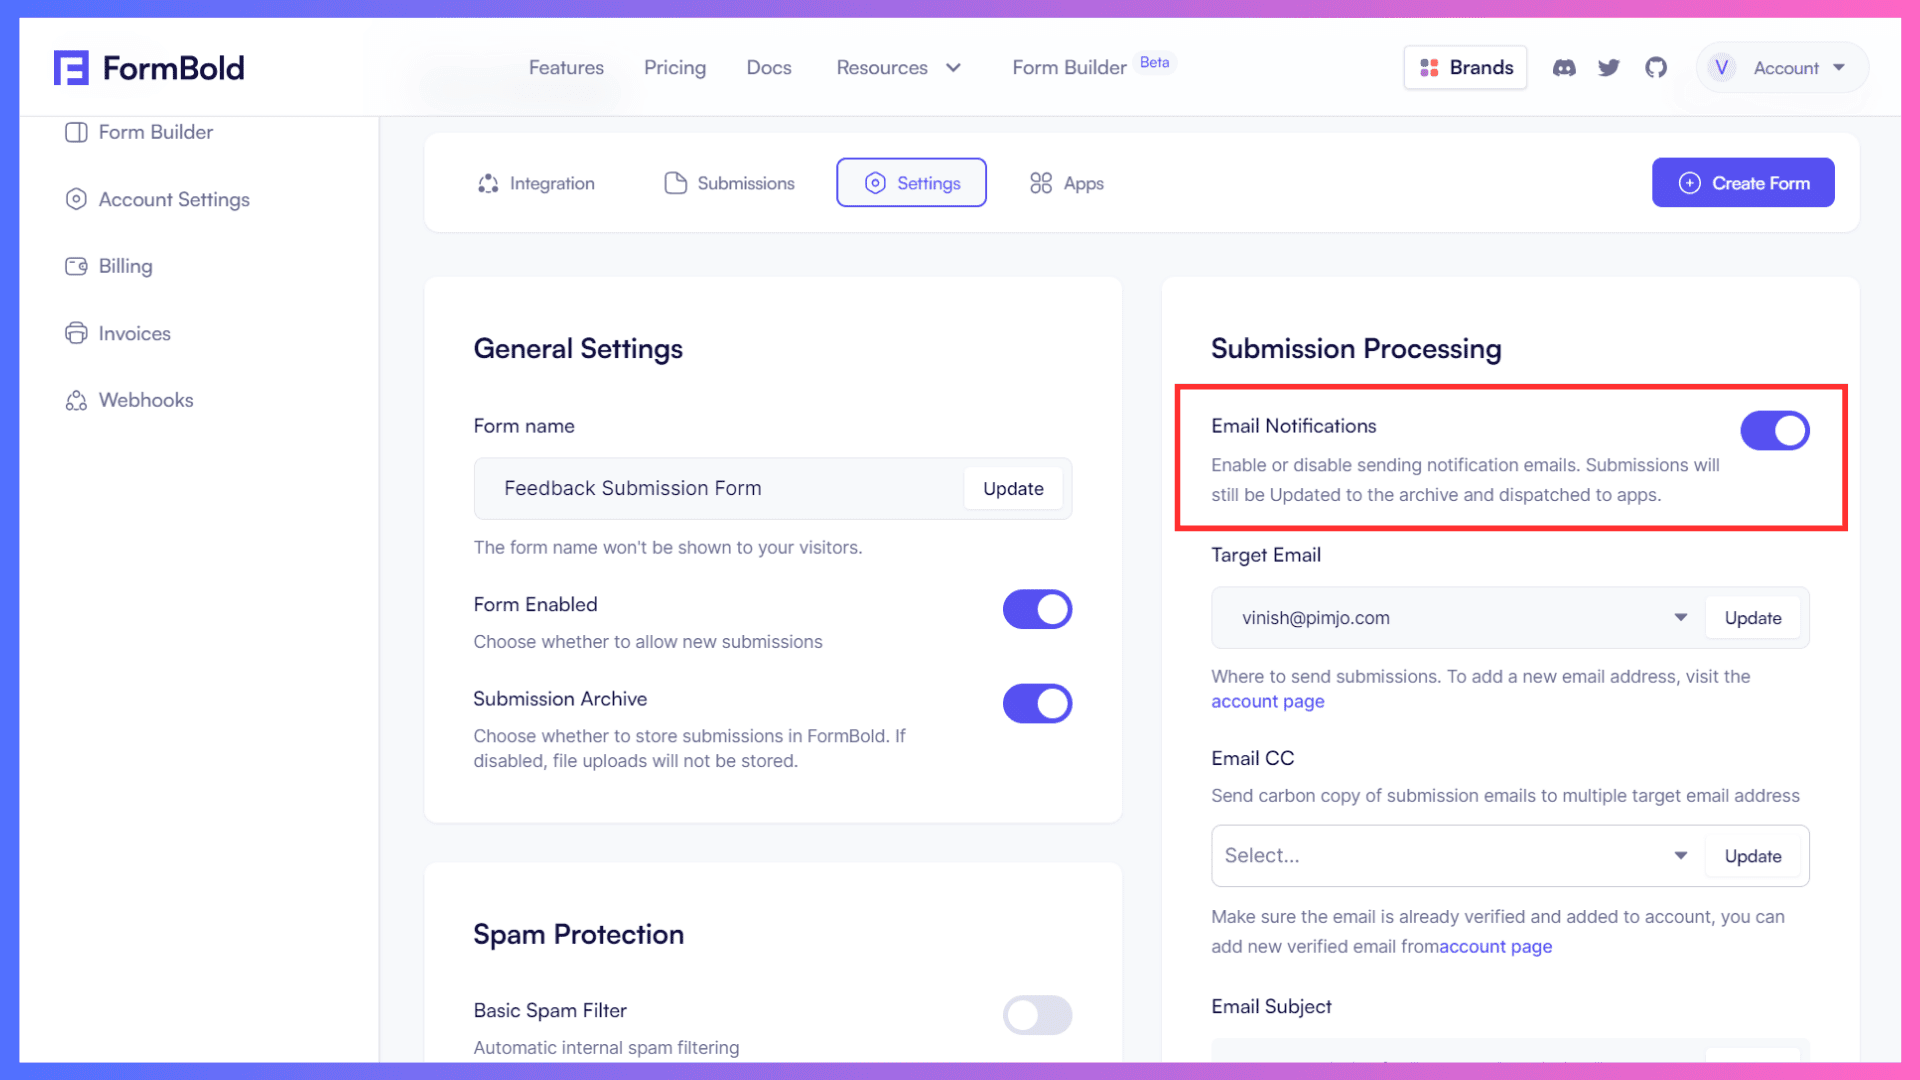
Step 2: In the 'Submission Process' section, as shown in the image for reference, you can manage various email notification settings.
You can toggle email notifications on or off, update the target email for receiving notifications, add CC to send a copy of the response, and even customize the email.
PS: We suggest you turn the email notification OFF, in case you don't wish to fill your mailbox with notifications for each and every response.
Step 3: For testing purposes, let's enable the emailemailfication for now.
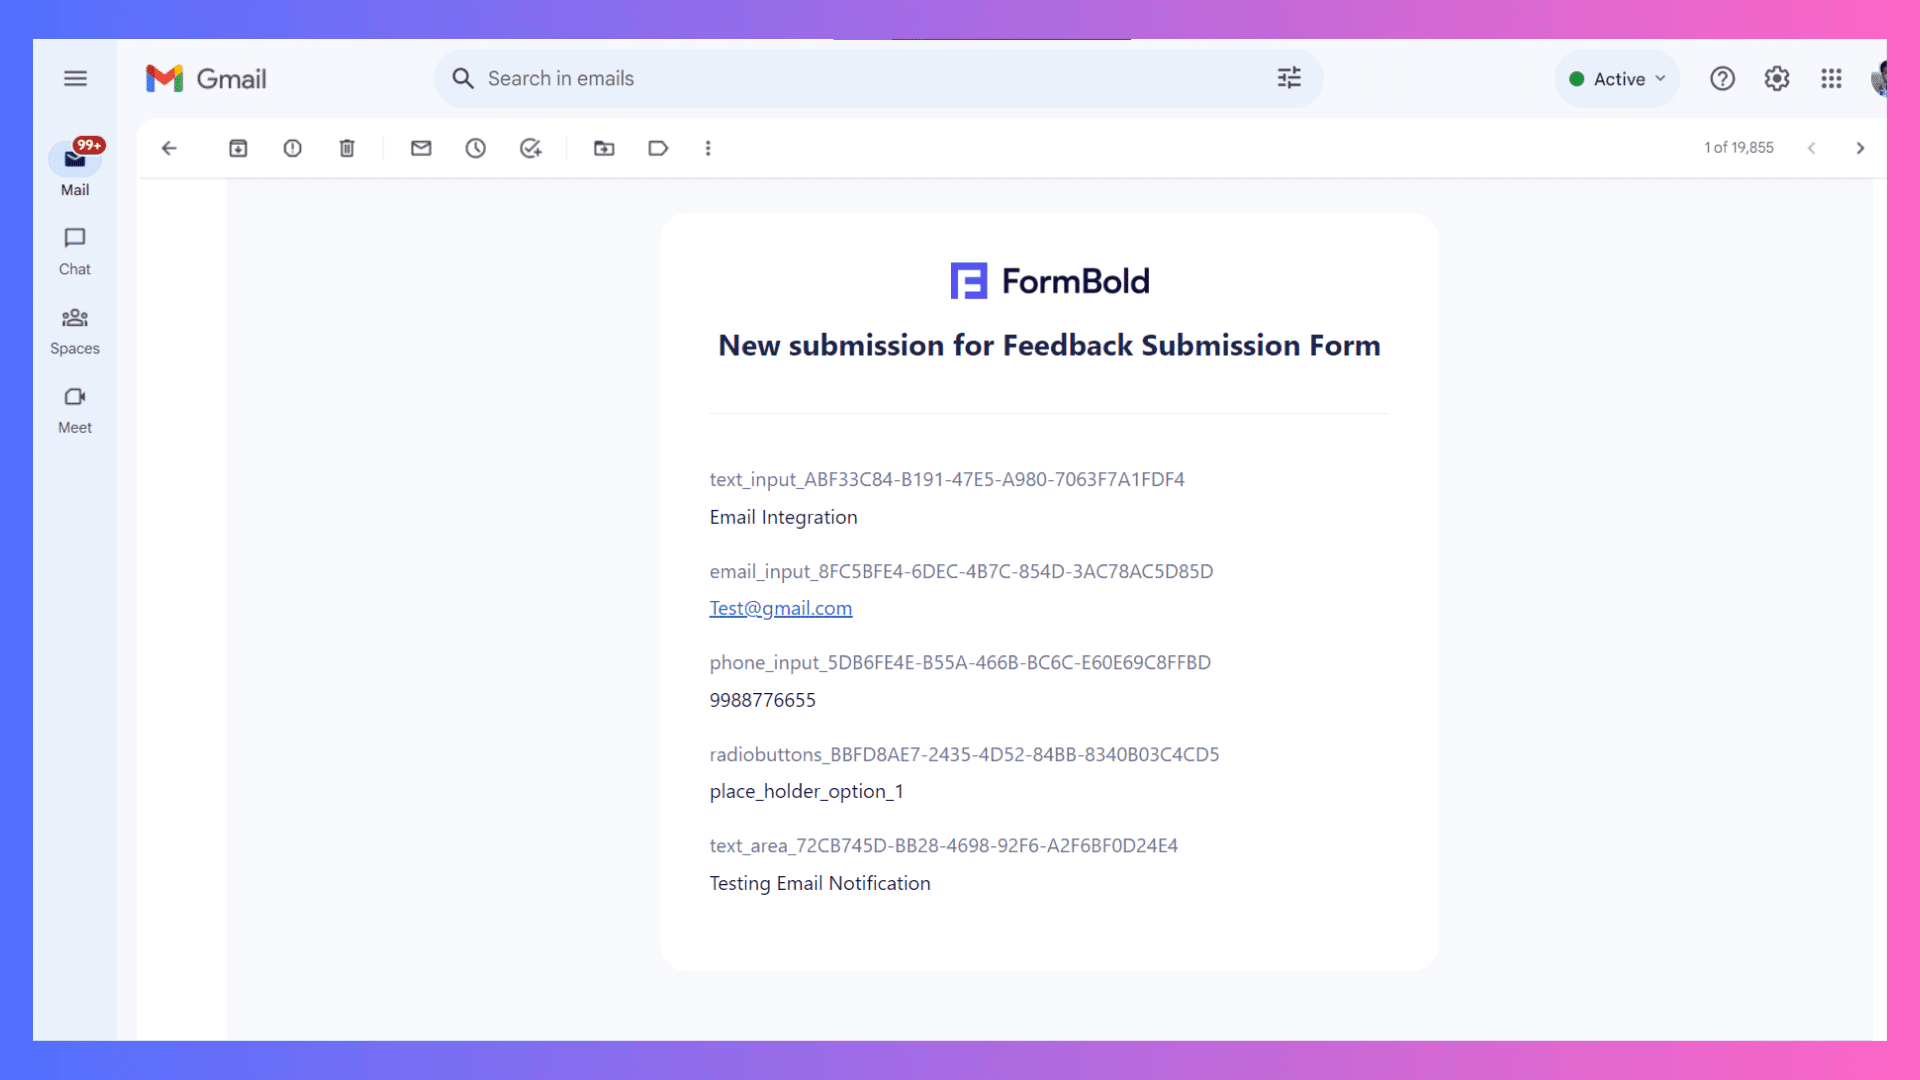
Now, open the public URL of the form and submit a response. If you're unable to find the form's public URL, check the form creation section above…
Once you submit a response to the form, you'll receive an emailemailfication like this (below image) for the response.
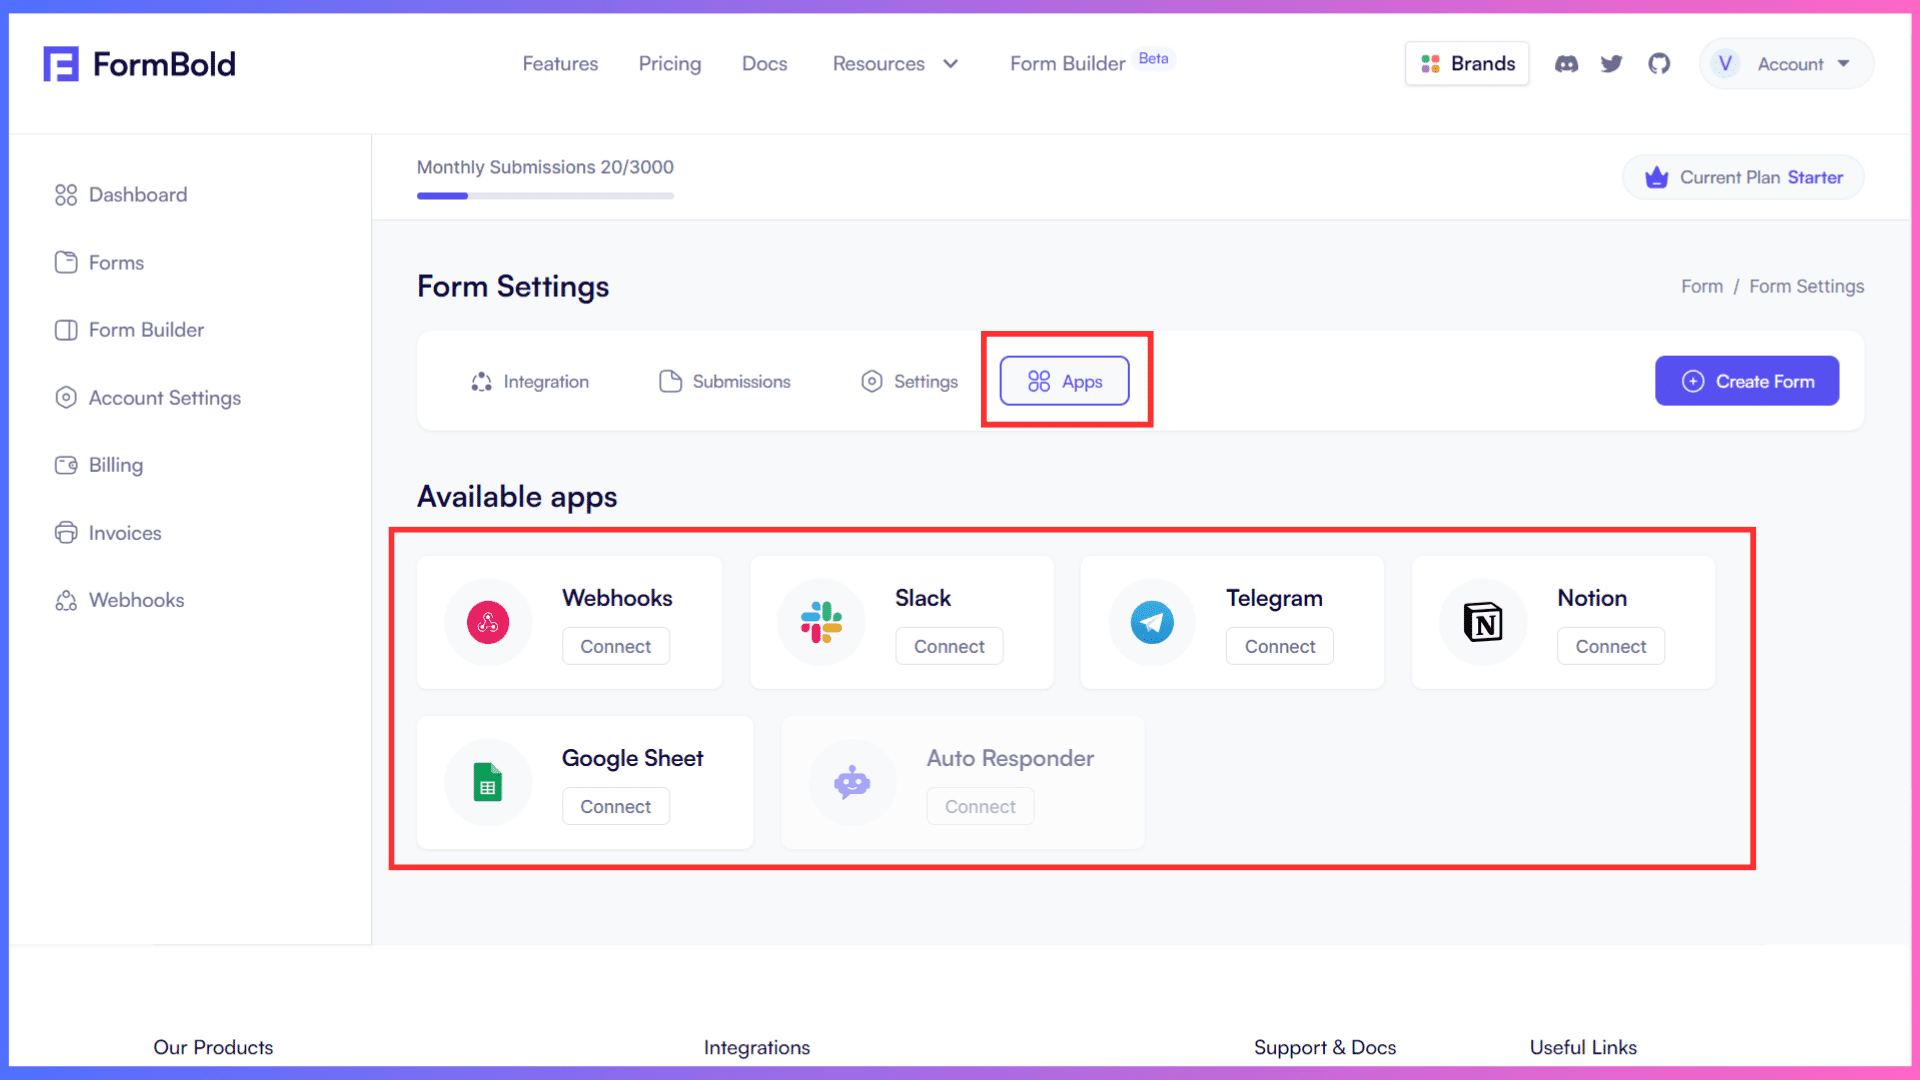
Integration with Apps
FormBold offers seamless app integrations with popular channels, including Webhooks, Google Sheets, Telegram, Slack, and Notion. We've already explored the default Email Integration that comes with FormBold. However, for other App integrations, we need to follow certain steps to make them work.
To simplify this process, we'll discuss app integrations with different channels one by one, ensuring a smooth setup and understanding.
Let's start our app integration journey with Google Sheets, which lets us collect all form responses in an organized spreadsheet.
Integration with Google Sheet
Google Sheets serves as a central hub, effectively managing and organizing data in a structured format. When you integrate your forms with Google Sheets, you simplify the process of gathering and analyzing form responses. It helps in easy visualization and real-time collaboration with team members.
We'll use the Feedback Submission Form to integrate with Google Sheets.
Let's integrate ForBold Form with Google Sheets.
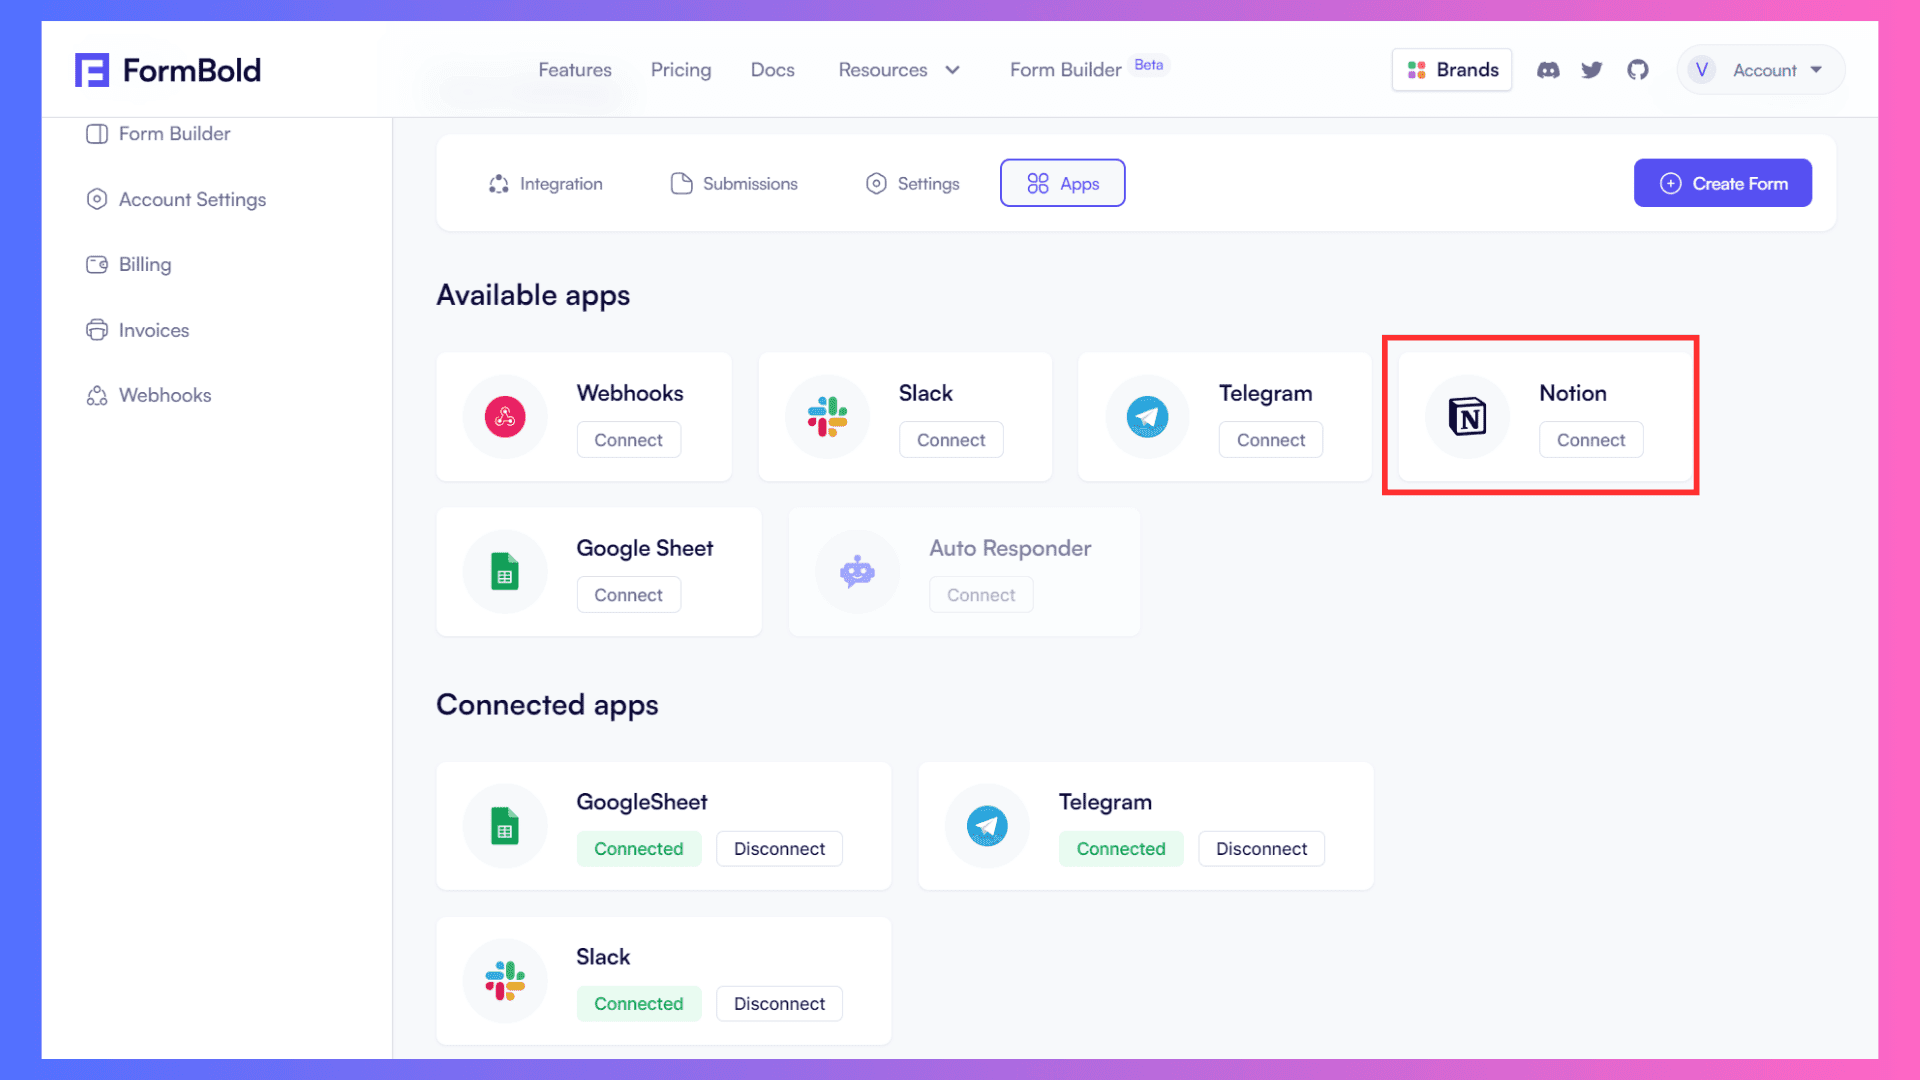
Step 1: Navigate to the Form Dashboard page and click on the 'Apps' tab to discover all the available integration options. Then, click on the 'Google Sheets' option.
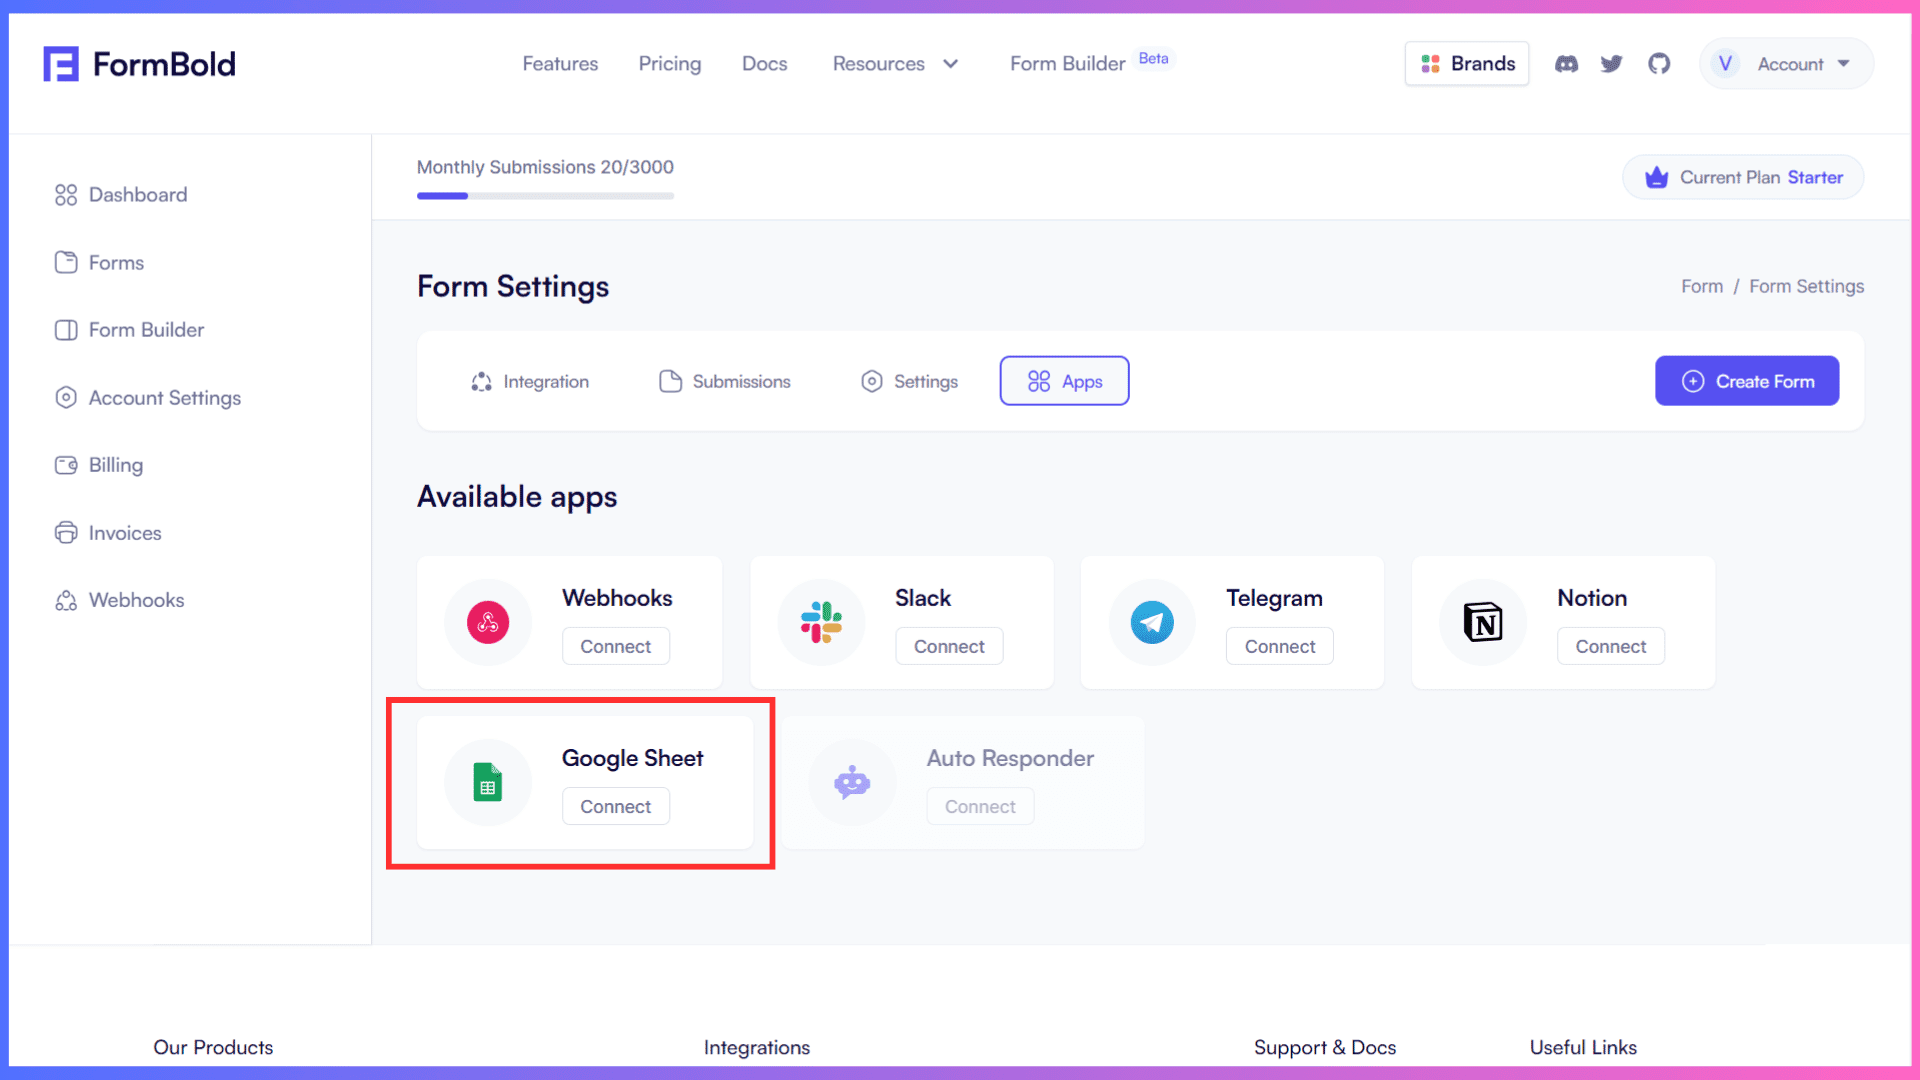
Step 2: Next, a login page will open. Log in with your Google account and allow the required permissions to proceed.

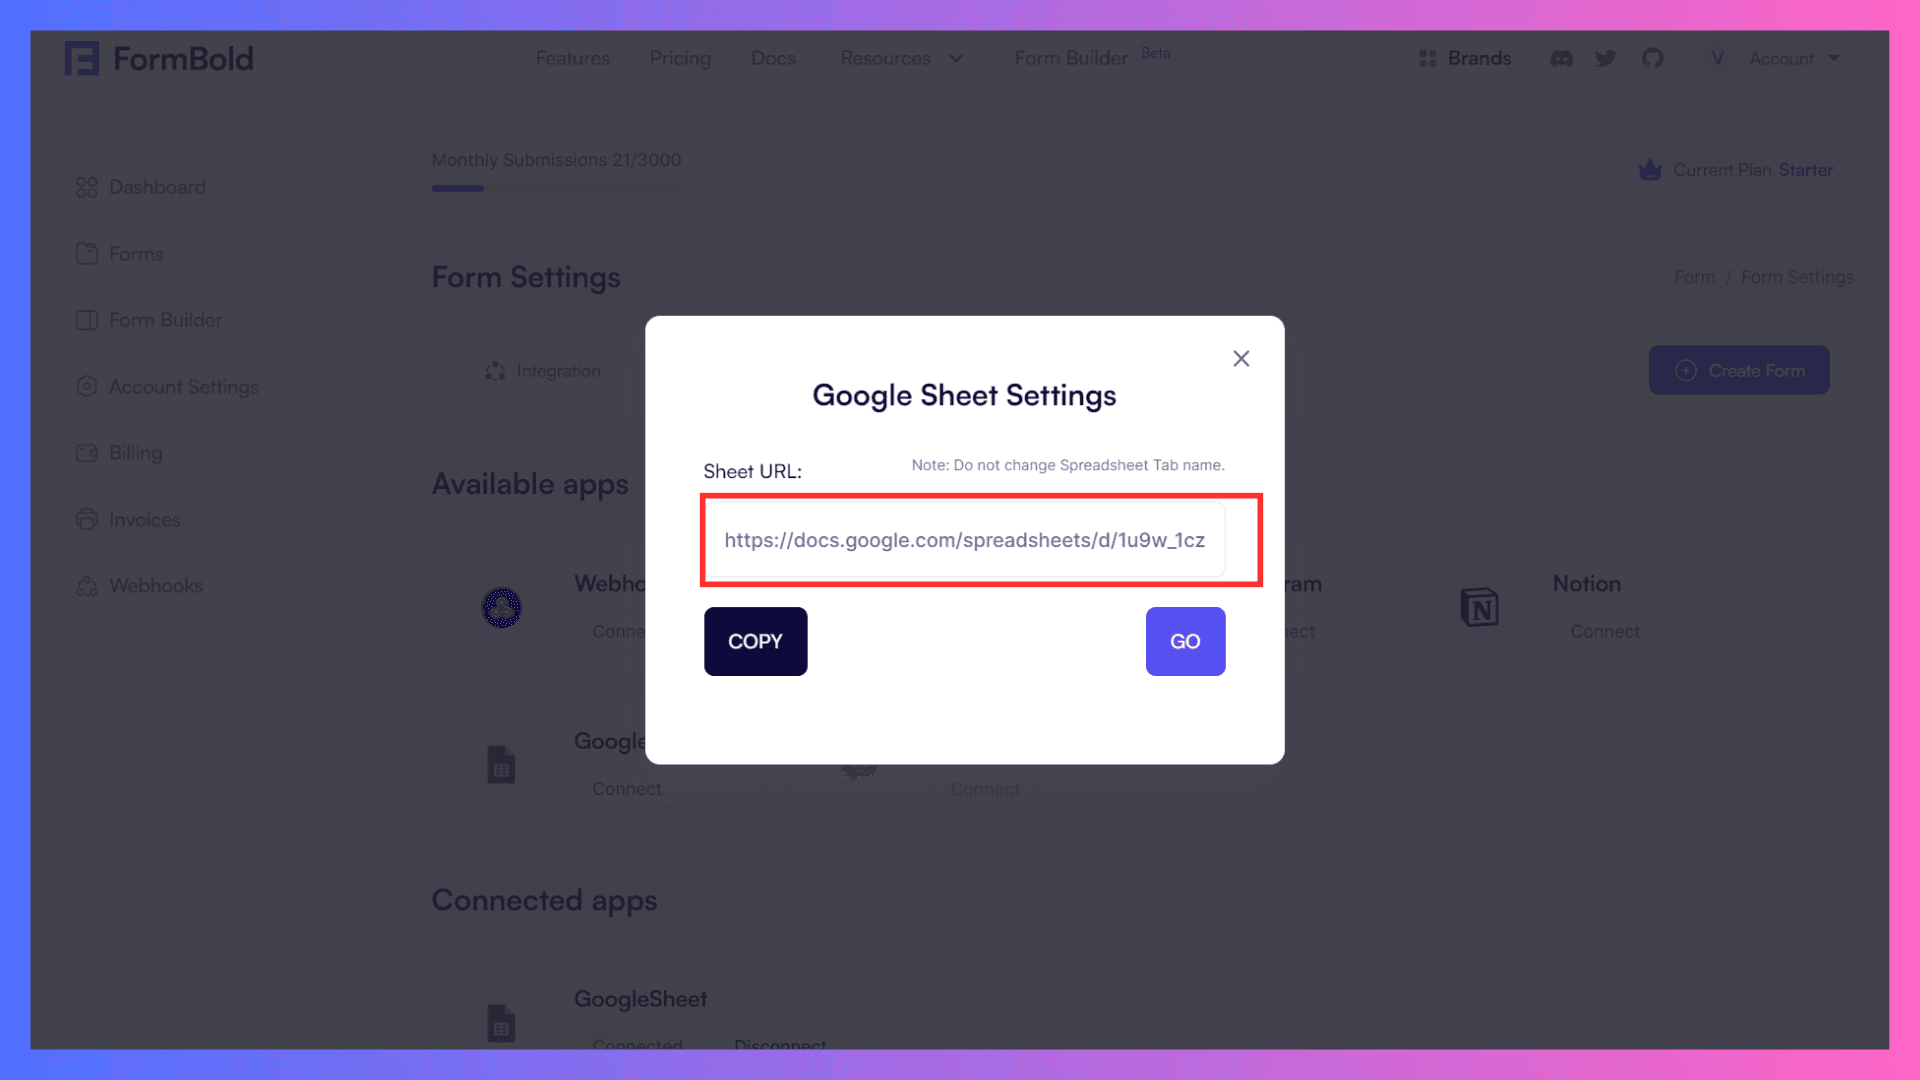
Step 3: After granting all the required permissions, a pop-up with the Google Sheets link will appear. You can either copy this link or open it directly to see the response.
The great advantage of Google Sheets integration is that you can access all your previous form responses directly in the sheet, ensuring a complete record of all submissions.
Voila! You've successfully integrated Google Sheets with FormBold. Easy, isn't it?
Let's now explore integration with the Telegram app.
Integration with Telegram
Integrating your forms with Telegram is like having a direct and always active communication channel.
FormBold Telegram bot provides instant notifications as soon as a response is received in your inbox, ensuring timely updates and rapid communication. Whether you're in a meeting or out and about, your form's messages reach you wherever you are.
Let's explore how to set a connection between FormBold Form and Telegram with easy steps:
For this integration process, we'll utilize the Feedback Submission Form.
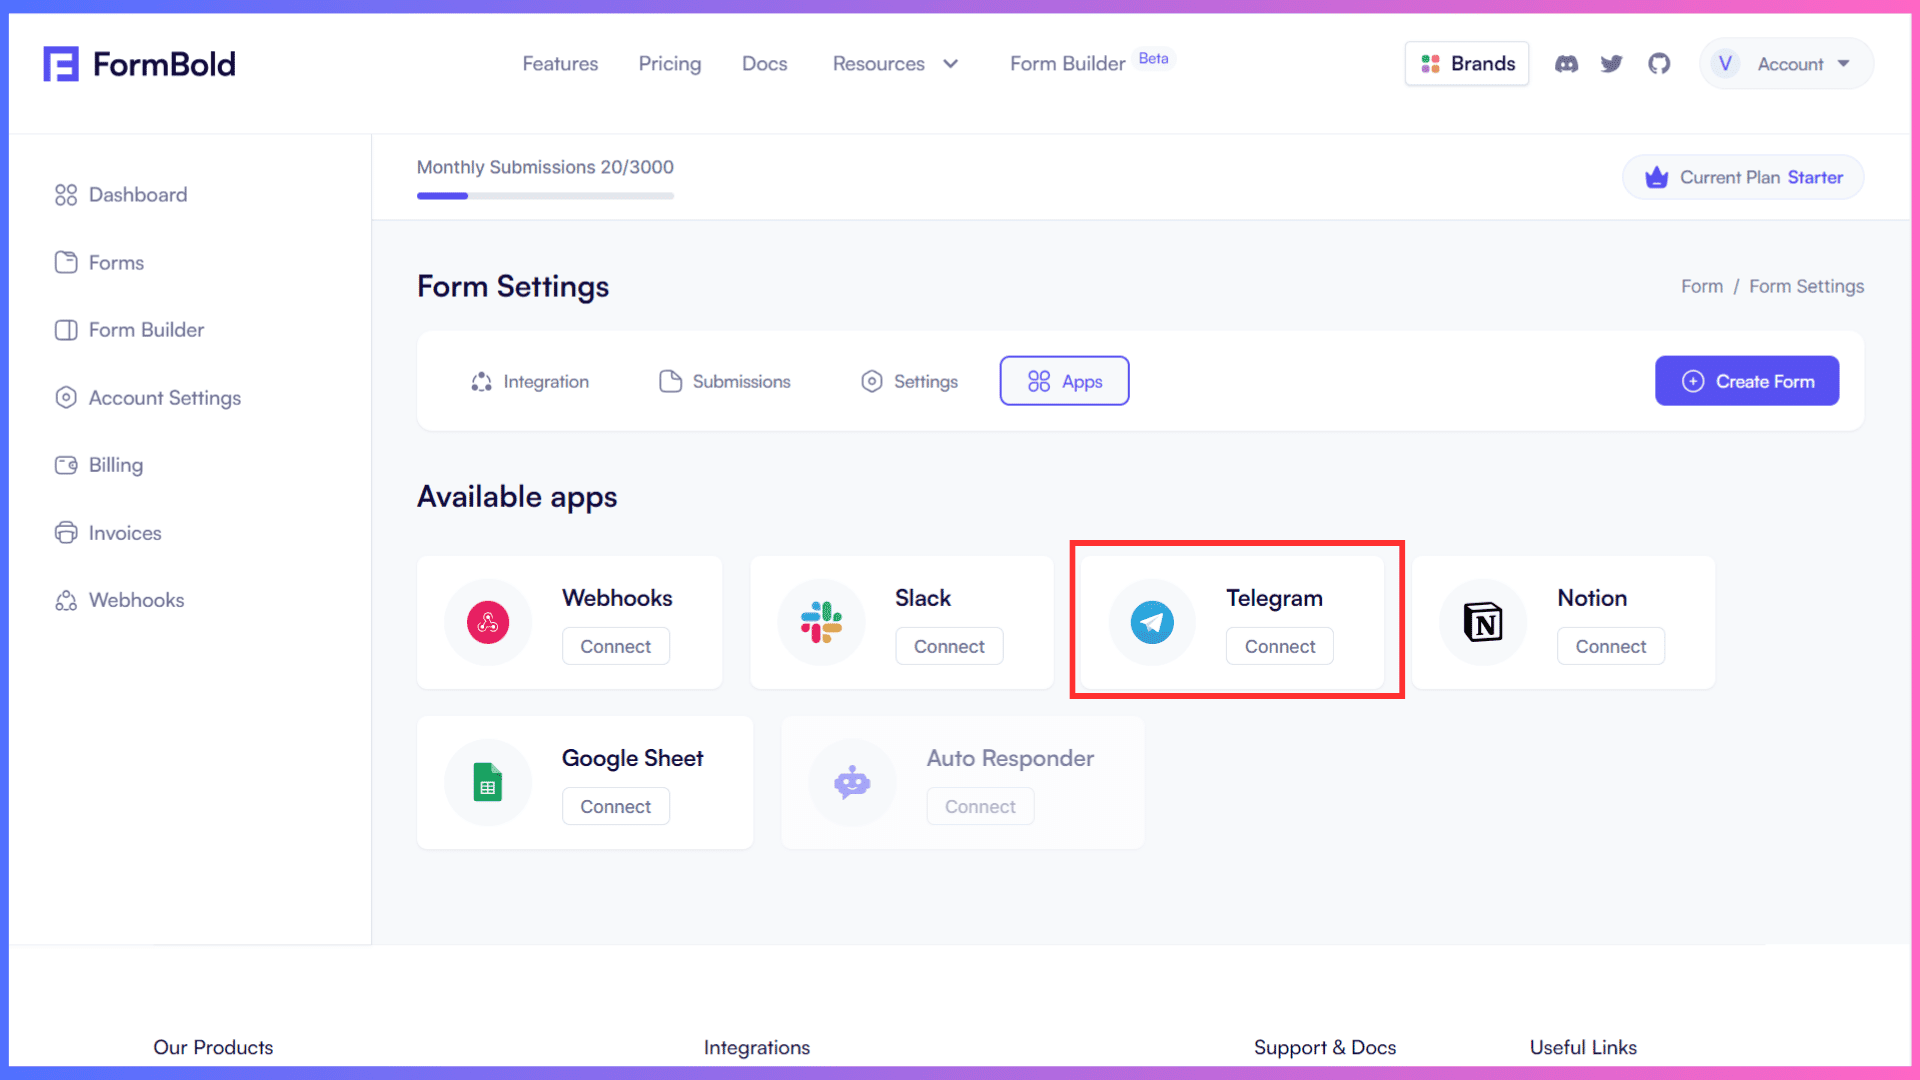
Step 1: Click on the 'Apps' tab on the Form Setting Dashboard Page, locate the 'Telegram' option, and click on it.
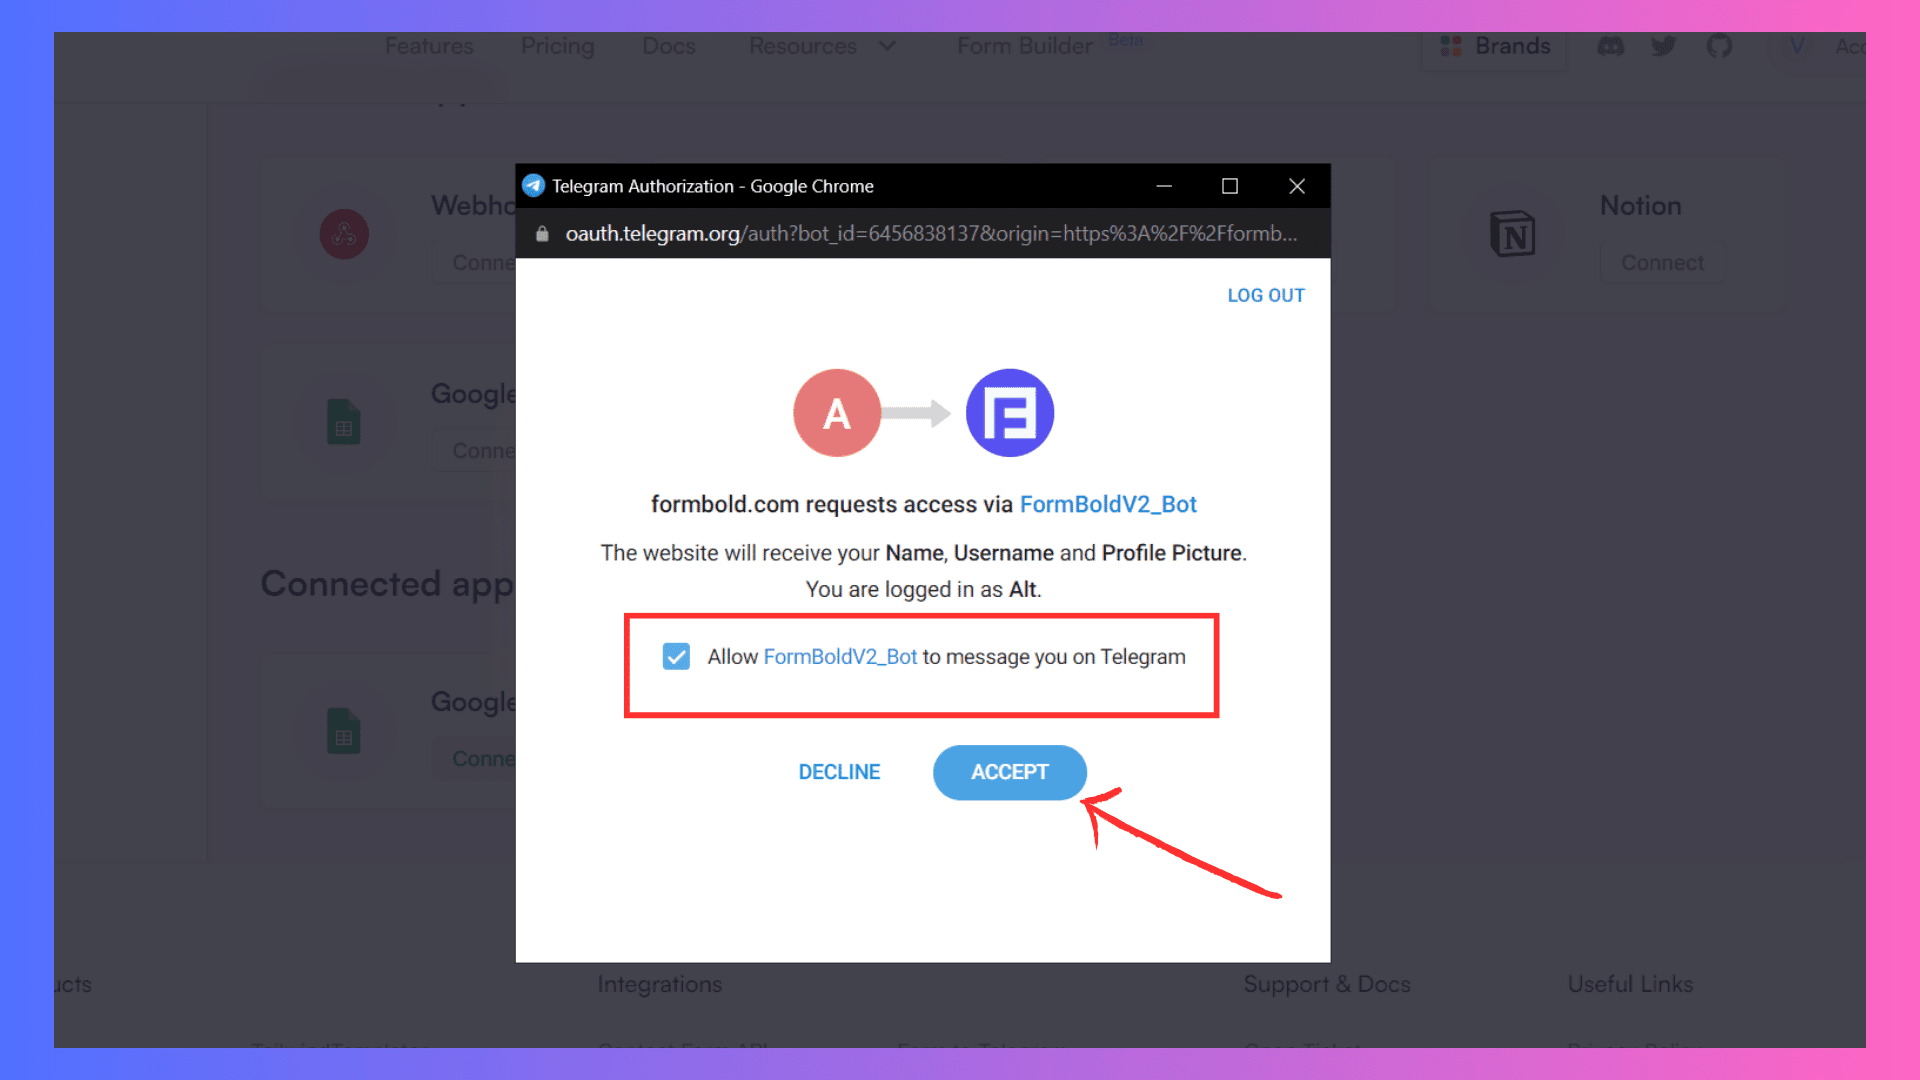
Step 2: Next, a pop-up will appear, prompting you to log in to Telegram and grant permission for the Telegram Bot to send you messages.
Just log in with the Telegram account where you wish to receive the notifications.
Step 3: In this step, you'll need to send a 'Hello' message to the Telegram bot.
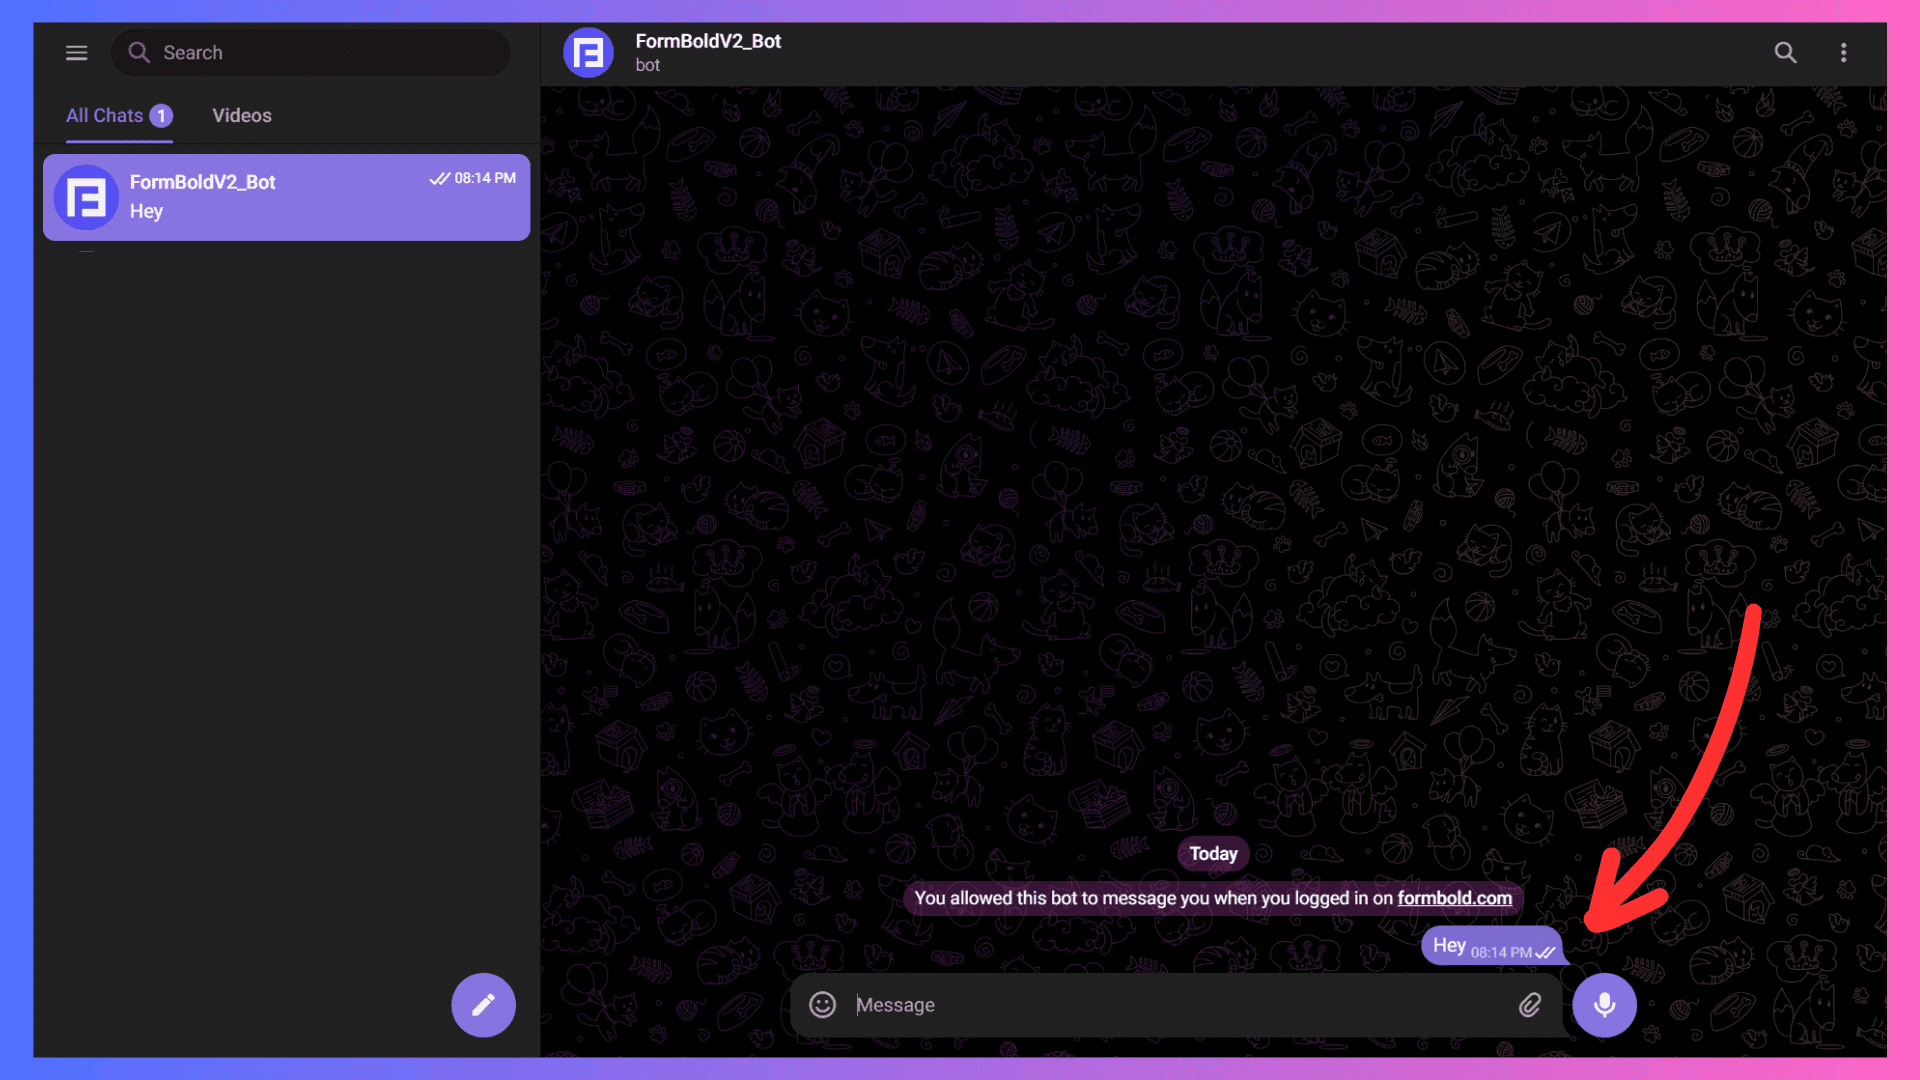
Done! You have successfully integrated the Feedback Submission Form with the FormBold Telegram Bot. Now, you will receive a notification for each form submission directly into your Telegram inbox.
Let's now explore integration with Slack.
Integration with Slack
Integrating your forms with Slack is like having a dedicated messenger for your team. It ensures everyone receives the response instantly.
When your forms are linked with Slack, the entire team can receive real-time updates and engage in discussions about responses, ensuring seamless communication and collaboration.
Here's how you can integrate FormBold Form with Slack with easy steps:
For the integration with Slack, we'll use the Feedback Submission Form.
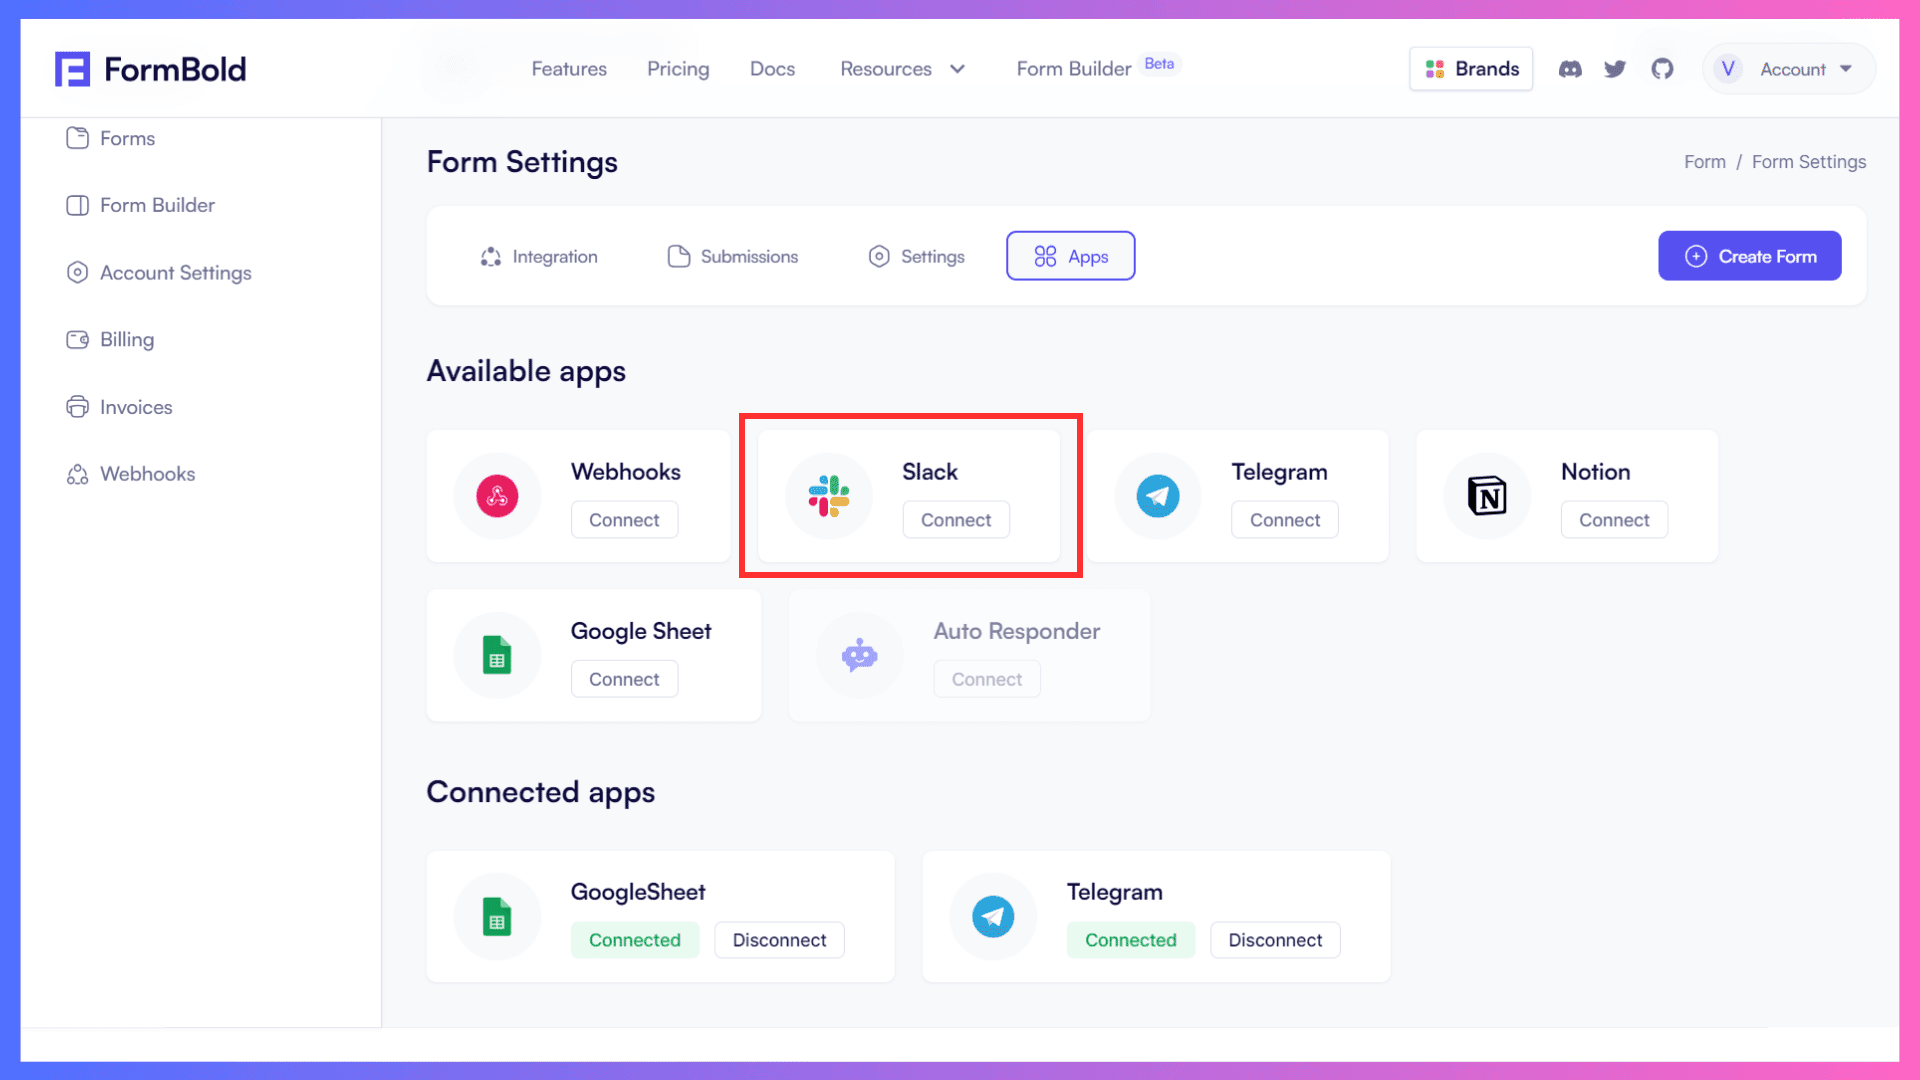
Step 1: Click on the 'Apps' tab on the Form Setting Dashboard Page, locate the 'Slack' option, and click on the Connect button.
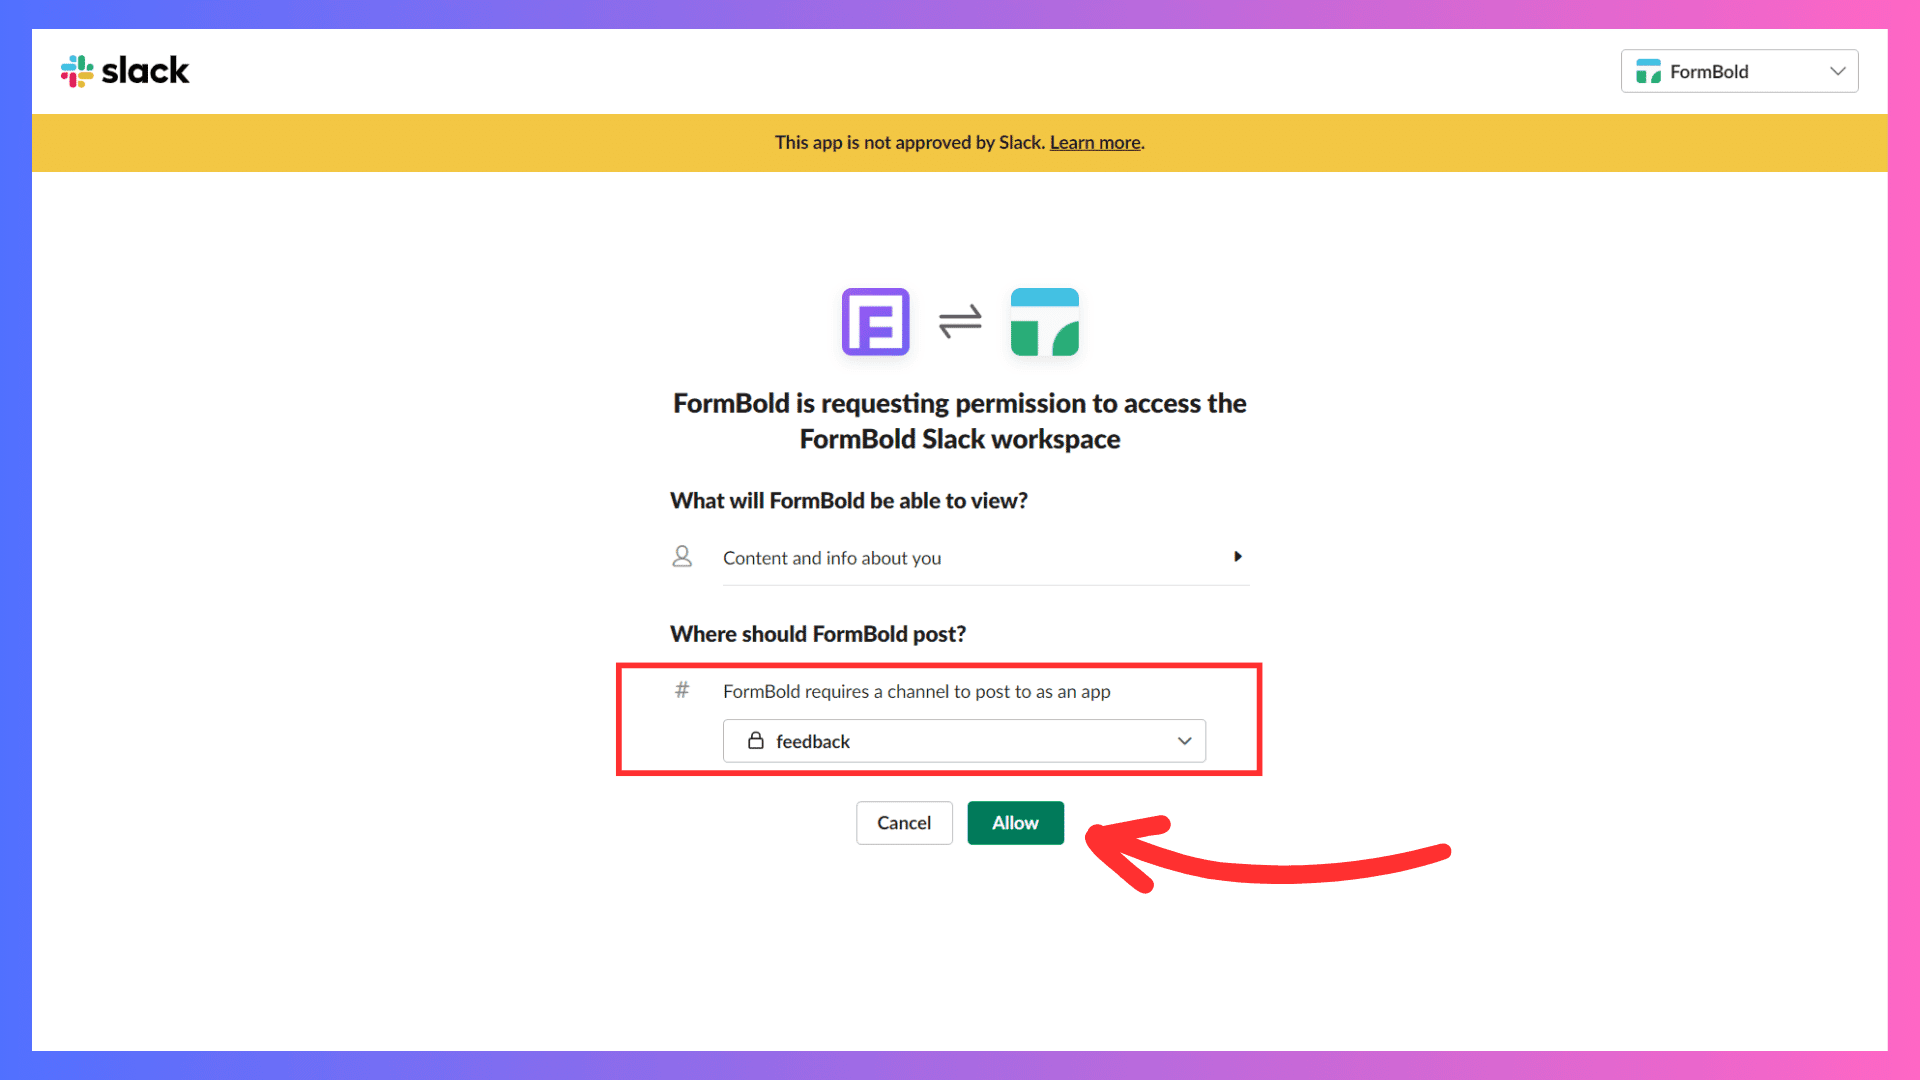
Step 2: Log in with your Slack account and choose the Slack channel where you want to receive notifications for form responses.
Then, click on the 'Allow' button to proceed.
Step 3: Congratulations! You've successfully integrated the form with the Slack channel. Now, it's time to proceed with testing.
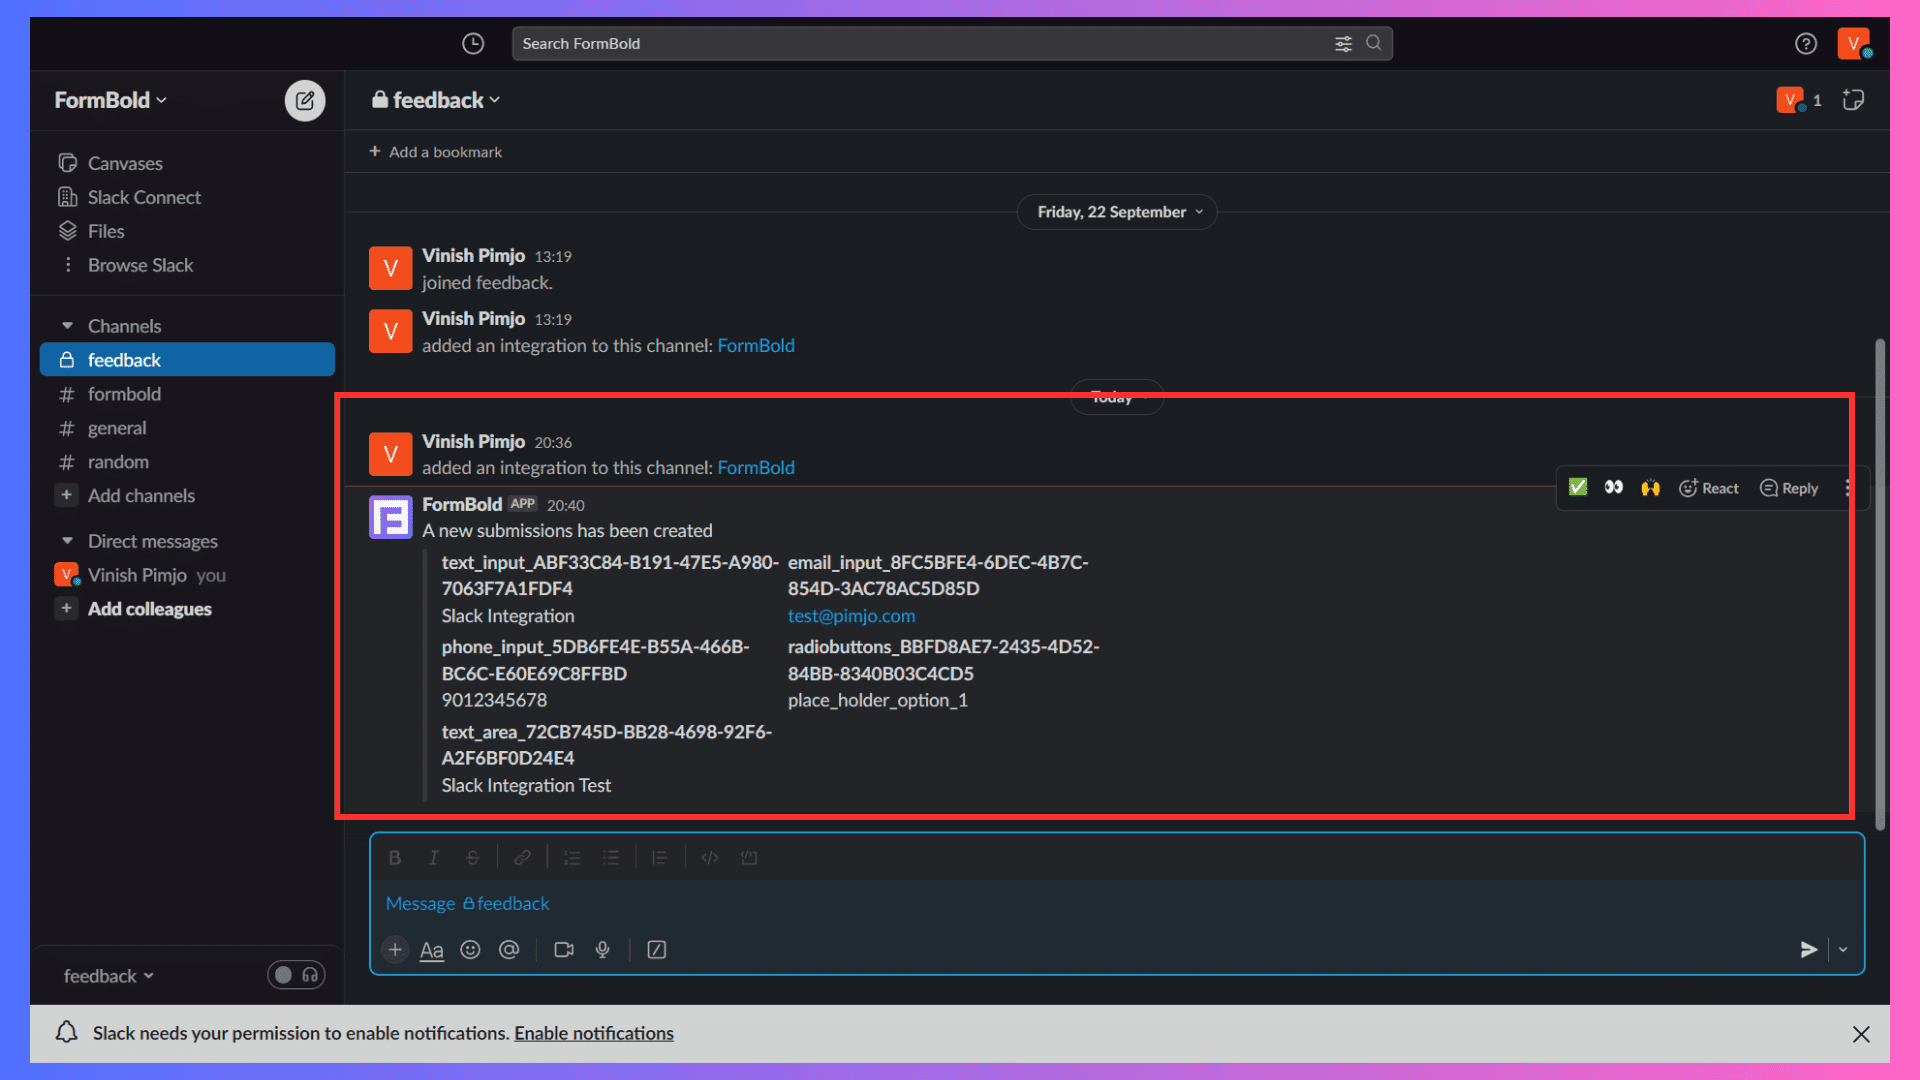
Just open the public URL of the Feedback Submission Form, submit a dummy response, and observe it being received in the Slack channel.
Upon submitting the response, you'll receive a submission notification like this ( Check the image below) in your Slack channel.
Voila! You have successfully integrated and tested FormBold Form with a Slack channel.
Let's now explore integration with Notion.
Integration with Notion
Notion is an all-in-one workspace and collaboration tool that lets users organize, plan, and collaborate on projects across a unified, customizable platform. We will use Notion databases to get responses that can be customized to fit various needs.
With Notion integration, responses are neatly organized in the Notion database, offering a smooth retrieval and analysis process. You can structure your data in Notion however you like to best suit your specific needs.
Here's how you can integrate FormBold Form with Notion with easy steps:
Once more, for the Notion integration, we'll use the Feedback Submission Form.
Step 1: Click on the 'Apps' tab on the Form Setting Dashboard Page, locate the 'Notion' option, and click on the Connect button.
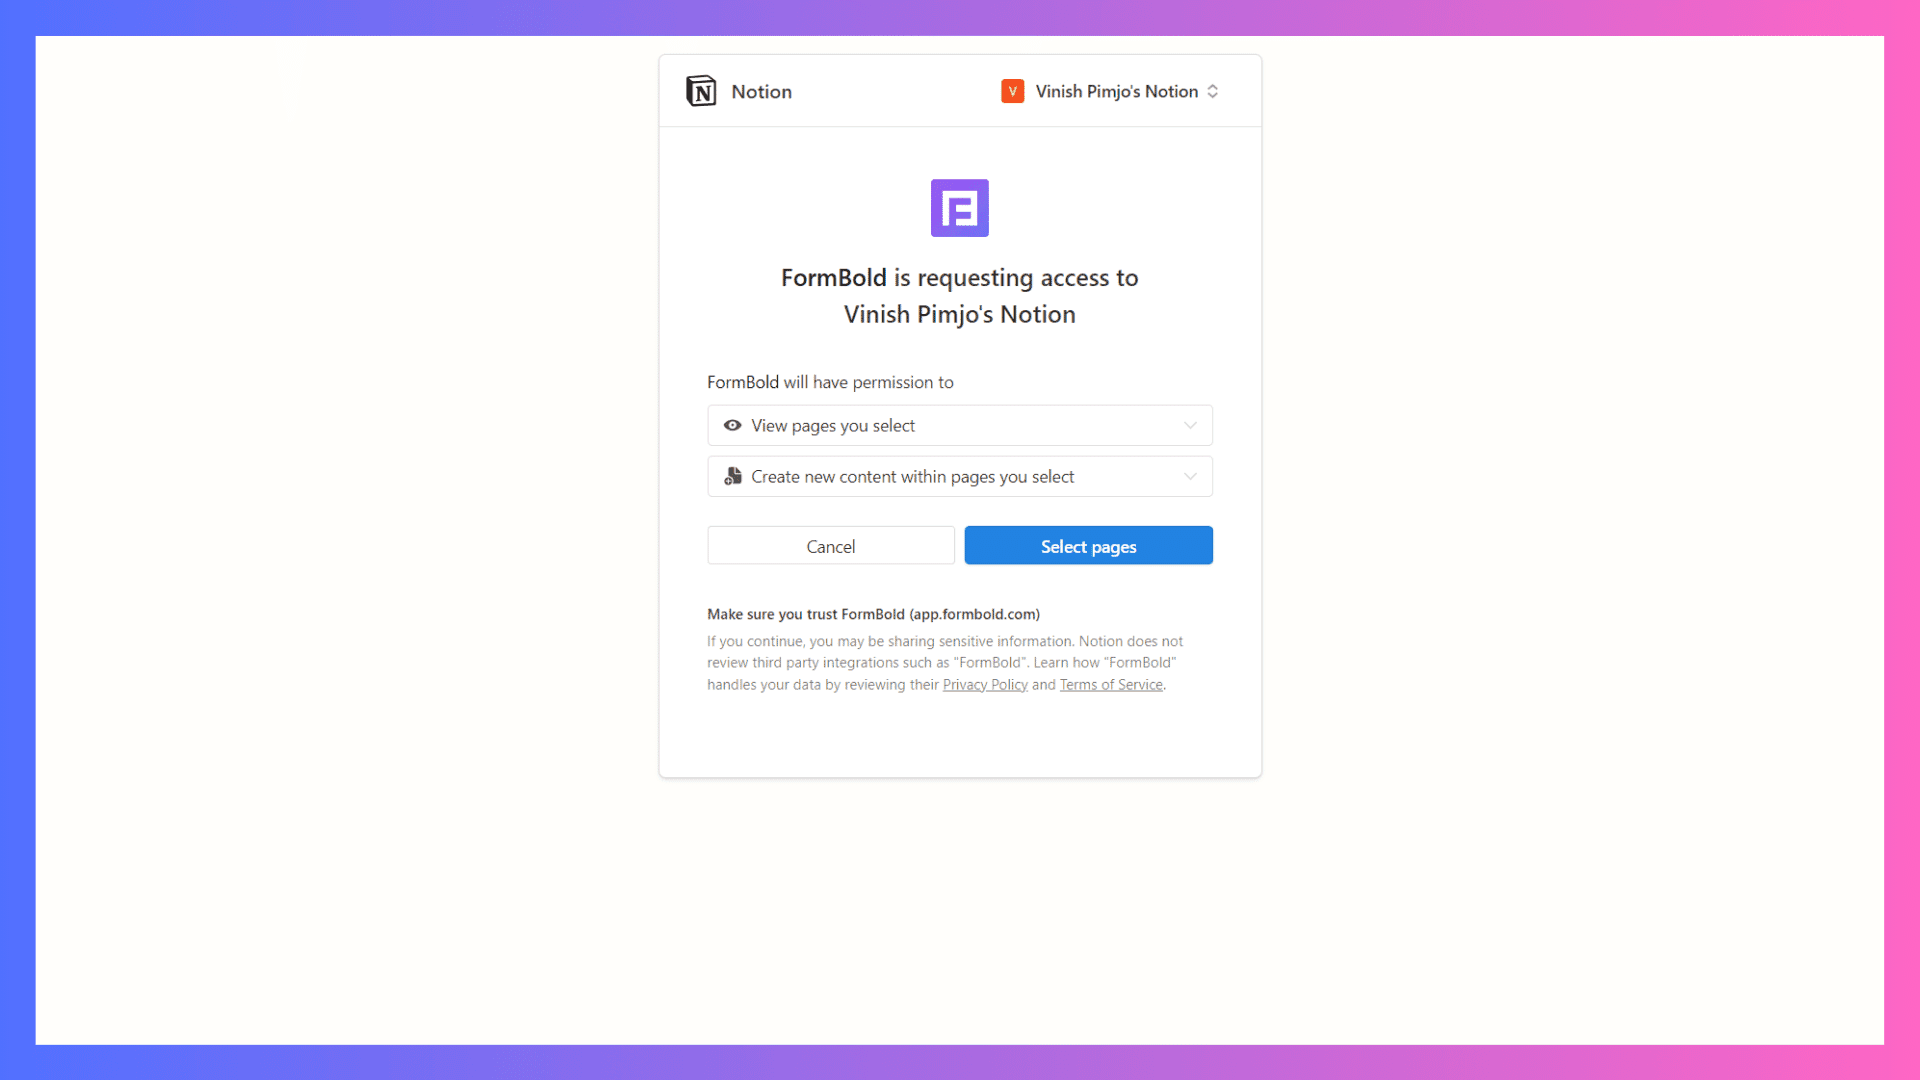
Step 2: Log in with your Notion account and select the specific page with the database where you'd like to receive data for form responses.
Then, click on the 'Allow' button to proceed.
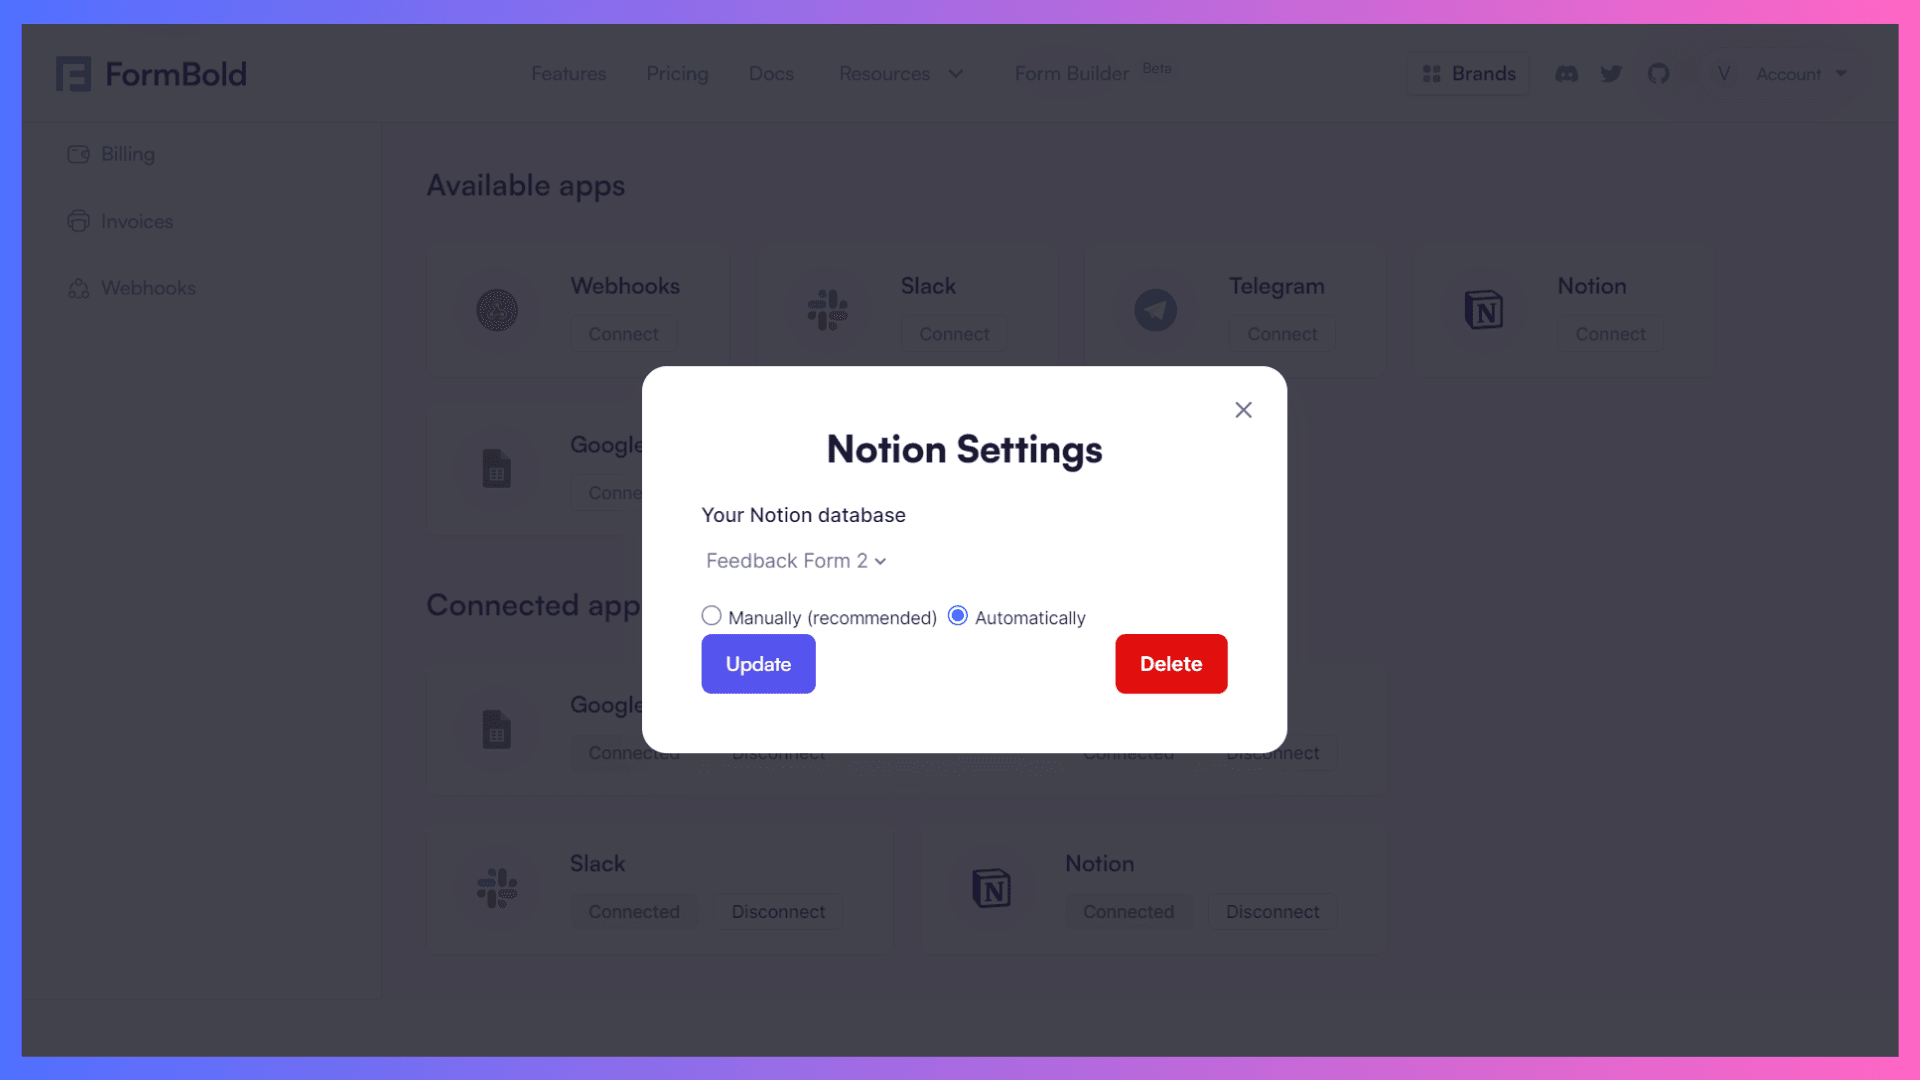
Step 3: Navigate back to the 'App' page, then click on 'Notion' in the connected Apps section. A pop-up will appear, allowing you to choose the Notion database. Select the appropriate database and click 'Update,' or manually map the table with responses.
Key considerations for Notion integration:
- Configure Database Connection: Set up the connection by choosing the Notion database where you want your form responses to go.
- Map Form Fields to Database
Done! You have successfully integrated a Notion page (database) with FormBold, allowing you to receive data directly in a structured format within the database. Now you can use the response data however you need.
Let's now explore integration with Webhooks ( Zapier).
Integration with Webhooks (Zapier)
Webhooks act like messengers, informing other applications instantly when a form is submitted. By linking the forms to webhooks, we can trigger actions in your other tools, saving time and ensuring no responses are delayed.
- Webhooks send responses instantly to connected apps, ensuring no delay in processing.
- The integration triggers automated actions based on form submissions—such as updating a database, sending an email, or posting a message.
- Instead of manually entering data in different applications, webhooks do the job for you.
For the integration and demonstration of Webhooks, we'll utilize the popular platform Zapier.
Zapier is like having a dedicated assistant that takes your form responses and performs a series of tasks for you. It listens for form submissions (via webhooks), and when triggered, it initiates a predefined sequence of actions across multiple applications.
We will integrate Zapier with FormBold via a Webhook and capture the triggers in a Google Sheet.
Once more, for the Webhooks integration, we'll use the Feedback Submission Form.
Here's how you can integrate FormBold Form with Webhooks (Zapier) with easy steps:
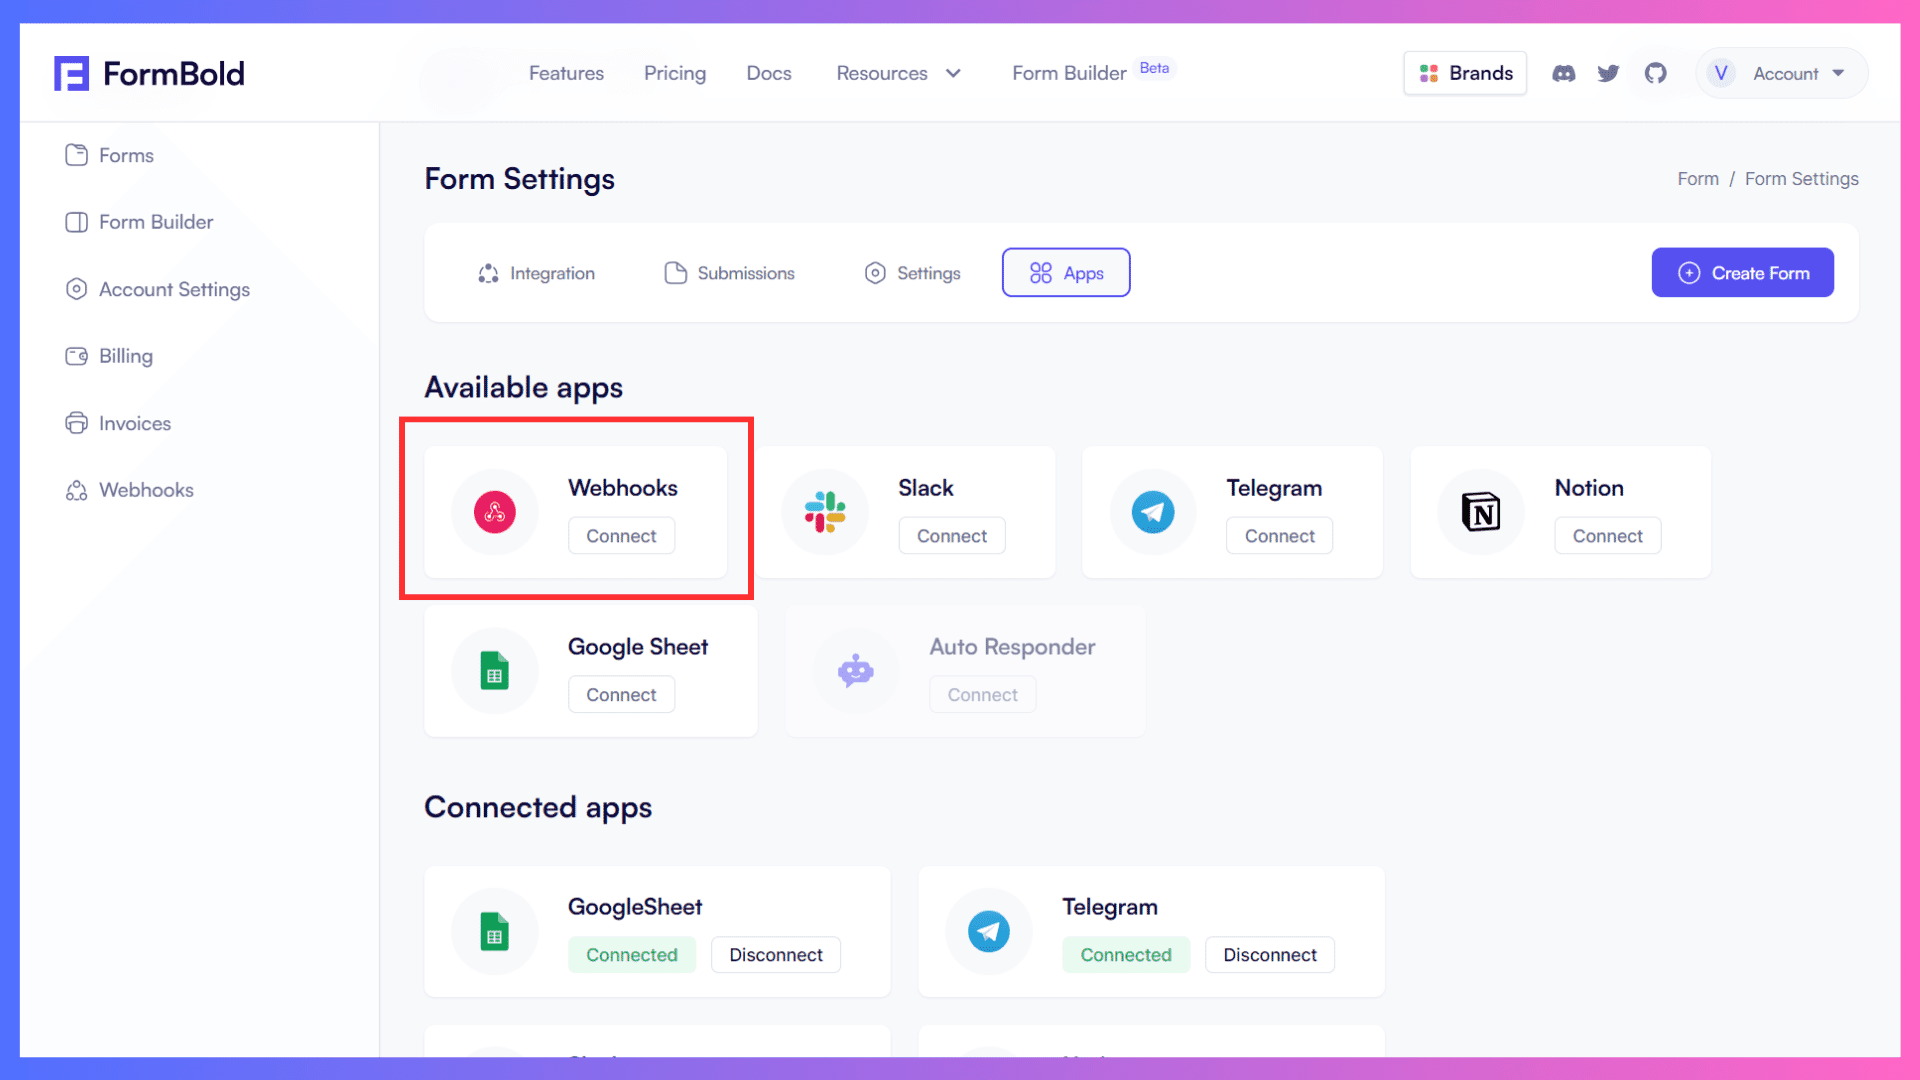
Step 1: Click on the 'Apps' tab on the Form Setting Dashboard Page, locate the 'WebHooks' option, and click on the Connect button.
Upon clicking the 'Connect' button, a pop-up will appear, prompting you to enter the Webhook response URL.
For this, let's proceed to create a Zap on Zapier.
Creating Zaps for Automation
Step 2: To create a Zap, log in or sign up on Zapier. Then, click on the 'Create a Zap' option. A similar page (Check the image below) will appear.
Step 3: Here, you need to select the following option to get a response in the sheet:
- Connect this app - Webhook by Zapier.
- With this One! - Google Sheet
- When this happens - Catch Hooks
- then do this- Create a Spreadsheet Row.
You can also select any action from the dropdown menu as needed.
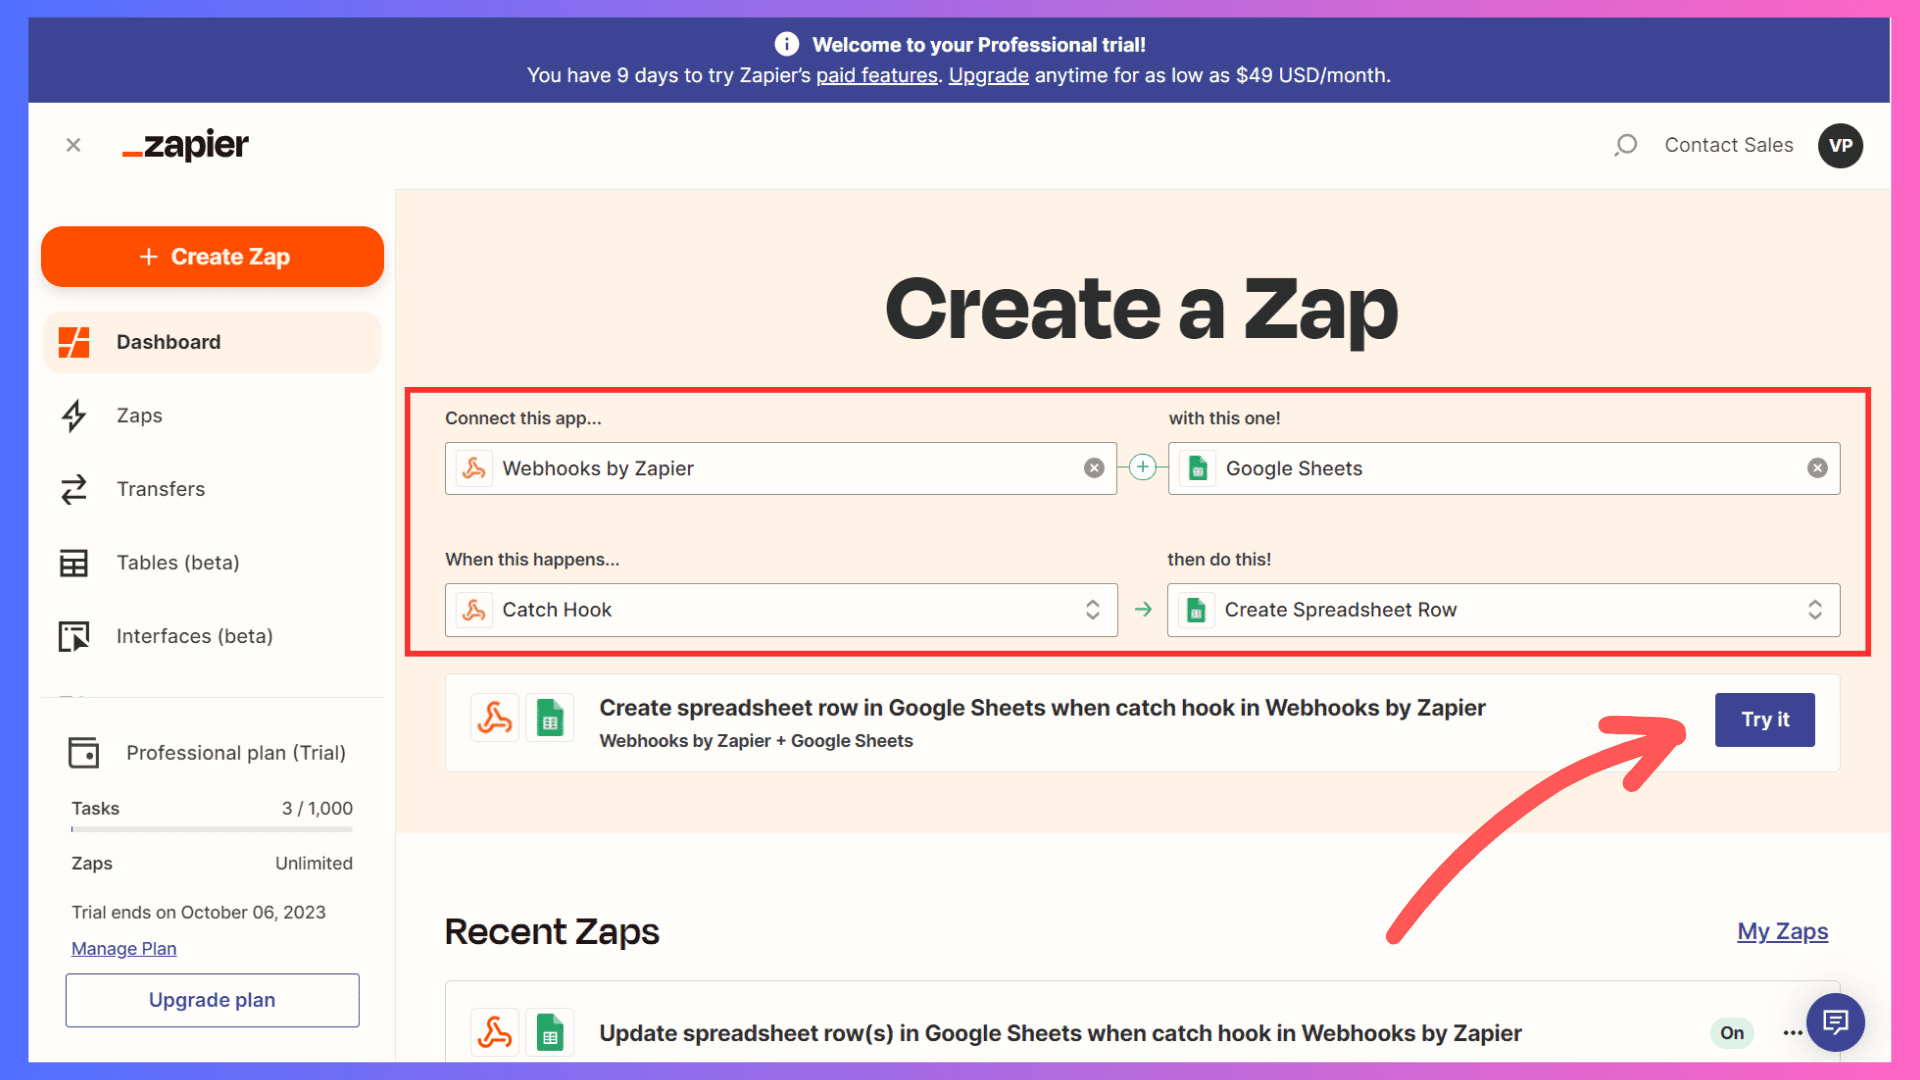
Step 4: Click on the Try it button to create the Zap.
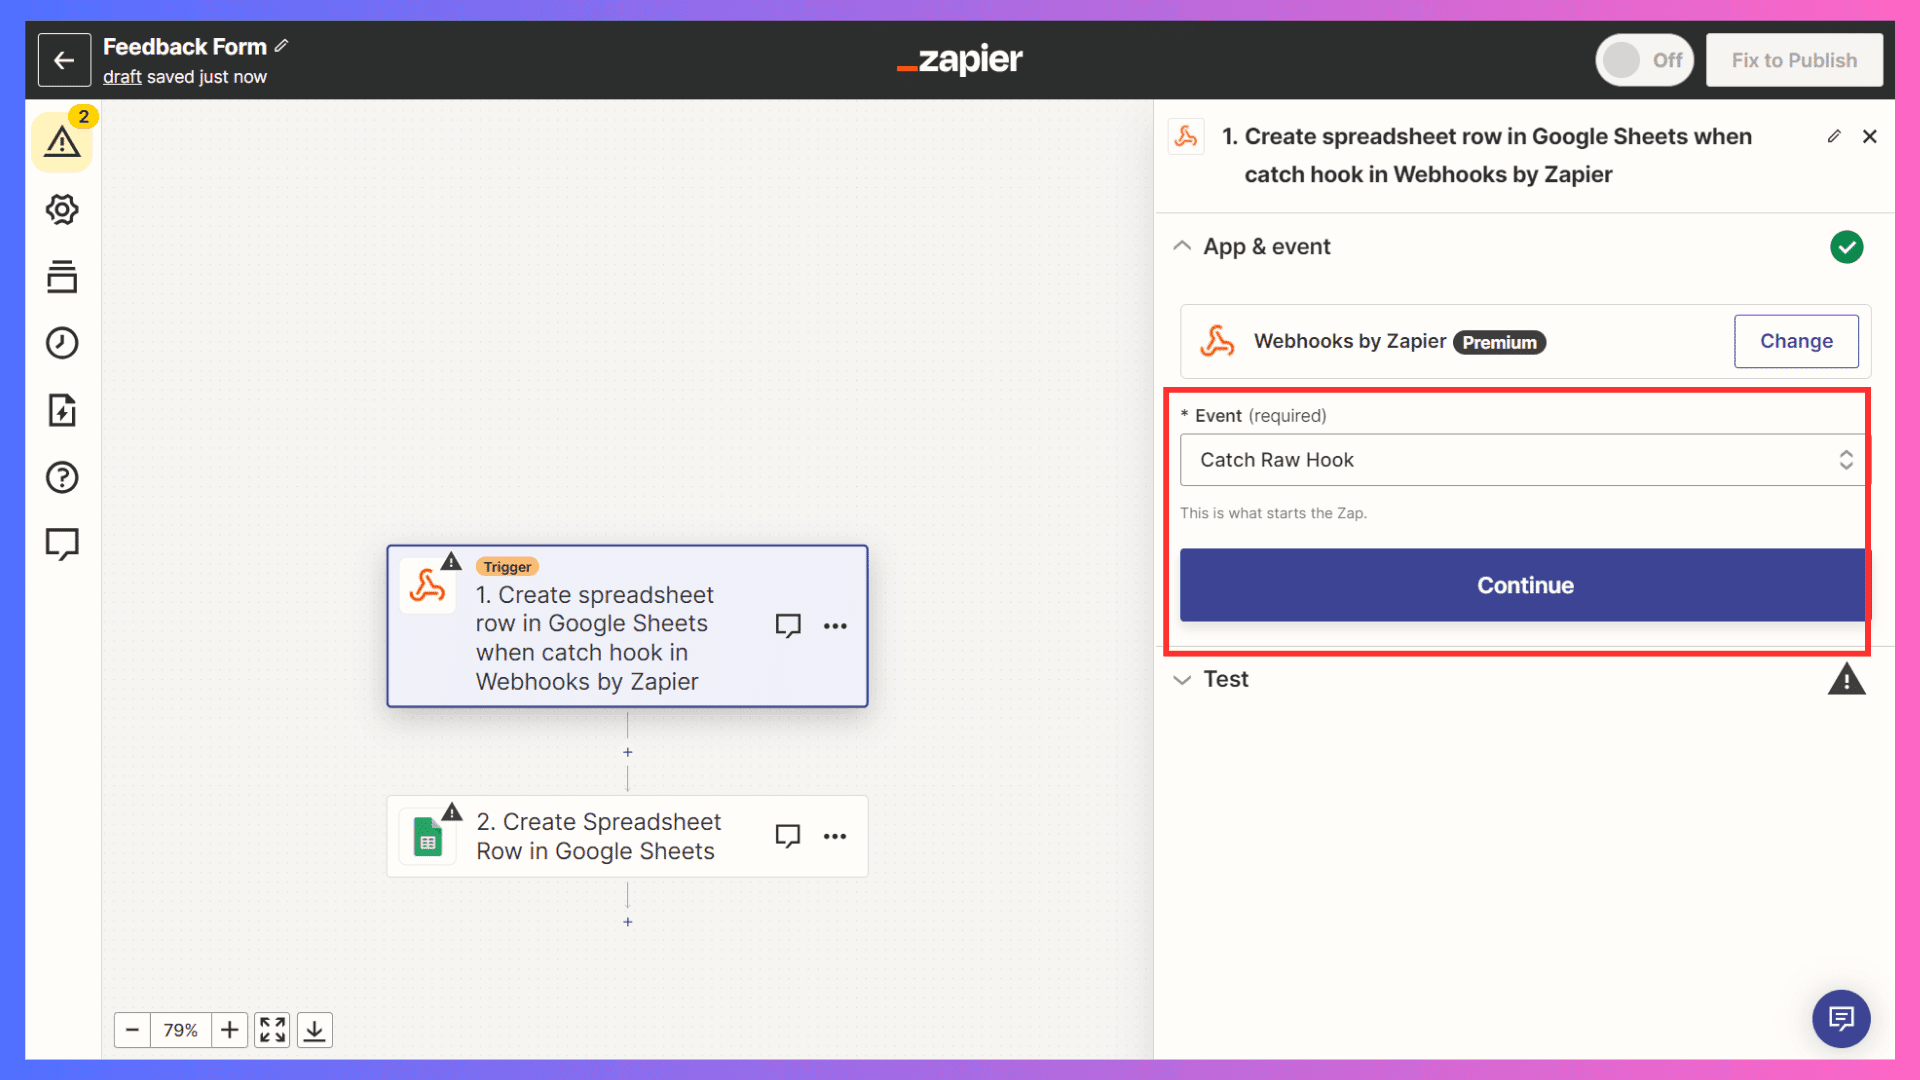
Step 5: Once the Zap is created, a sidebar with 'App & Event' will appear. Here, you need to select the 'Catch Hook' option from the dropdown menu, and then click on the 'Continue' button.
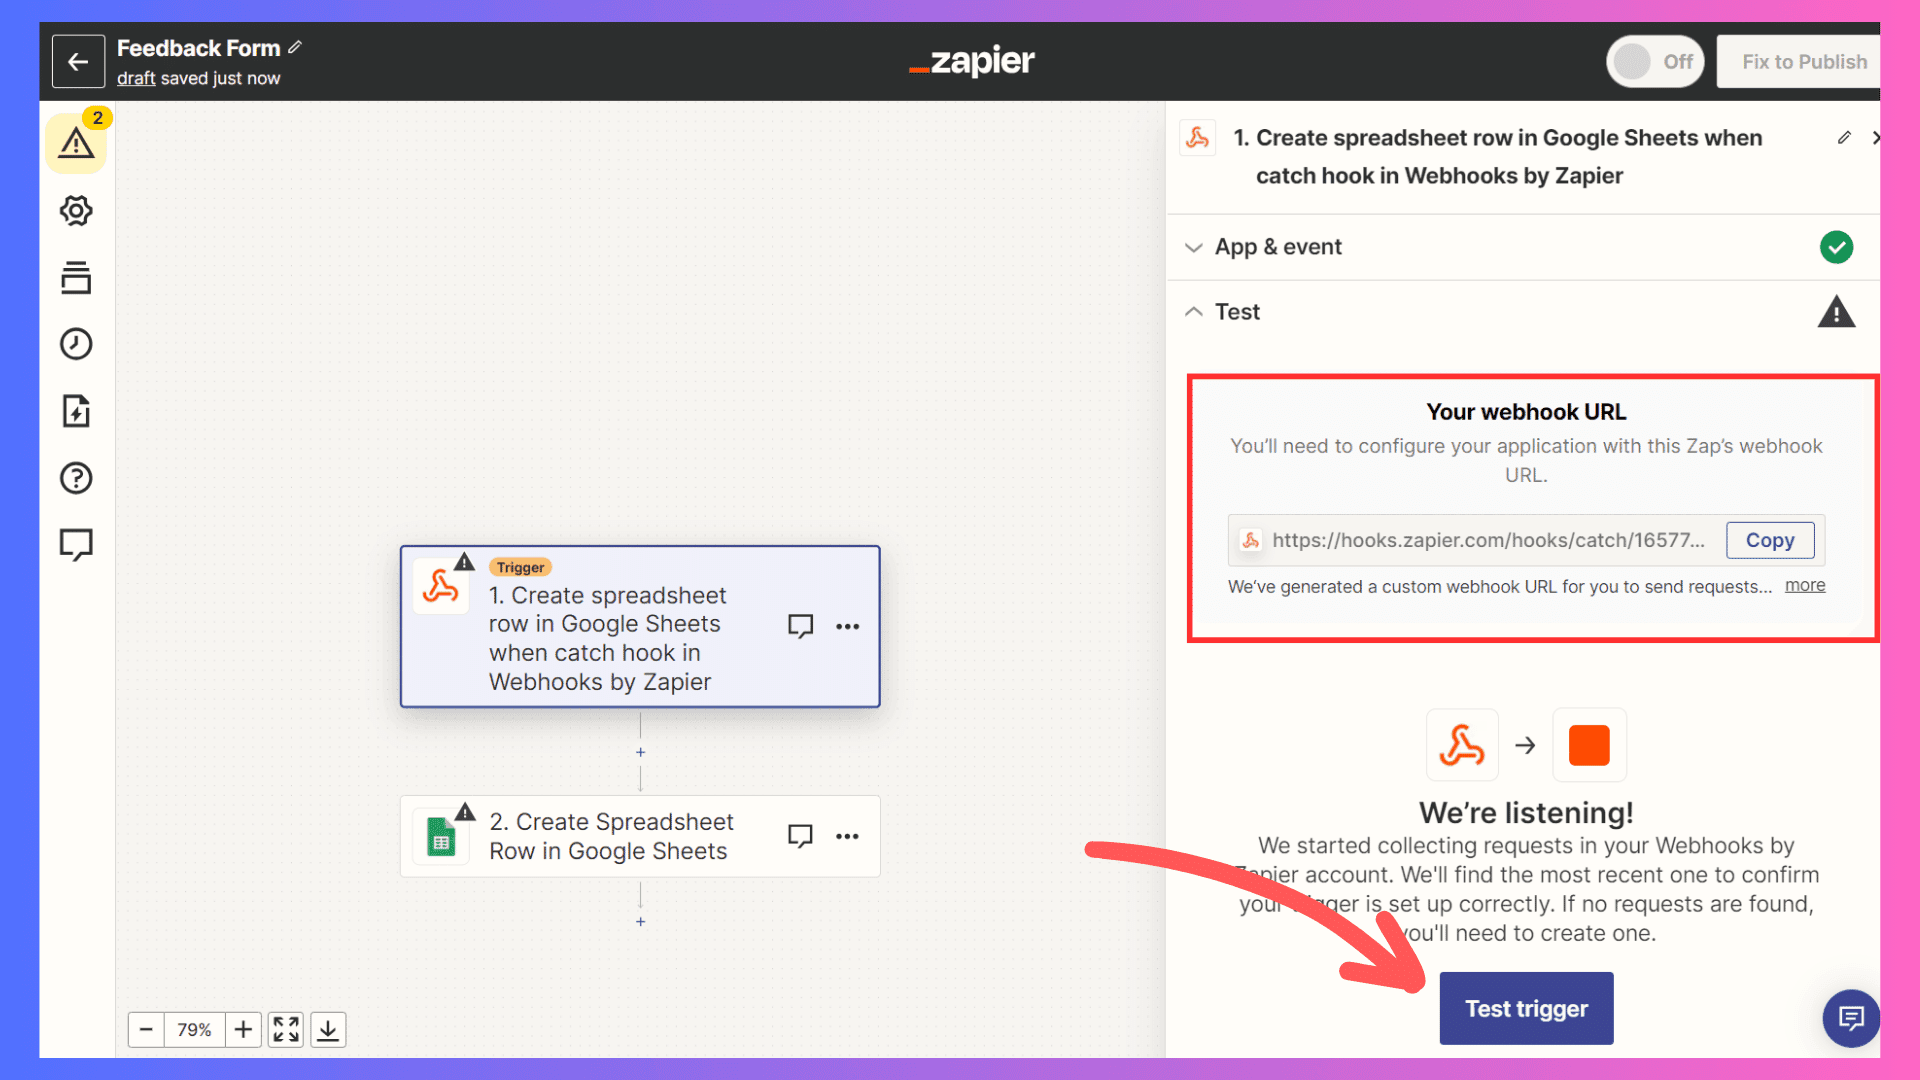
Step 6: Next, in the 'Test' section, you'll find the Webhook URL. We'll need this URL in the upcoming steps to trigger the webhook, so make sure to copy it.
Step 7: Now, click the 'Test trigger' button to listen for a response at the webhook URL.
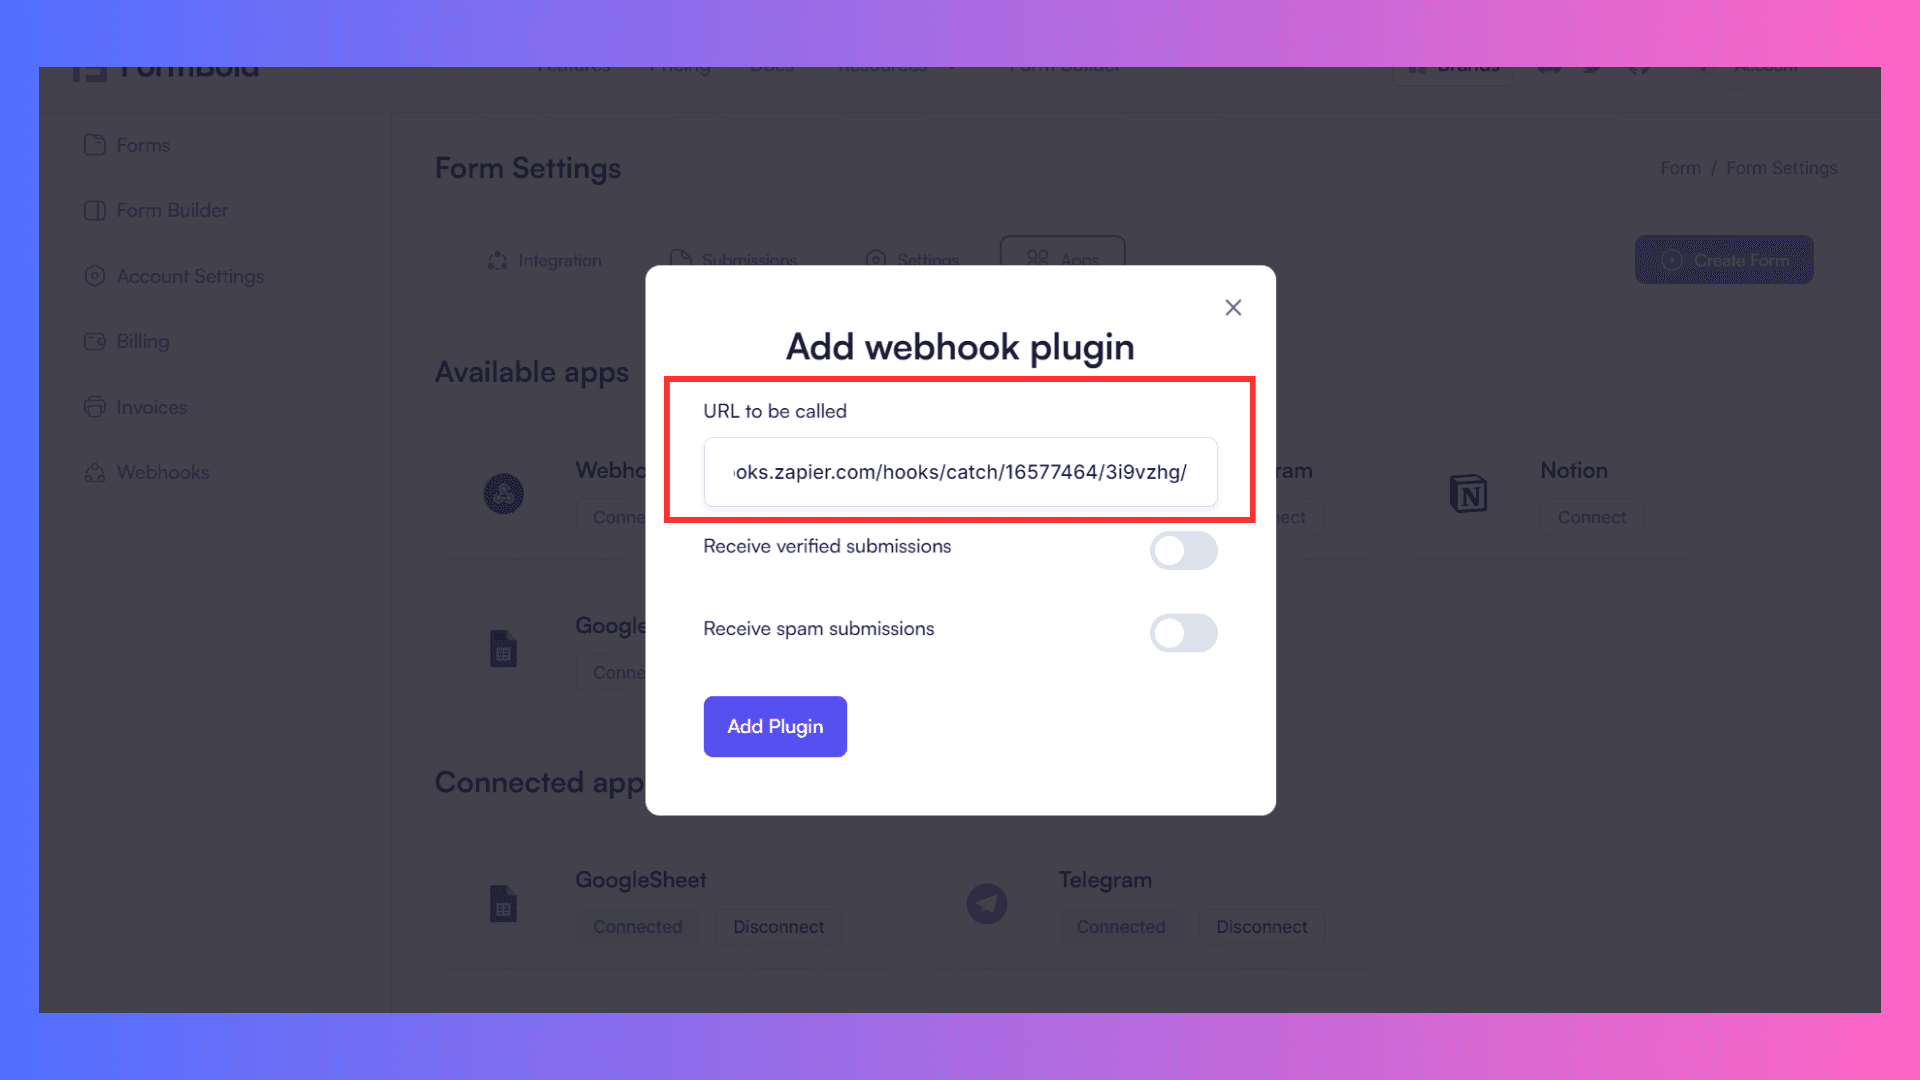
Step 8: Now, return to FormBold and paste the copied Zapier webhook URL in the Webhook pop-up we left in Step 1. Click on the 'Add Plugin' button to proceed.
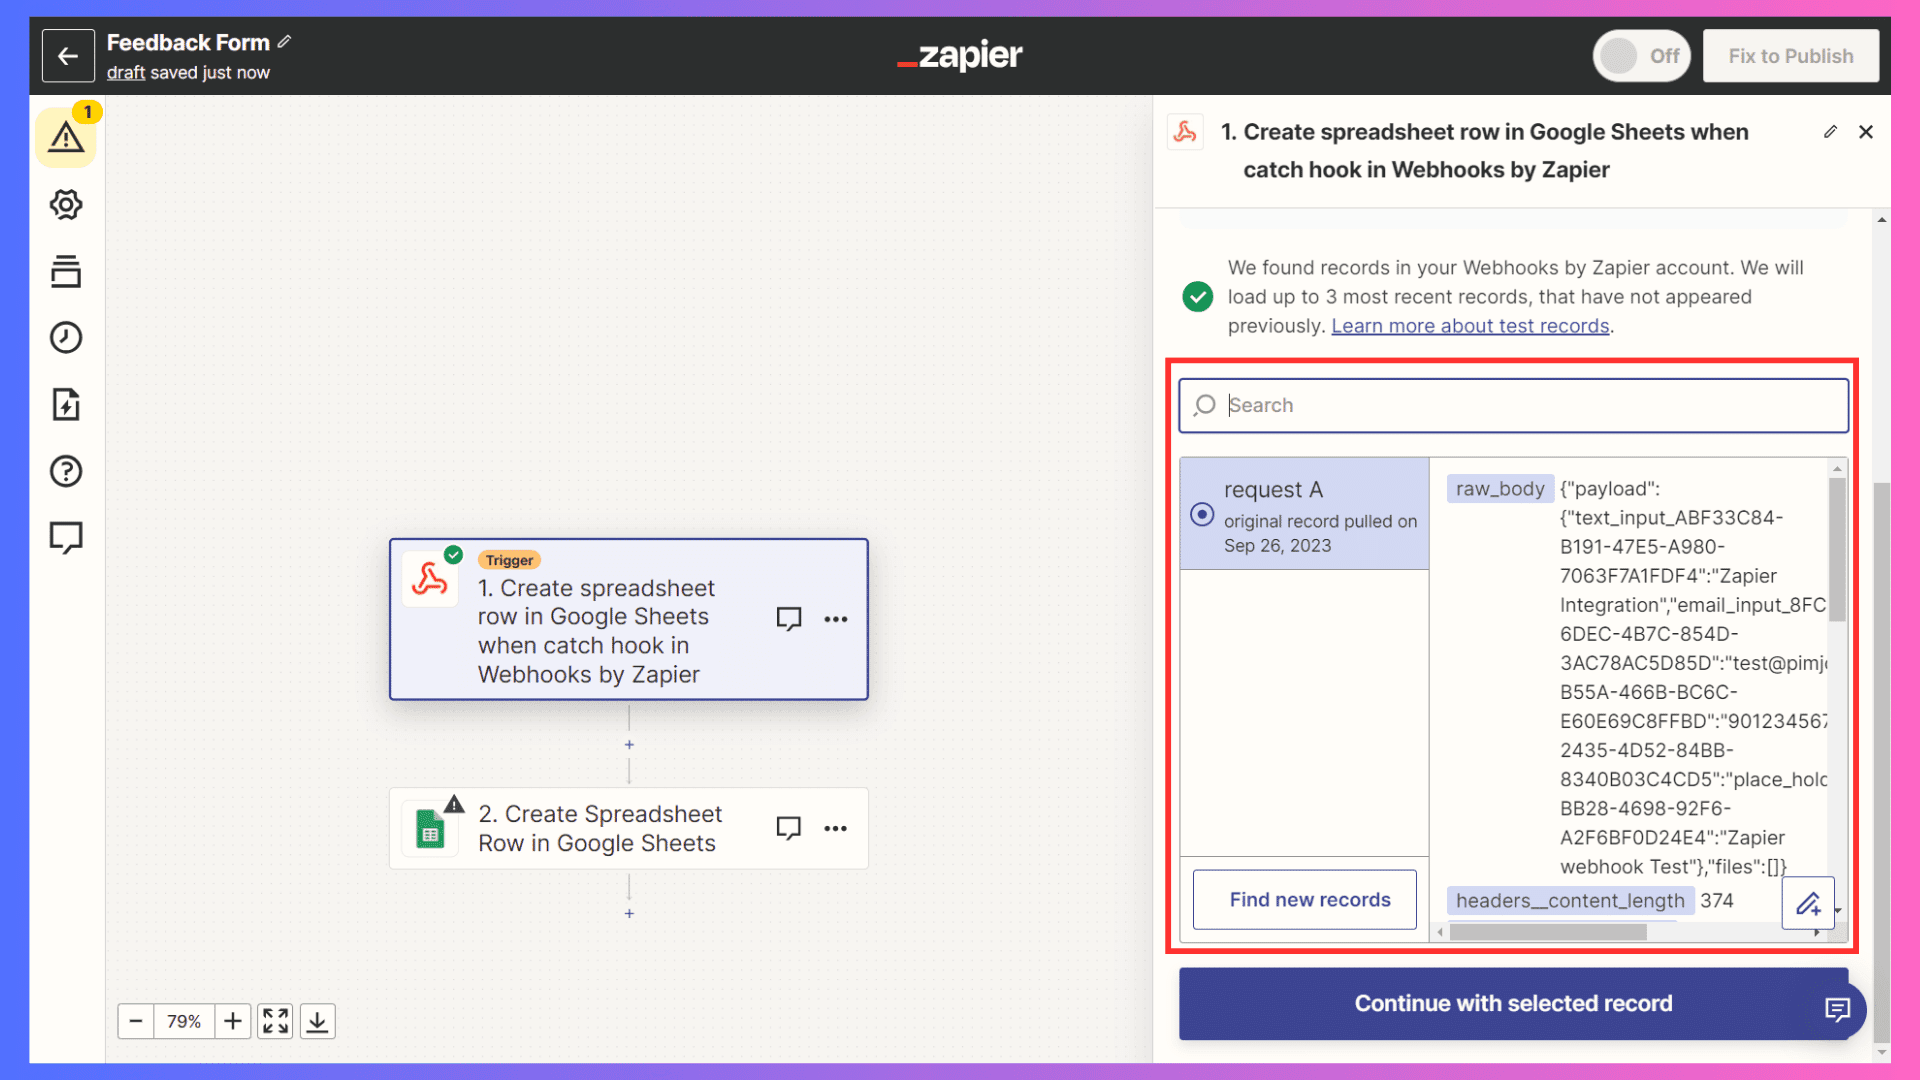
Step 9: Now, open the public URL of the form and submit a dummy response to trigger the webhook. Check Zapier to review the raw response data.
Once we receive the trigger data, we are ready to proceed to the next part (action) of this integration process.
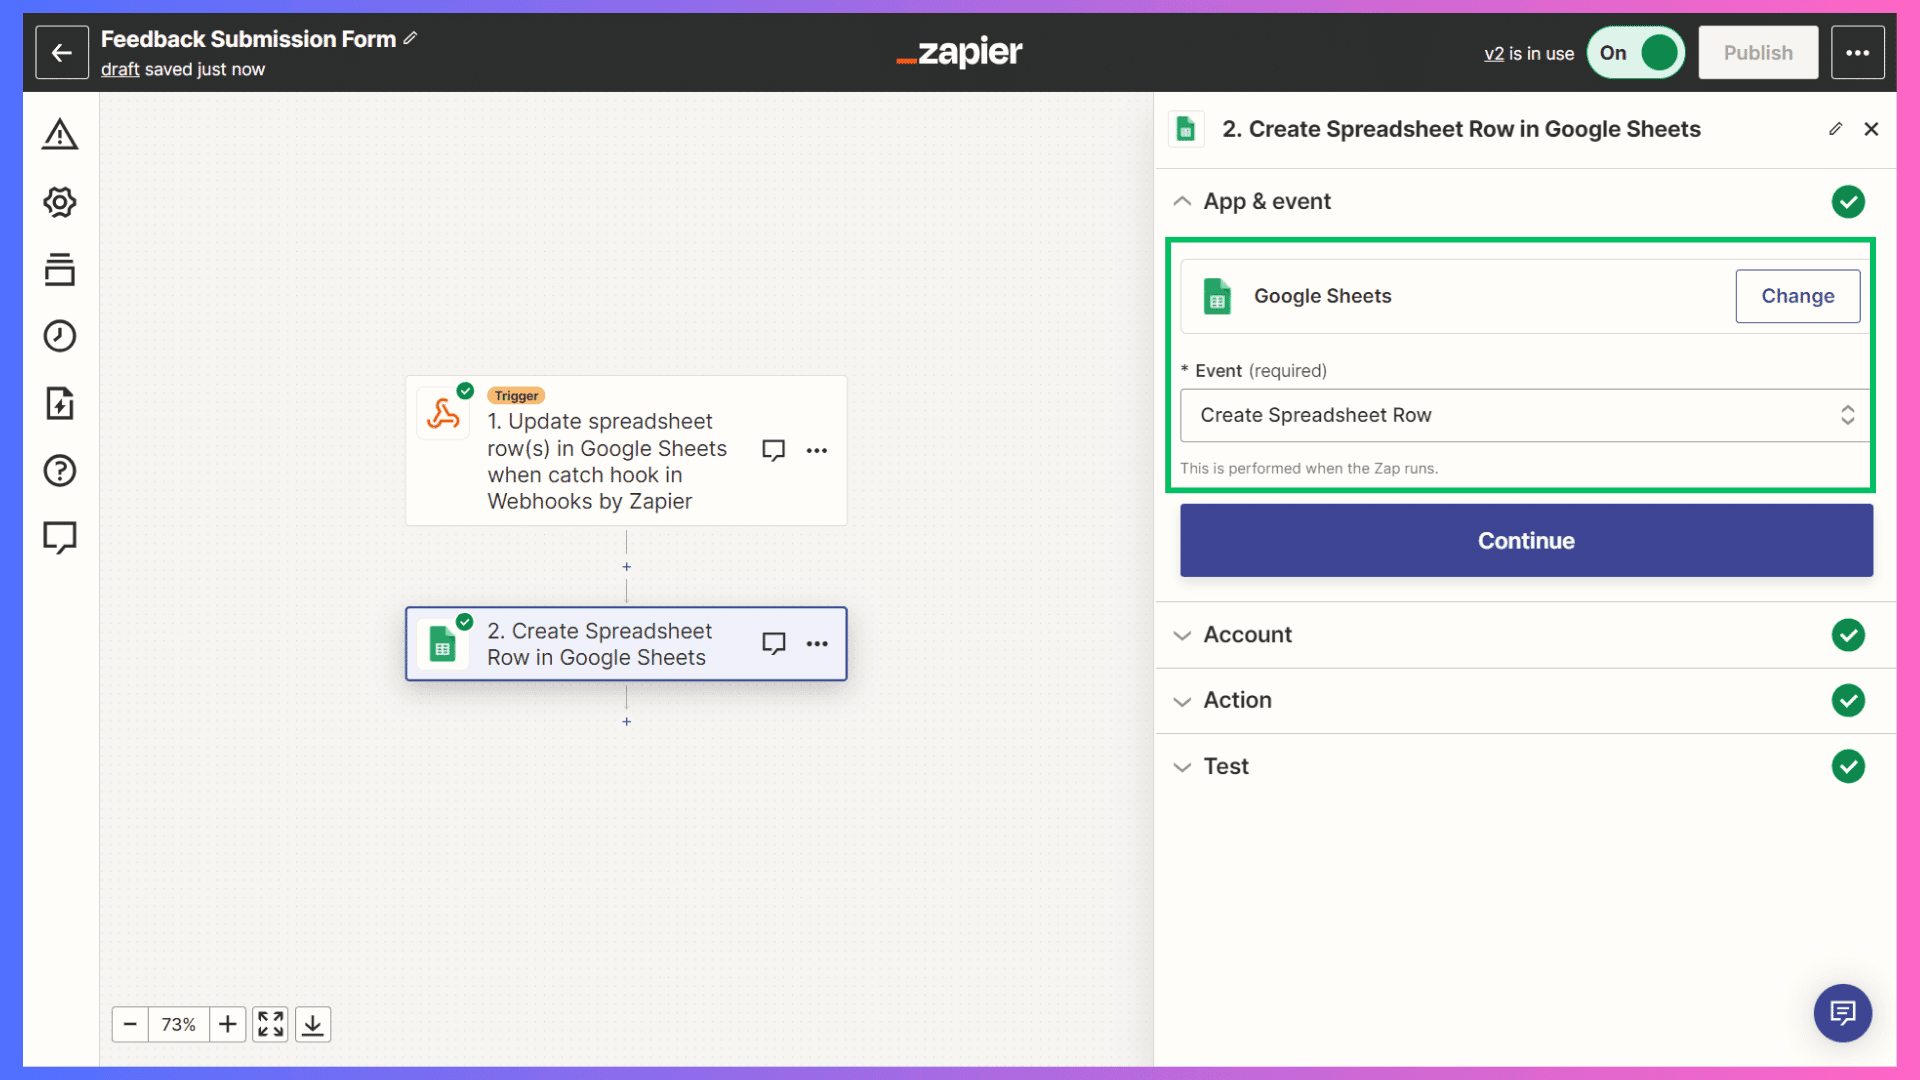
Step 10: Now, click on 'Create a Spreadsheet Row in Google Sheets' in the main section to open up the 'Action & Event' of this action part.
Step 11: In the 'App & Event' Google Sheets section, ensure that the 'Create Spreadsheet Row' option is selected.
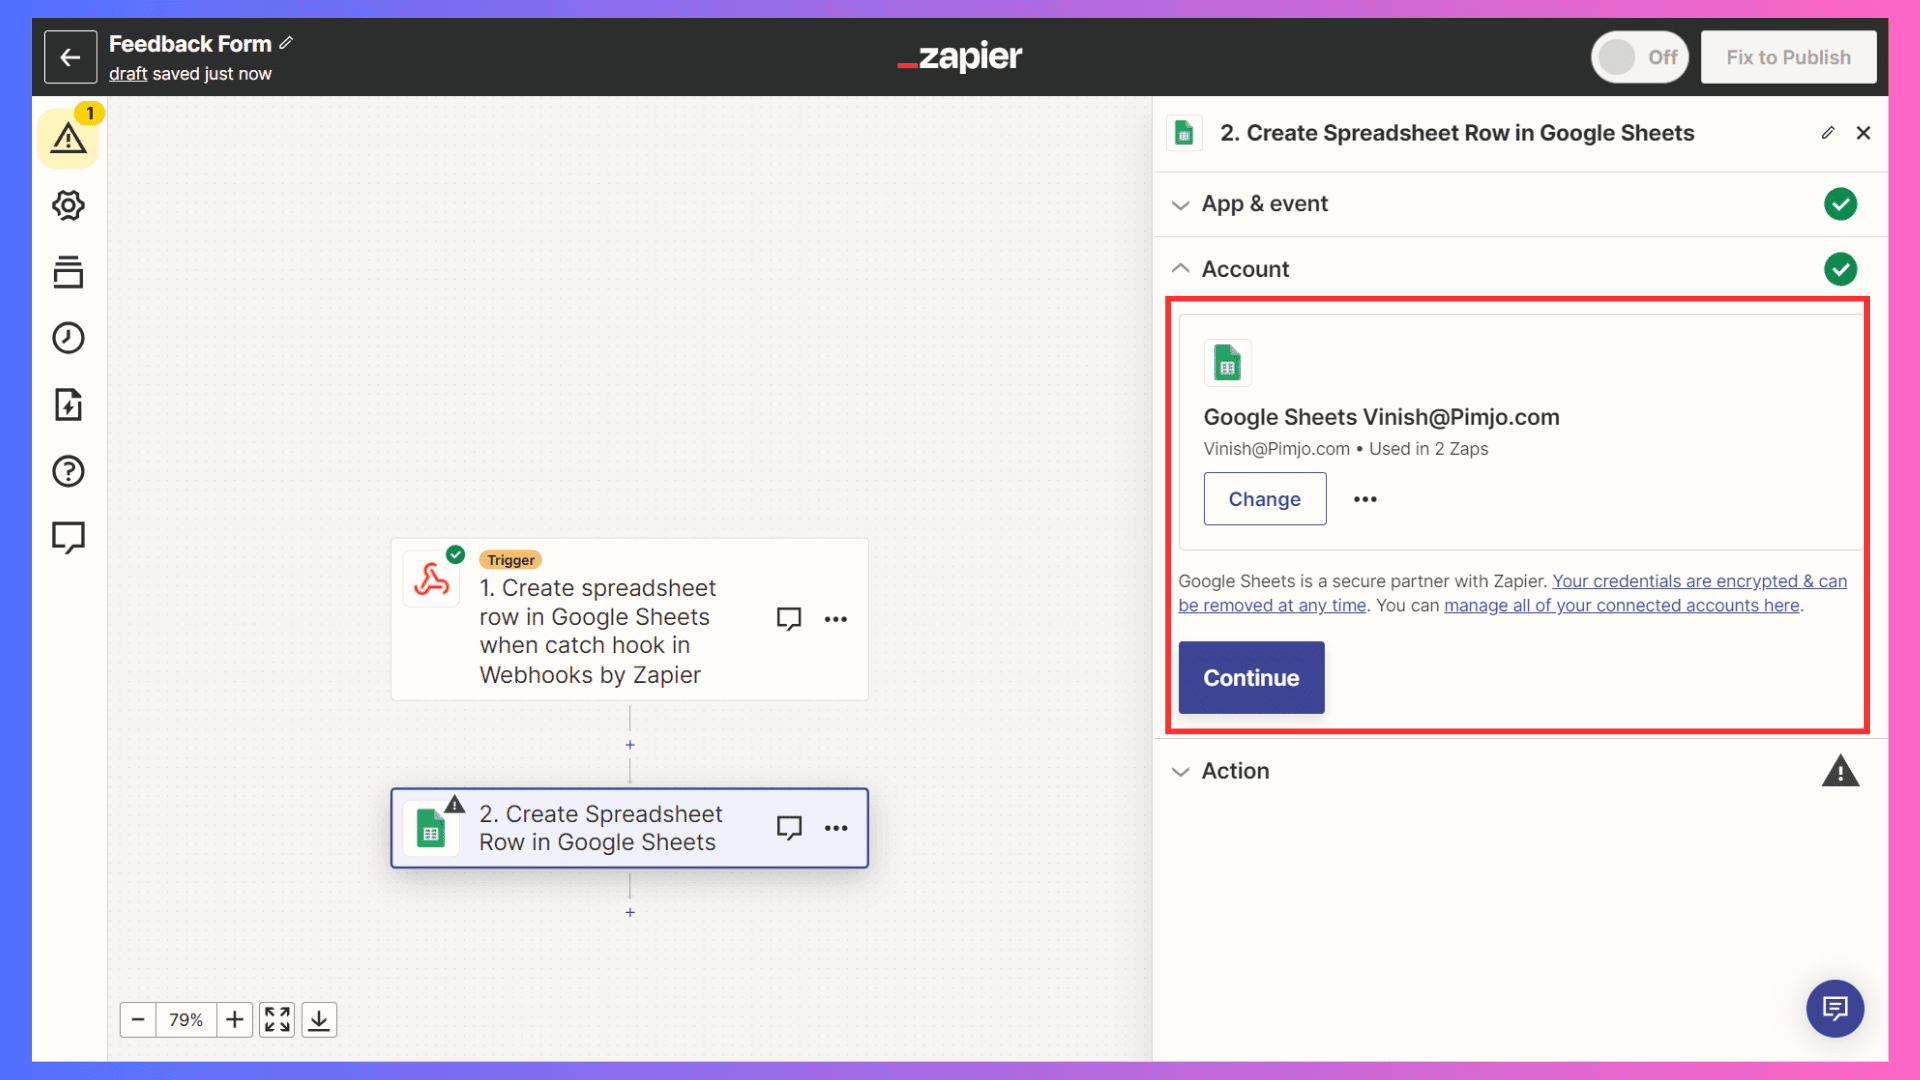
Step 12: Now, proceed to the Action section. Here, log in with your Google account.
Also, create a new sheet to receive the responses with proper columns. We'll need to map it in the next step.
Step 13: Now, select the sheet where you want to store the responses.
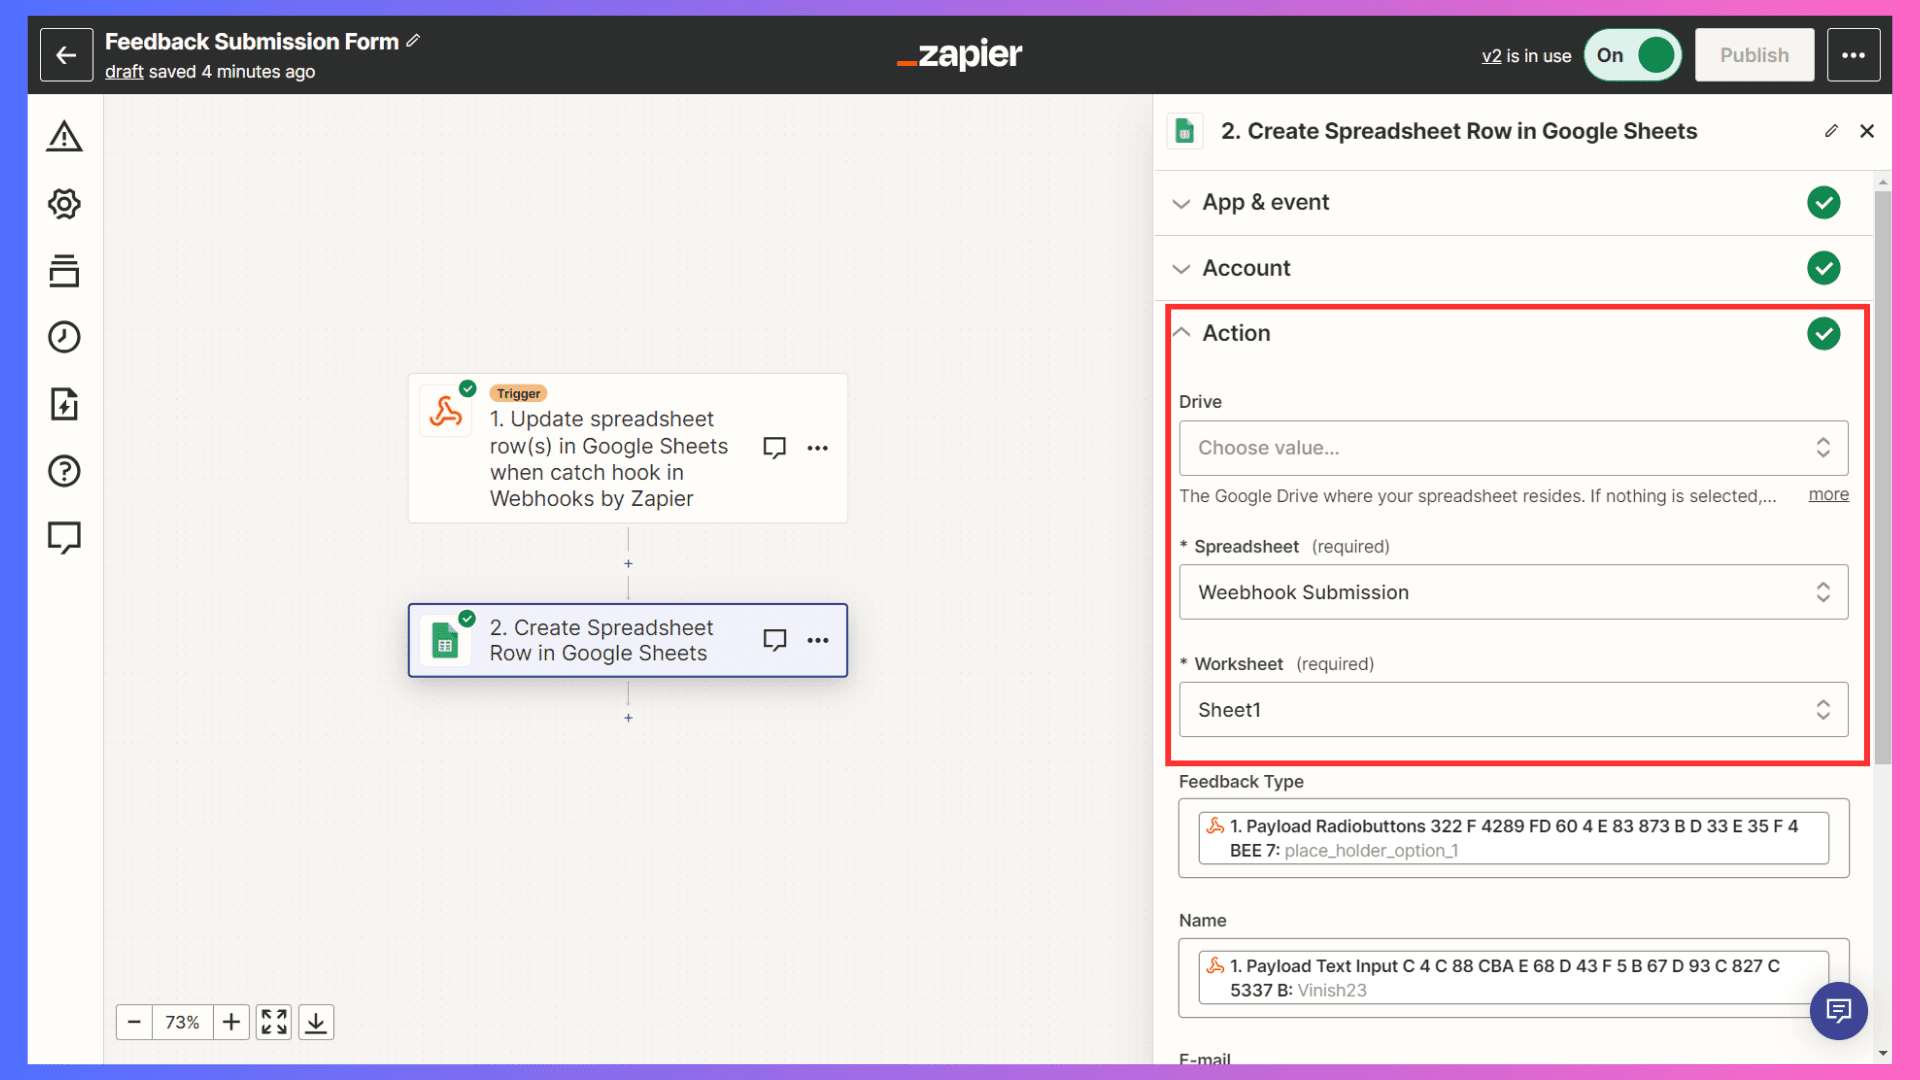
Step 14: Next, map the Google Sheets columns with the Form response fields. Please use the refresh field button to ensure the updated columns from the Google Sheet are reflected.
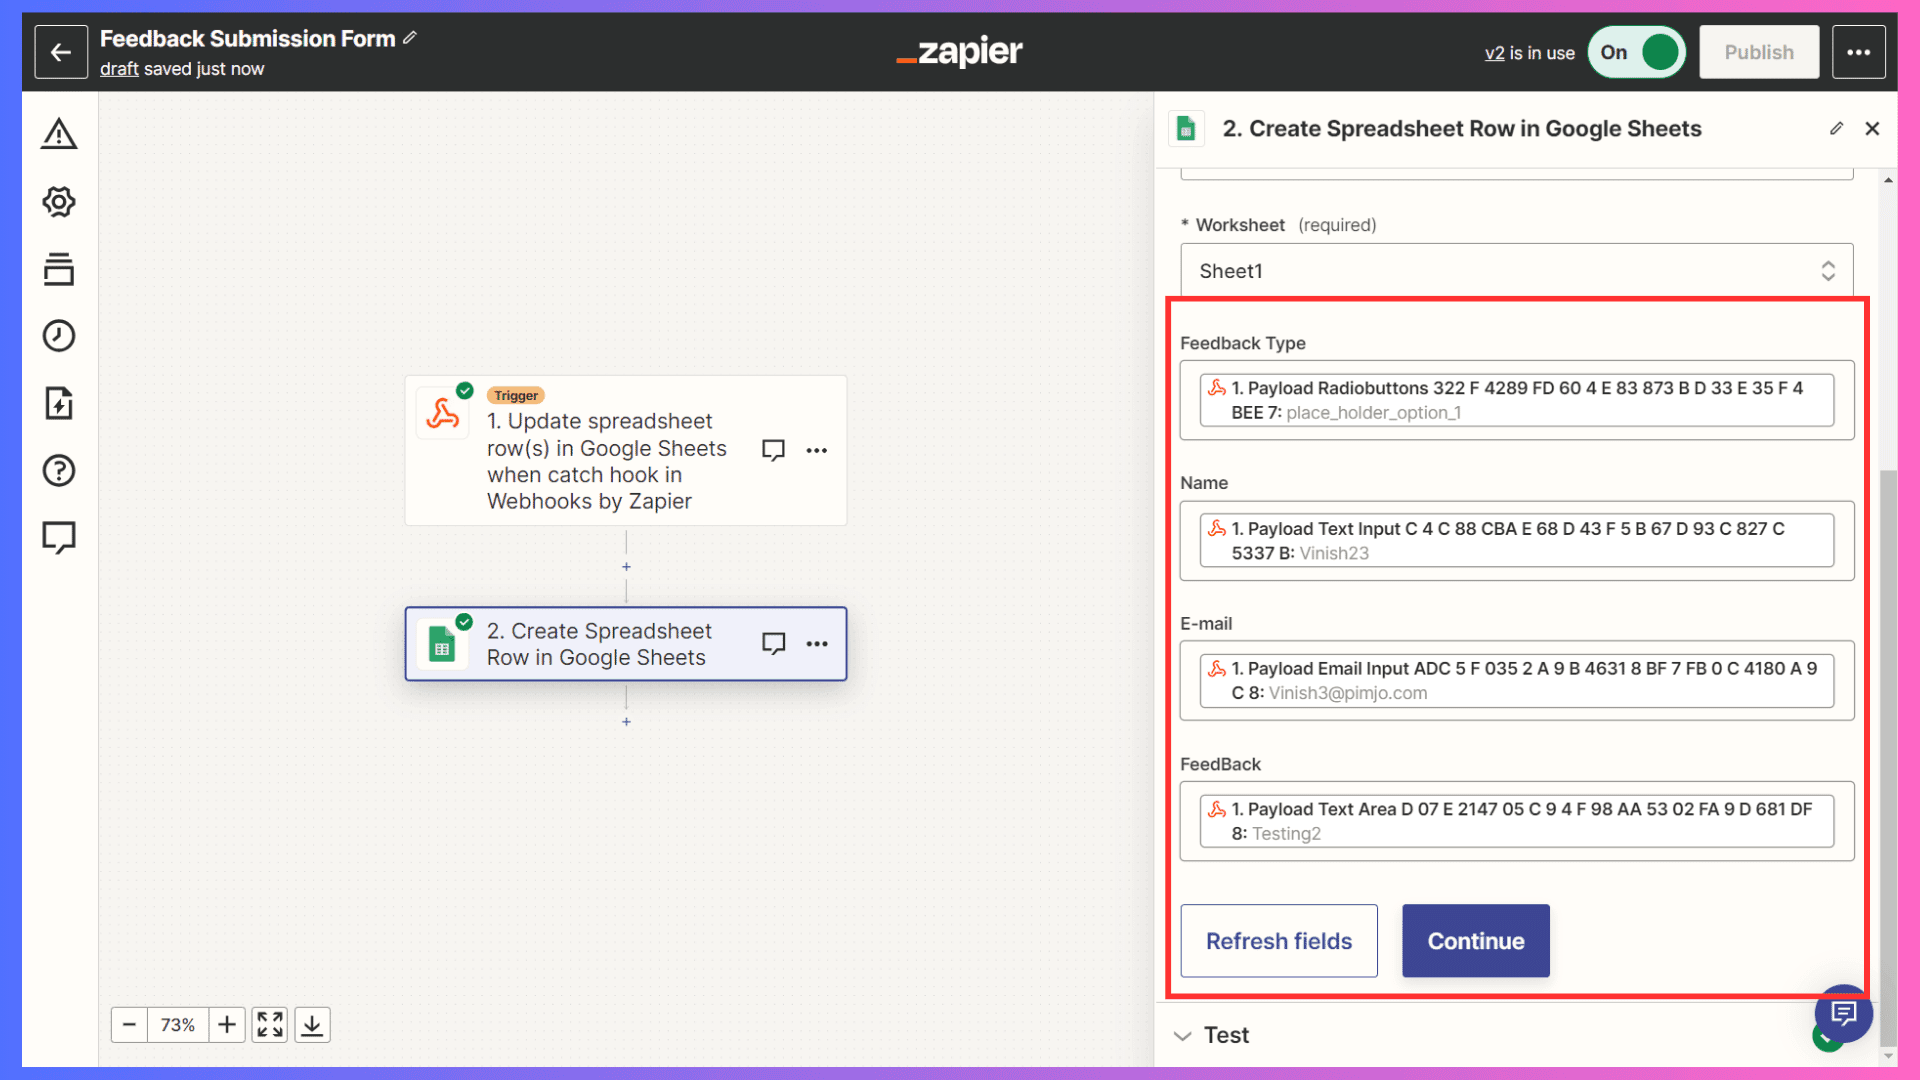
Step 15: Click the 'Continue' button to complete this step.
Congratulations! You have successfully completed the integration process.
Step 16: Now, it's time to test. Submit a dummy response in the Feedback Submission Form and open the Google Sheet to check the response.
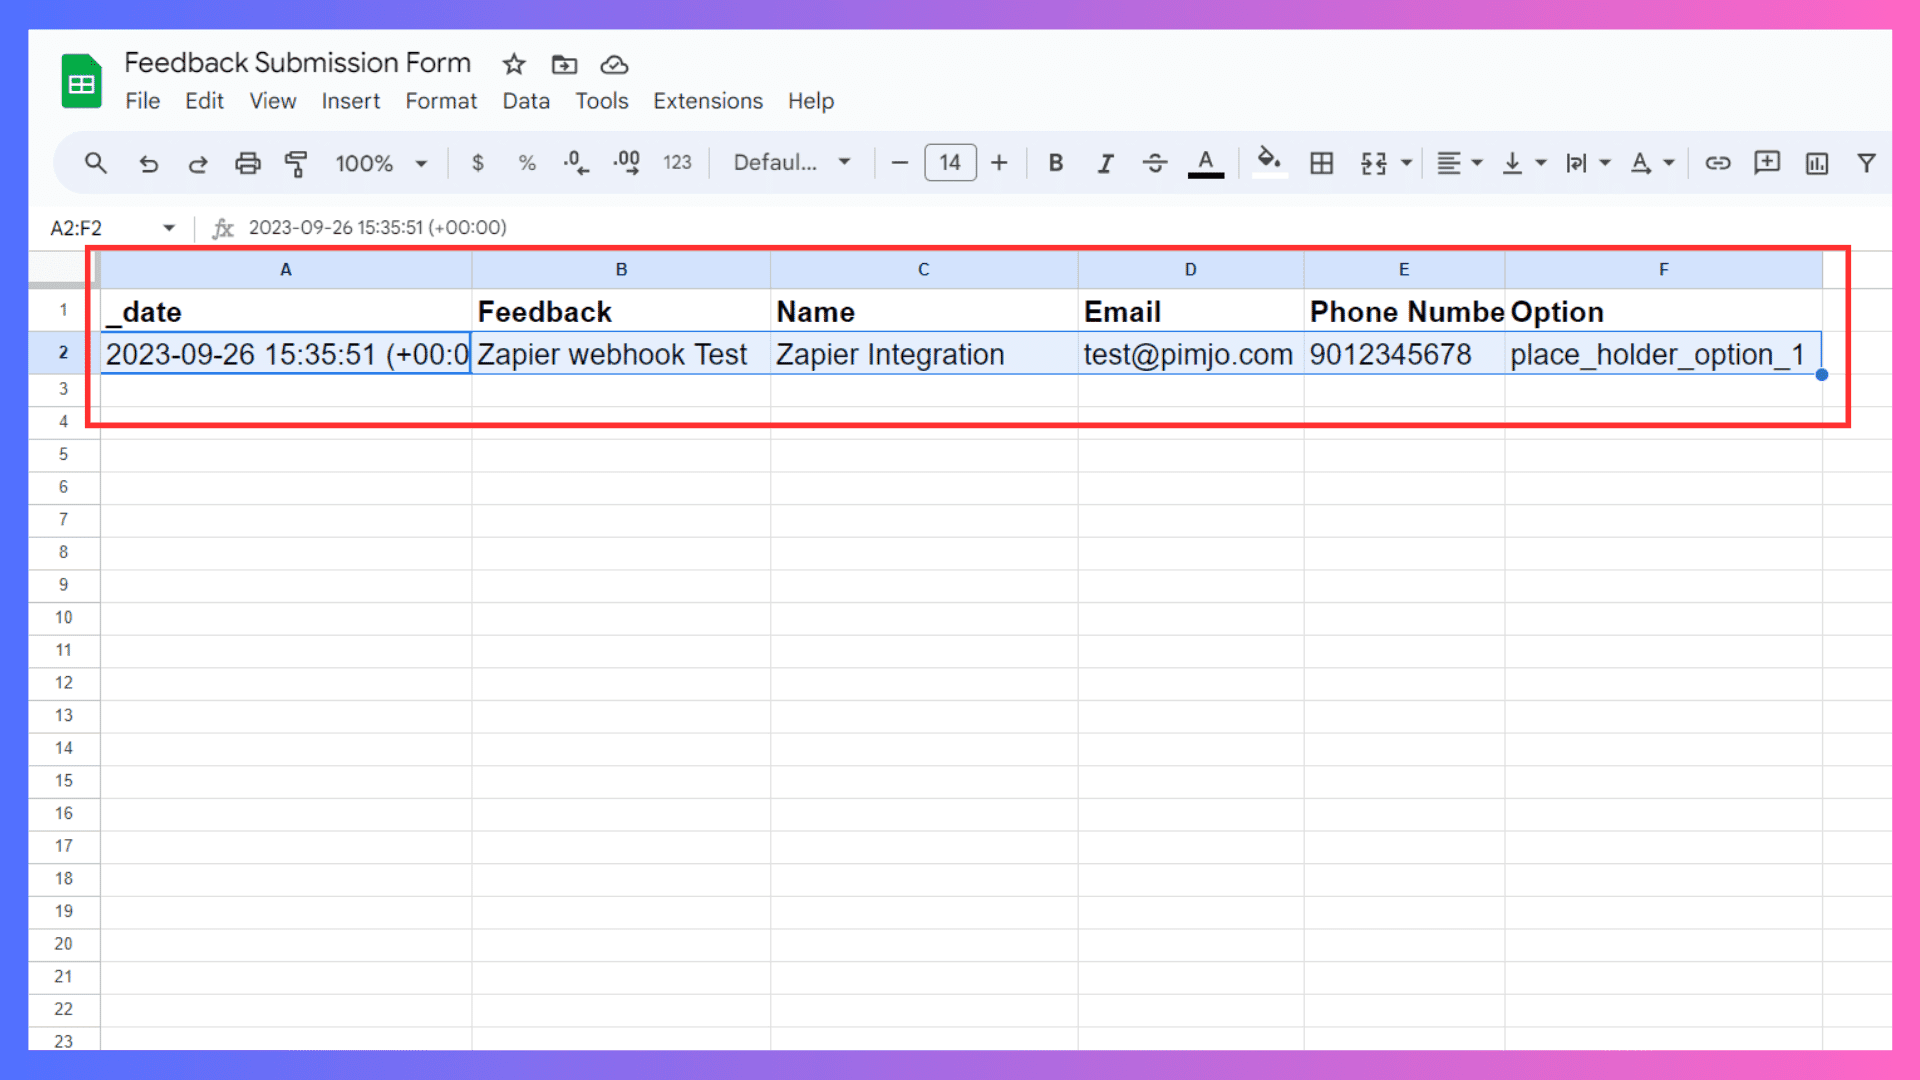
Voila! You have successfully integrated and tested the Webhook (Zapier) with FormBold, capturing the Webhook trigger in the Google Sheet.
Conclusion
To wrap up, we’ve explored how FormBold’s drag-and-drop form builder helps you create interactive, shareable forms in minutes—without any coding. Whether it’s for feedback collection, hiring workflows, or creative contests, FormBold makes form creation effortless and efficient.
We also walked through how to connect your forms with popular tools like Email, Gmail, Sheets, Telegram, Slack, Notion, and Zapier using Webhooks. Each integration included step-by-step guidance to help you automate workflows and manage responses with ease.
Now it’s your turn, build smart forms, integrate them seamlessly, and turn submissions into insights that drive better decisions. Your next powerful form is just a few clicks away. Try Now!